Basics of dyeing
| Site: | MyCourses |
| Course: | OK7 Costume Workshop |
| Book: | Basics of dyeing |
| Printed by: | Guest user |
| Date: | Monday, 31 March 2025, 4:46 AM |
Description
GENERAL INSTRUCTION
- Read the facility-specific occupational safety instructions and remember to protect yourself appropriately.
- Select the method and materials in accordance with your project.
- If you are unsure about the use of a specific chemical, contact the workshop master.
1. Dyeable materials
In principle, it is possible to dye natural fibres by hand. Natural fibres are divided into cellulose fibres and protein fibres. Synthetic fibres can be dyed safely in industrial settings. Blended fabrics usually absorb some dye, depending on the ratio of fibres. You can dye polyamide, nylon and elastane with direct and reactive dyes.
In addition to fibres, the fabric’s structure and finishings affect its colour fastness and tones. When dyeing ready-made garments, the dye does not usually adhere to the stitching as the yarn is made of polyester.
NATURAL FIBRES
Cellulose fibres: cotton, flax, hemp, jute, ramie, sisal, manila, coir or coconut fibre and kapok.
Regenerated cellulose fibers: viscose, modal, Cupro and Lyocell.
Protein fibres: silk and wool.
SYNTHETIC FIBRES
Fibres that hold colour: polyamide, elastane and nylon.
Fibres requiring industrial dyeing: polyester, polyacrylic, modacrylic, chlorofibre and polypropene.
2. Dyes
The composition of the material to be dyed influences the choice of dyes and techniques. In the Costume Workshop, you have access to Dylon direct dyes and some natural dyes with their auxiliary chemicals. If you want, you can also buy reactive dyes and use them. In addition, you will need an auxiliary appropriate for your dye. Familiarise yourself with the differences between dyes below.
Direct dyes (Dylon)
This simple dyeing method enables an artistic approach and allows you to search for the correct shade as the dyeing process proceeds. It may be challenging to repeat the resulting shade.
- Dyeable materials: cellulose and protein fibres, polyamide and nylon.
- Auxiliary agent: salt.
- Wash fastness: moderate.
- Light fastness: good.
- Pre-treatment: wash / rinse of the material.
- Post-treatment: rinse and wash.
Natural dyes
An experimental dyeing method, beautiful, natural shades. This method is ecological if you use the correct techniques and environmentally-friendly dyeing auxiliaries.
- Dyeable materials: cellulose and protein fibres.
- Auxiliaries:
- Mordants: alum and cream of tartar.
- Acidic dye bath / neutraliser: vinegar.
- Alkaline dye bath: sodium carbonate.
- Darkening of colour: ferrous sulphate.
- Reducing the pH level: citric acid.
- Wash fastness: poor in some dyes.
- Light fastness: poor in some dyes.
- Pre-treatment: mordanting improves wash and light fastness.
- Post-treatment: rinse and wash.
Reactive dyes (Remazol, Semitone)
This is a more challenging dyeing method involving very detailed recipes. The precise recipes make it possible to repeat the results. Can also be used for fabric printing.
- Dyeable materials: cellulose and protein fibres, polyamide and elastane.
- Auxiliaries:
- Cellulose fibres: sodium carbonate and salt.
- Protein fibres: vinegar and salt.
- Wash fastness: good.
- Light fastness: good.
- Pre-treatment: wash / rinse of the material.
- Post-treatment: rinse and wash.
3. Dyeing with direct dyes
General information on the dyeing process
The material to be dyed is always weighed dry before writing the recipe. Thereafter, the fabric is washed or rinsed in order to get even results. Do not use fabric softener in the pre-wash. Many fabrics contain finishing chemicals, which may affect the results. When dyeing old clothes, it is worth noting that dye does not usually adhere to stitching, sweat marks may be more visible, and it may be difficult to cover stains.
The original colour of the material affects the results and the choice of shades in accordance with colour theory. When blue fabric is dyed with red dye, the result will be purple in tone. It is not possible to achieve a lighter shade by dyeing. However, the fabric’s darkness can be utilised when hoping to achieve a darker shade.
The amount of dye and auxiliary chemicals required depends on the dry weight of the material and the desired colour. When dyeing with Dylon, the maximum amount of dye, or so-called full shade, is 2–3% of the material’s dry weight. With black or dark shades, the amount of dye can be as much as doubled. However, the fibres cannot take in more dye than the maximum amount. It is ecological to calculate the recipe in advance and to start with slightly less dye, increasing the amount as the dyeing process continues. Different fibres absorb dye differently, which means that the same amount of dye creates a light shade in cotton and a very deep shade in polyamide. Take this into consideration when calculating how much dye you need.
Things to consider when dyeing different fibres
Wool and polyamide:
- Good colour absorption and dark shades.
- Hardly any traces of dye left in the finishing wash.
- Wool has poor resistance to mechanical agitation and changes in temperature. Increase the temperature slowly and let the dye bath cool before rinsing. Wool felts easily.
- Polyamide is used for cleaning the dyeing machine, as it absorbs all the remaining dye.
Cellulose fibres:
- Very dark shades are difficult to achieve.
- Particularly cotton looks remarkably darker when wet than when dry.
- A lot of excess colour is released from the fabric in the final wash.
- Soaking in vinegar may help set the dye slightly better.
- Very resistant to temperature changes, good strength when wet (except for viscose).
3.1. Dylon recipe
Achieving the correct shade and calculating dye quantities for the recipe- Boil some water in a kettle.
- Place various (5) glasses by the sink and pour the boiling water in the glasses (you can add a pinch of salt if you want).
- Add a pinch of salt in the glass and mix thoroughly.
For example
Glass 1: Dye A 100
Glass 2: Dye B 100%
Glass 3: Dye A 50% + B 50%
Glass 4: Dye A 25% + B 75%
Glass 5: Dye B 25% + A 75%
- Insert the test fabrics in the glasses and wait for a moment.
- Dry the test strips with an iron and assess the colour.
- Continue the experiment until the colour is right and you have determined the correct ratio.
- Calculate the amount of dye for the recipe: 0.1–6% of the fabric’s dry weight = X grammes.
- Calculate how much (g) dye A and dye B you need.
Sample recipe (dyeing in a pot)
Material: a cotton T-shirt, 200g.
Pre-treatment: wash / rinse.
Liquor ratio: according to the size of the pot, so that the item can circulate easily in the dye bath.
Amount of dye:
Full shade 2–3% of dry weight = 20–30g dye / 1kg of material.
Dark shades: 4–6%.
Light shades: 0,1-2%.
Formula for full shade 2%: 0,02 (%) x 200 (g) = 4g dye.
Auxiliaries: Salt 125g / 5g dye.
Dyeing curve:
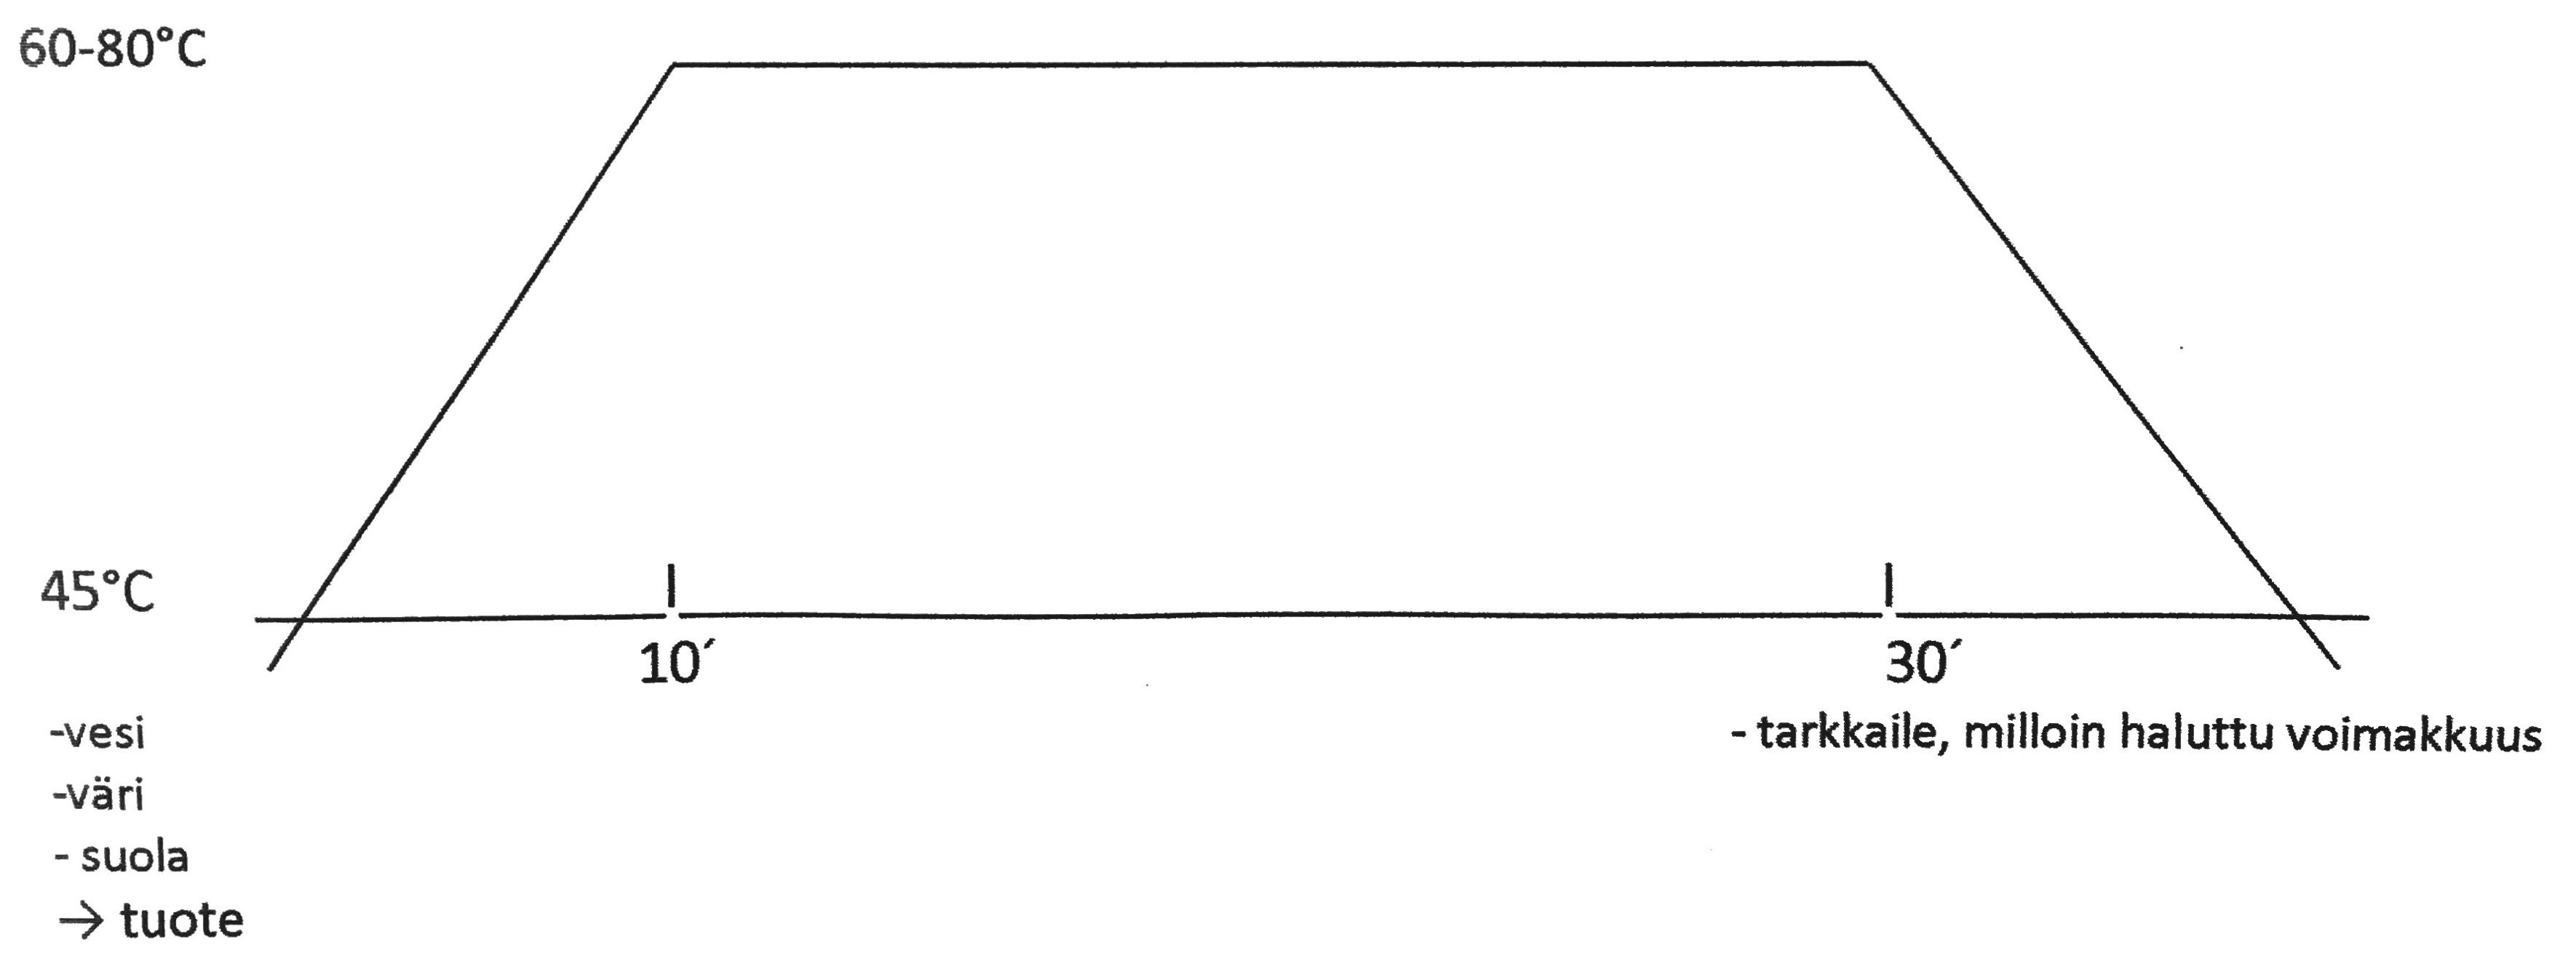
Sample recipe (dyeing in a machine)
Material: a cotton T-shirt, 200g.
Pre-treatment: wash.
Liquor ratio: 20l suffices for even a large amount of fabric, as the material circulates continuously in the machine (0,200kg x 20l = 1:200 is a very high ratio).
Amount of dye: see above.
Auxiliaries: salt 125g / 5g dye, at least 100g salt for each machine load.
Dyeing programme: Select a suitable dyeing programme and amount of water. See section 3.3 for more detailed instructions on how to add dye and auxiliaries into the machine.
Please note: There are pre-programmed settings for wool; turn the temperature dial to 1 "slow heating".
3.2. Dyeing in a pot
This method is good for creating very precise shades, ombré or gradient fades, and other effects on small amounts of fabric.
Cellulose fibres
- Weigh the dry fabric.
- Wash / rinse the fabric; new fabrics may contain finishes.
- Add warm tap water in the pot. The more space the material has in the pot, the more even the result will be.
- Dissolve the dye in 0.5l of boiling water.
- Dissolve the salt in the water in the pot.
- Place the wet and unfolded fabric in the pot.
- Bring the dye bath back to a boil, stirring regularly for 20min or until you have achieved the desired shade.
- Rinse with cold water until water runs clear.
- Wash the item in a washing machine.
Protein fibres
- Steps 1–5 as above.
- Bring the dye bath slowly close to a boil and turn off the heat. Stir the dye bath for at least 10min.
- Leave the material in the dye bath (full shade) or remove it and let it cool down.
- Rinse with lukewarm water until water runs clear.
- The finishing wash is not entirely necessary. If you use a washing machine, remember to use the programme for wool, and detergent for wool/silk.
3.3. Dyeing in a machine
You can dye large amounts of fabric in a machine. It is more challenging to adjust the shade during the dyeing process than when dyeing by hand, albeit not entirely impossible. While the machine is on, you can add more dye diluted in water into the drum through the detergent compartment. You can also stop the programme half-way through and empty the machine if you are not happy with the resulting shade.
Instructions for dyeing with ESTERI 10
- Switch on the main power and open the taps (3).
- Add salt to the bottom of the drum.
- Wet the material, place it in the drum and close the cover.
- Measure and dissolve the pigments in boiling water using a separate container. Add a small amount of cold water; the liquid should not be boiling when you pour it into the machine.
- Select the programme and press start.
- While the machine is filling with water, pour in the dyeing liquid through the central detergent compartment.
- Check the resulting shade at the end of the programme and complete a finishing wash (this will also clean the machine for the next user).
- Make sure there are no traces of dye left in the machine. If necessary, run an empty wash cycle with some polyamide fabric.
- Turn off the taps (3) and power.
Dyeing programmes ESTERI 10
Select the programme from the front panel of the machine. Determine the amount of water according to the amount of fabric. There are pre-programmed settings for wool; turn the temperature dial to 1 "slow heating".
Stopping and emptying the machine half-way through the cycle
Please refer to the manual on top of the machine for more detailed instructions and information on specific button functions.