Sewing Studio manual
| Site: | MyCourses |
| Course: | OK7 Costume Workshop |
| Book: | Sewing Studio manual |
| Printed by: | Guest user |
| Date: | Sunday, 6 April 2025, 1:27 AM |
Description
Learn how to operate and adjust the industrial sewing machines, and learn how to use the steam iron unit. The instruction videos (5) will show you in detail how to operate and adjust the machines. Note: Open the table of contents from the black arrow "Open block drawer" in the upper right corner.
GENERAL INSTRUCTIONS
- Select the machine according to its intended use (see machine descriptions).
- Turn off the machine when changing the bobbin / needle, and when checking the threading.
- Eye and finger protection components cannot be removed.
- The machines are extremely rarely broken. Usually, the problems are caused by issues with threading or the condition of the needle. Be patient and try to solve the problem.
1. Industrial sewing machines
Before starting to sew, you must wind the bobbin, insert it and thread the machine. You may also need to replace the needle according to your material and adjust the thread tension and stitch length.
All industrial straight stitch or zigzag sewing machines are operated in a similar way, and they are often even easier to use than machines meant for home sewing. On the following pages you will learn the basic principles of how to thread, wind a bobbin and replace the needle of an industrial sewing machine. For more detailed threading charts for each machine, refer to the equipment description. Remember that you can always refer back to this material as your studies progress.
- Automatic with pedal OR knee lift, in which case the thread cutting is usually manual.
- Control panel OR no digital control options.
- The bobbin winder pin can be found either on the top of the machine or on the right side.
- There are small differences in the size of the bobbins, do not switch bobbins between different machine types.
- The bobbin rotates clockwise.
- The place for the bobbin case is either on the left (straight stitch machines) or on the front (zigzag).
- Each machine has its own set of needles, see the model number.
- The long groove in the needle points in a different direction in a zigzag machine than in a straight stitch machine.
- Although there are small variations in the threading, the basic principle is the same.
- Detailed instructional images for threading / winding a bobbin can be found in the device-specific manuals.
1.1. Winding a bobbin (video)
The bobbin winder pin is located either on the top of the machine or on its side.
Winding a bobbin
- Insert the bobbin into the bobbin winder pin (1).
- Lead the thread as shown in the illustration, check that the thread goes through all the guides and between the tension discs.
- Wrap the thread a few times tightly around the bobbin (2).
- Press the lock lever (3) against the bobbin and pull the thread end onto the cutter (4).
- You can wind a bobbin at the same time when sewing OR separately without any fabric, in which case:
- Remove the bobbin from the bobbin case and the thread from the needle eye, manually lifting up the presser foot.
- The winding stops automatically when the bobbin is full.

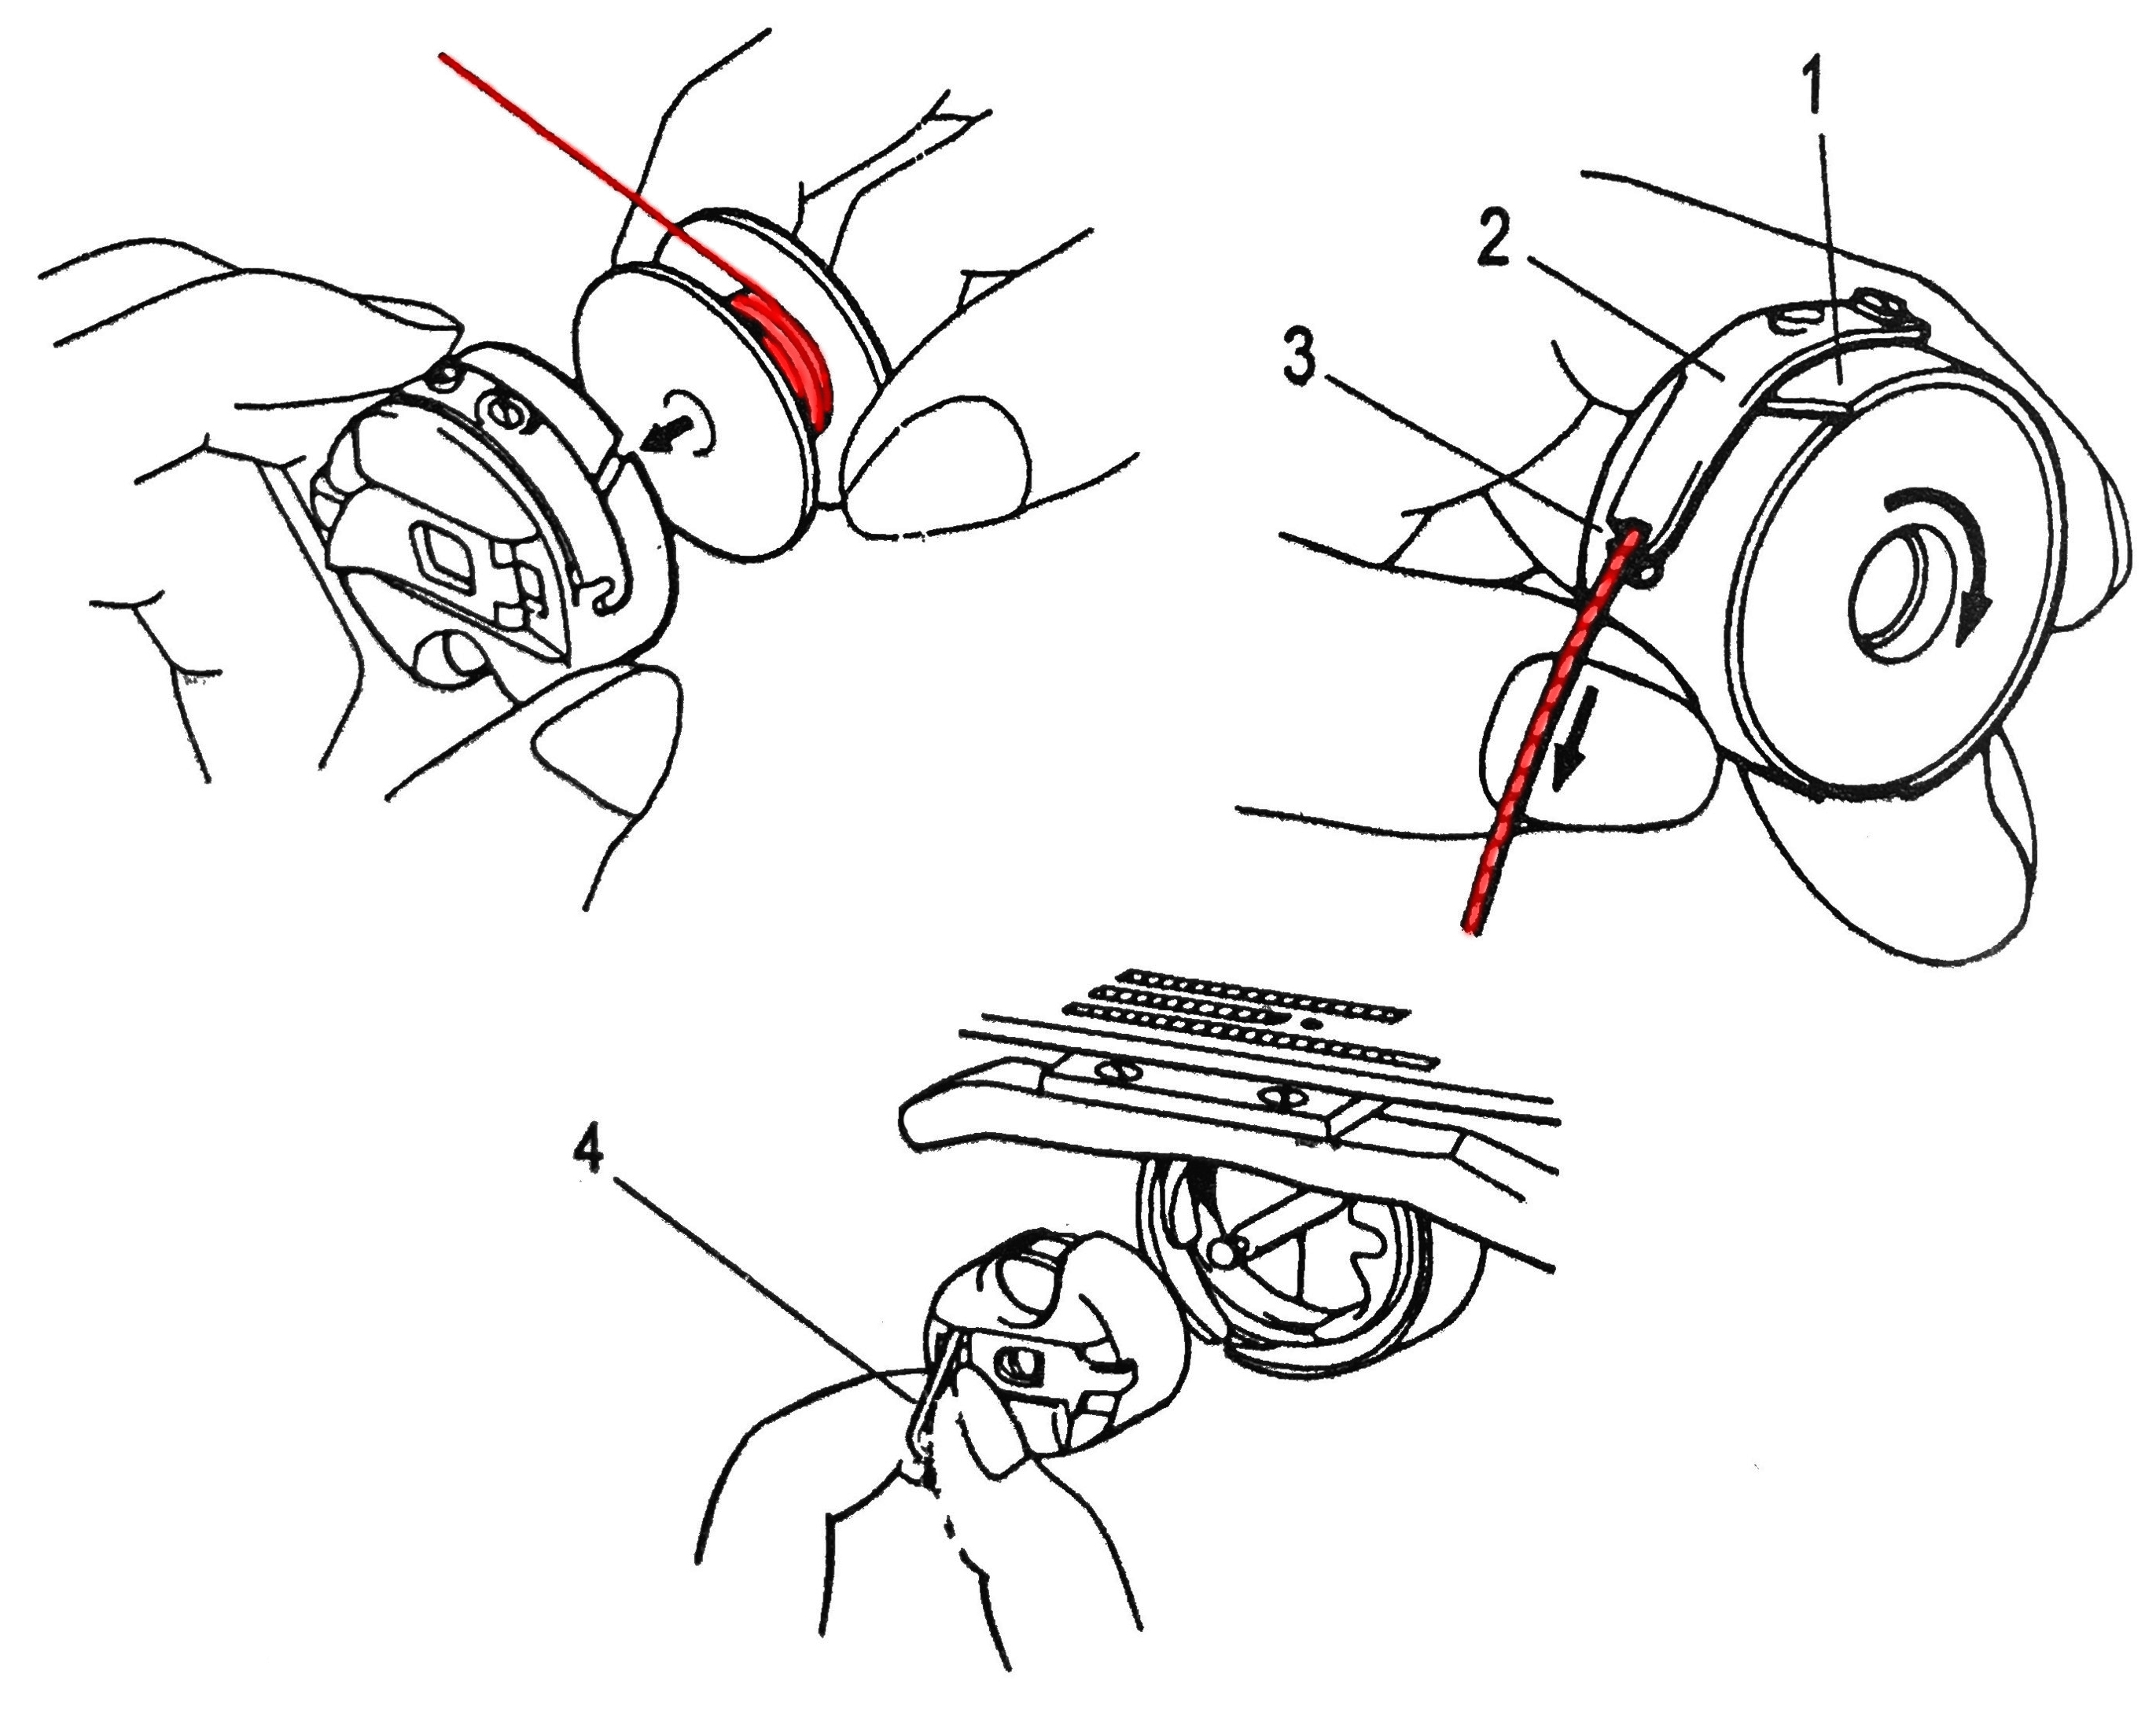
- The bobbin case is placed either on the left side of the machine or in the front (zigzag machines).
- The bobbin rotates clockwise.
- Place the bobbin into its case and lead the thread as shown (1-3).
- Release the small, hinged latch (4) to insert the bobbin case into the shuttle.
- Make sure the bobbin is locked in place.
- It is not necessary to lift the thread separately using the hand wheel.
1.2. Replacing a needle
- No. 70 thin materials.
- No. 80 basic needle for most materials.
- No. 90 medium materials.
- No. 100–130 heavy materials.
- Leather needles no. 90–130, the needle tip is knife-like.
- Ball-tip needles, for flexible materials (zig zag machines, overlockers).
-
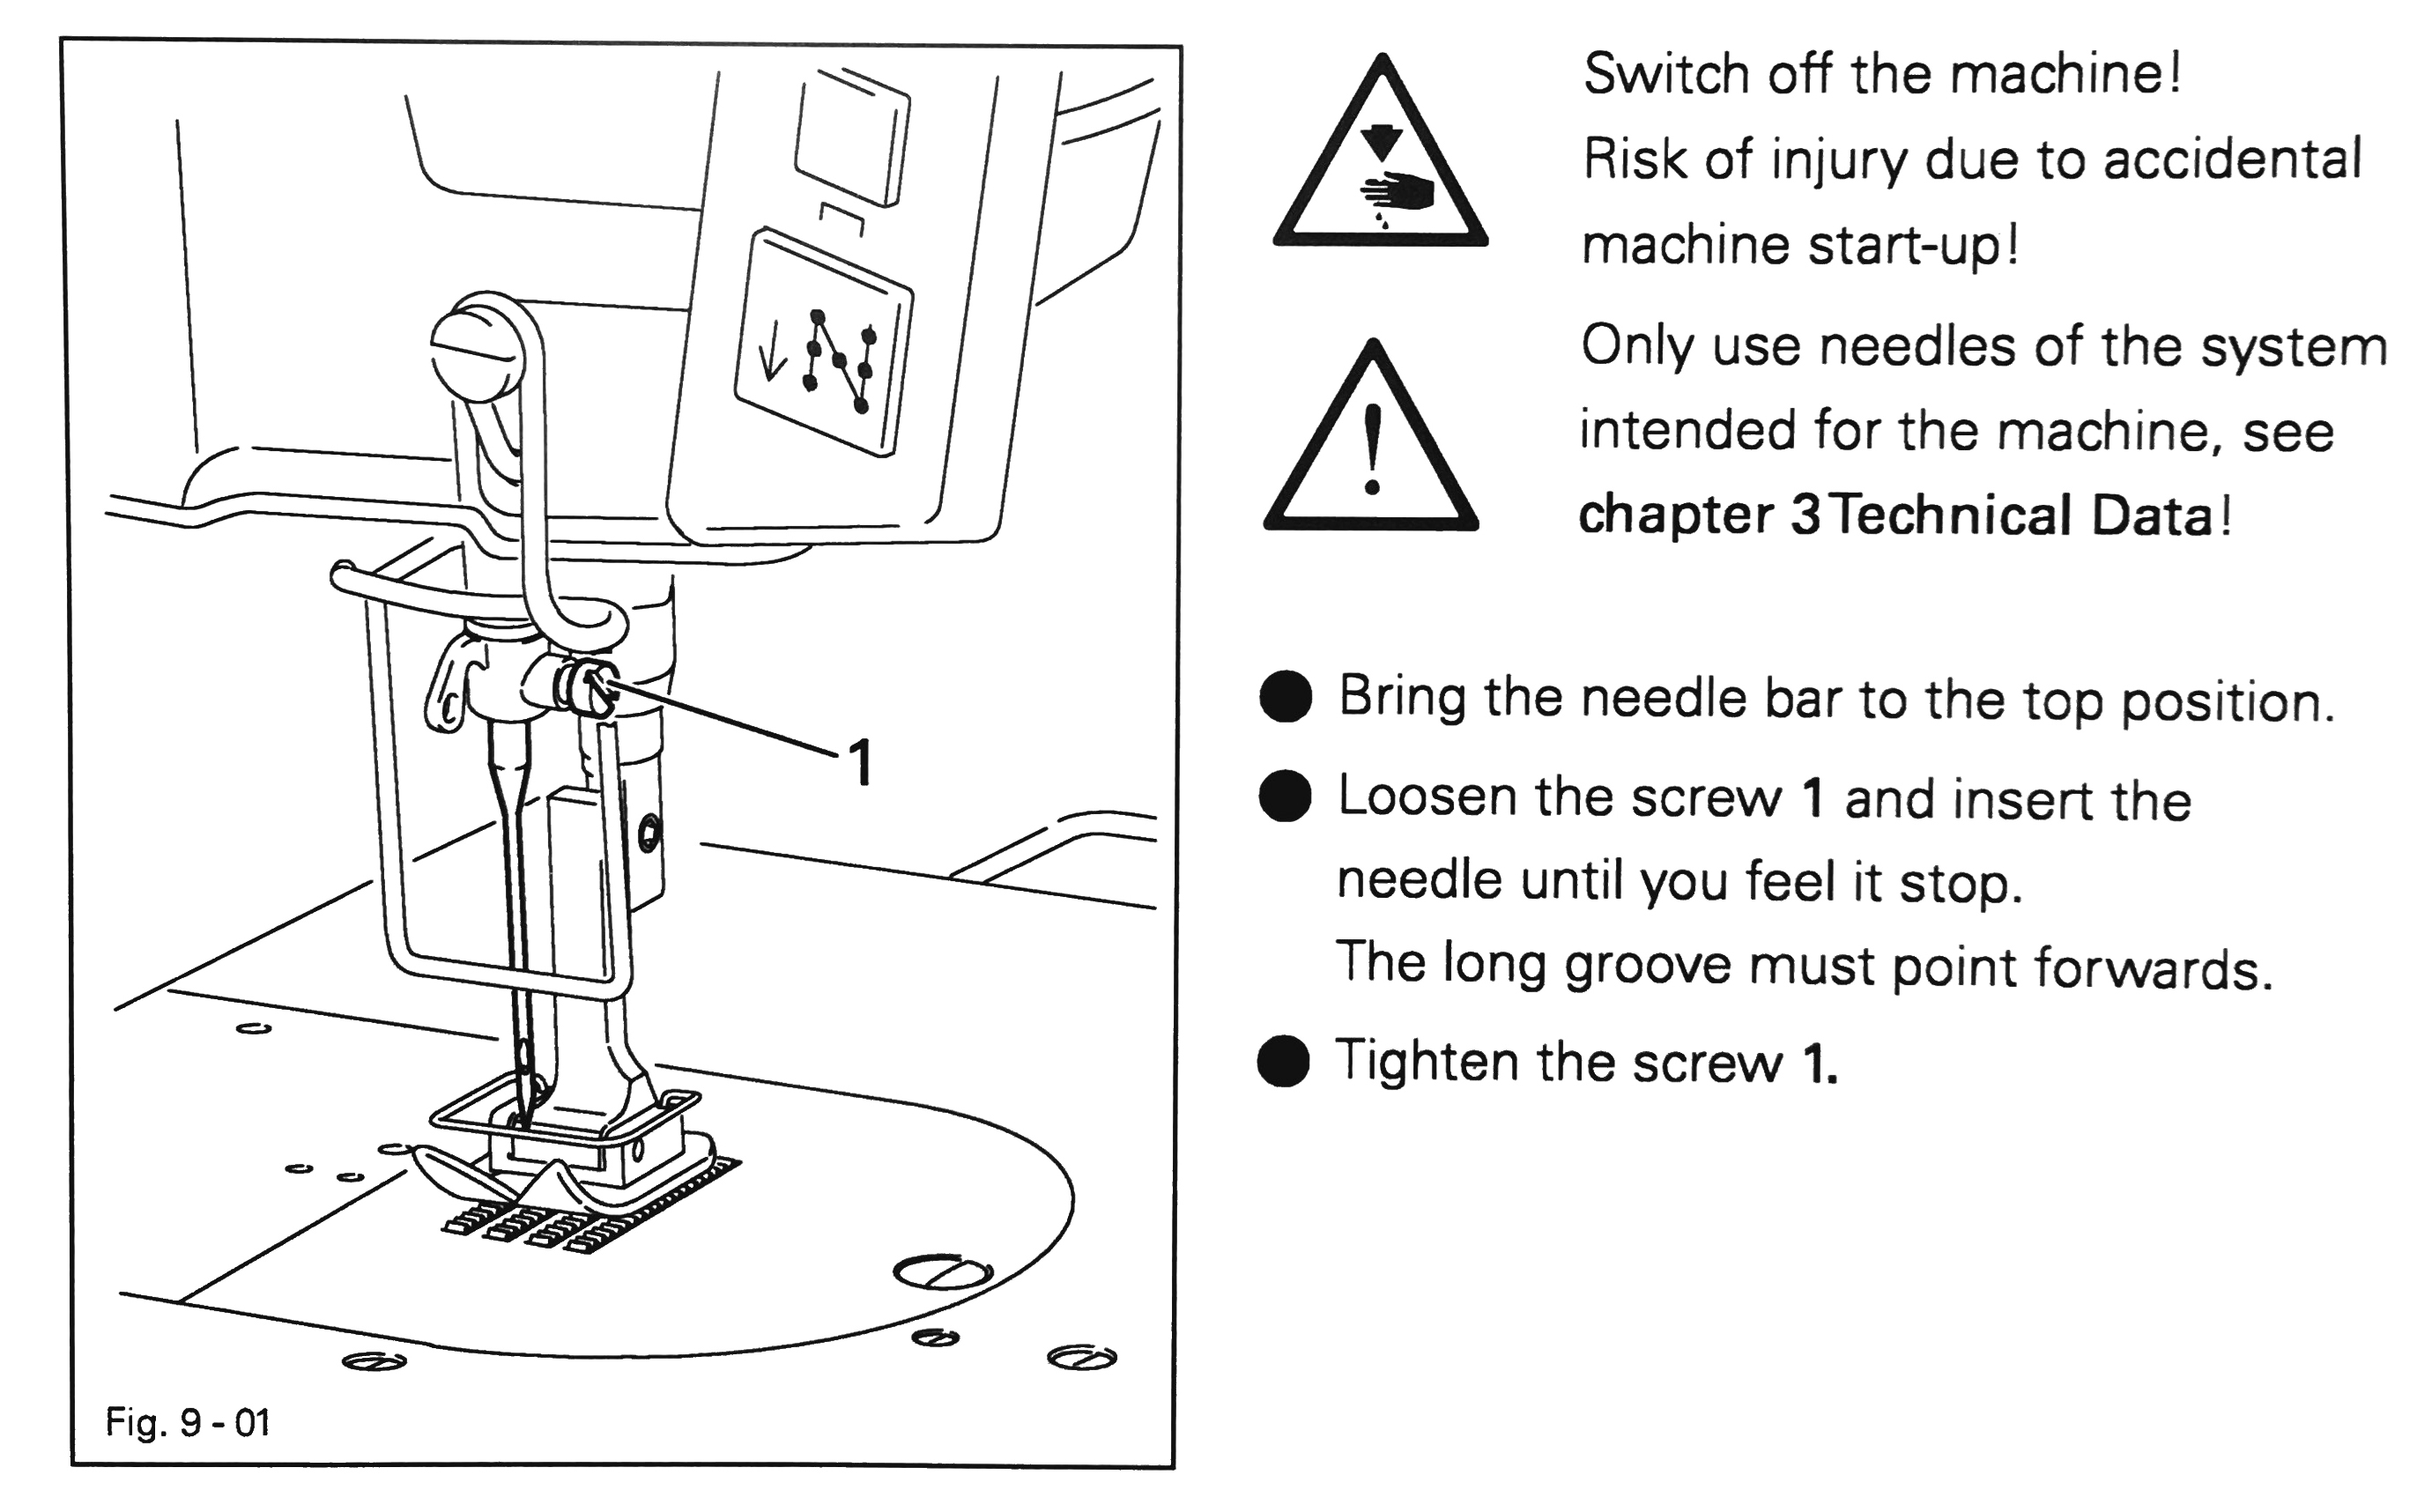
Turn off the machine. - Loosen the needle set screw (1), remove the needle, and recycle it into a separate waste container for “blades and needles” in the sewing accessory cabinet.
- Insert a new needle and push upwards until the needle hits the stop (O), tighten the screw.
- In straight stitch machines, the long groove of the needle points to the left and the thread goes into the eye of the needle from left to right.
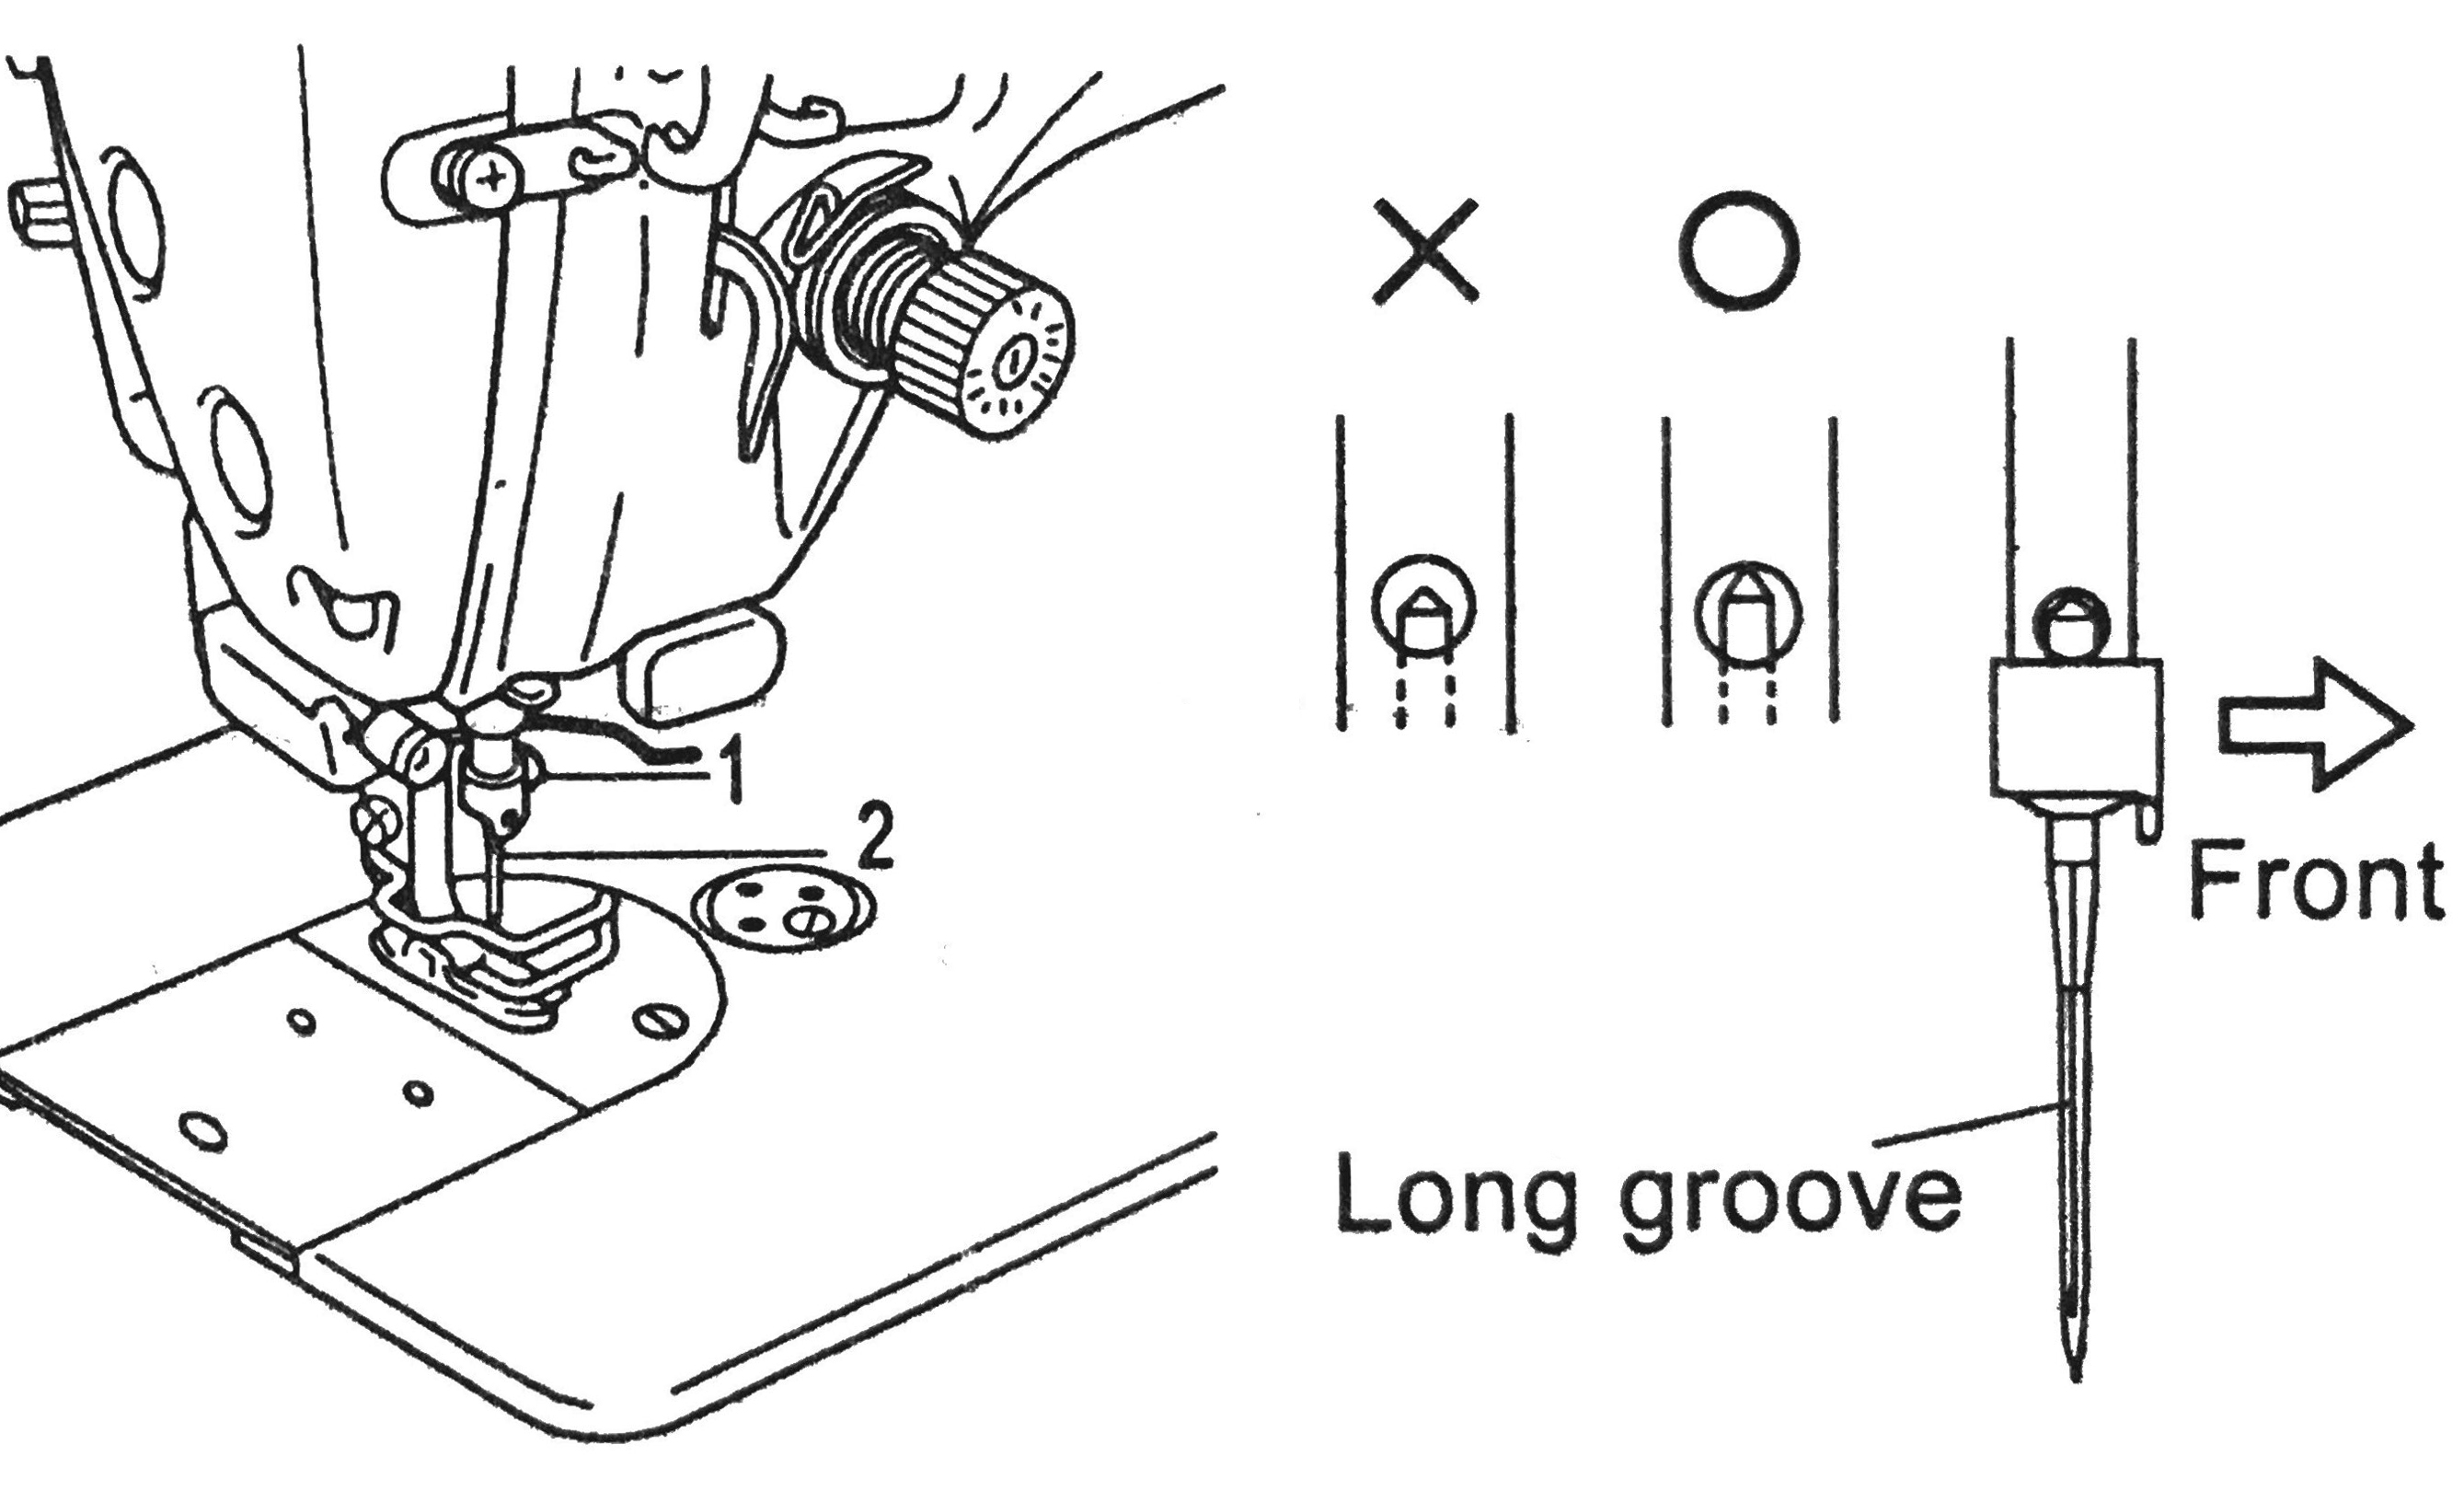
- In zigzag machines, the long groove of the needle points to the front and the thread goes into the needle eye from front to back.
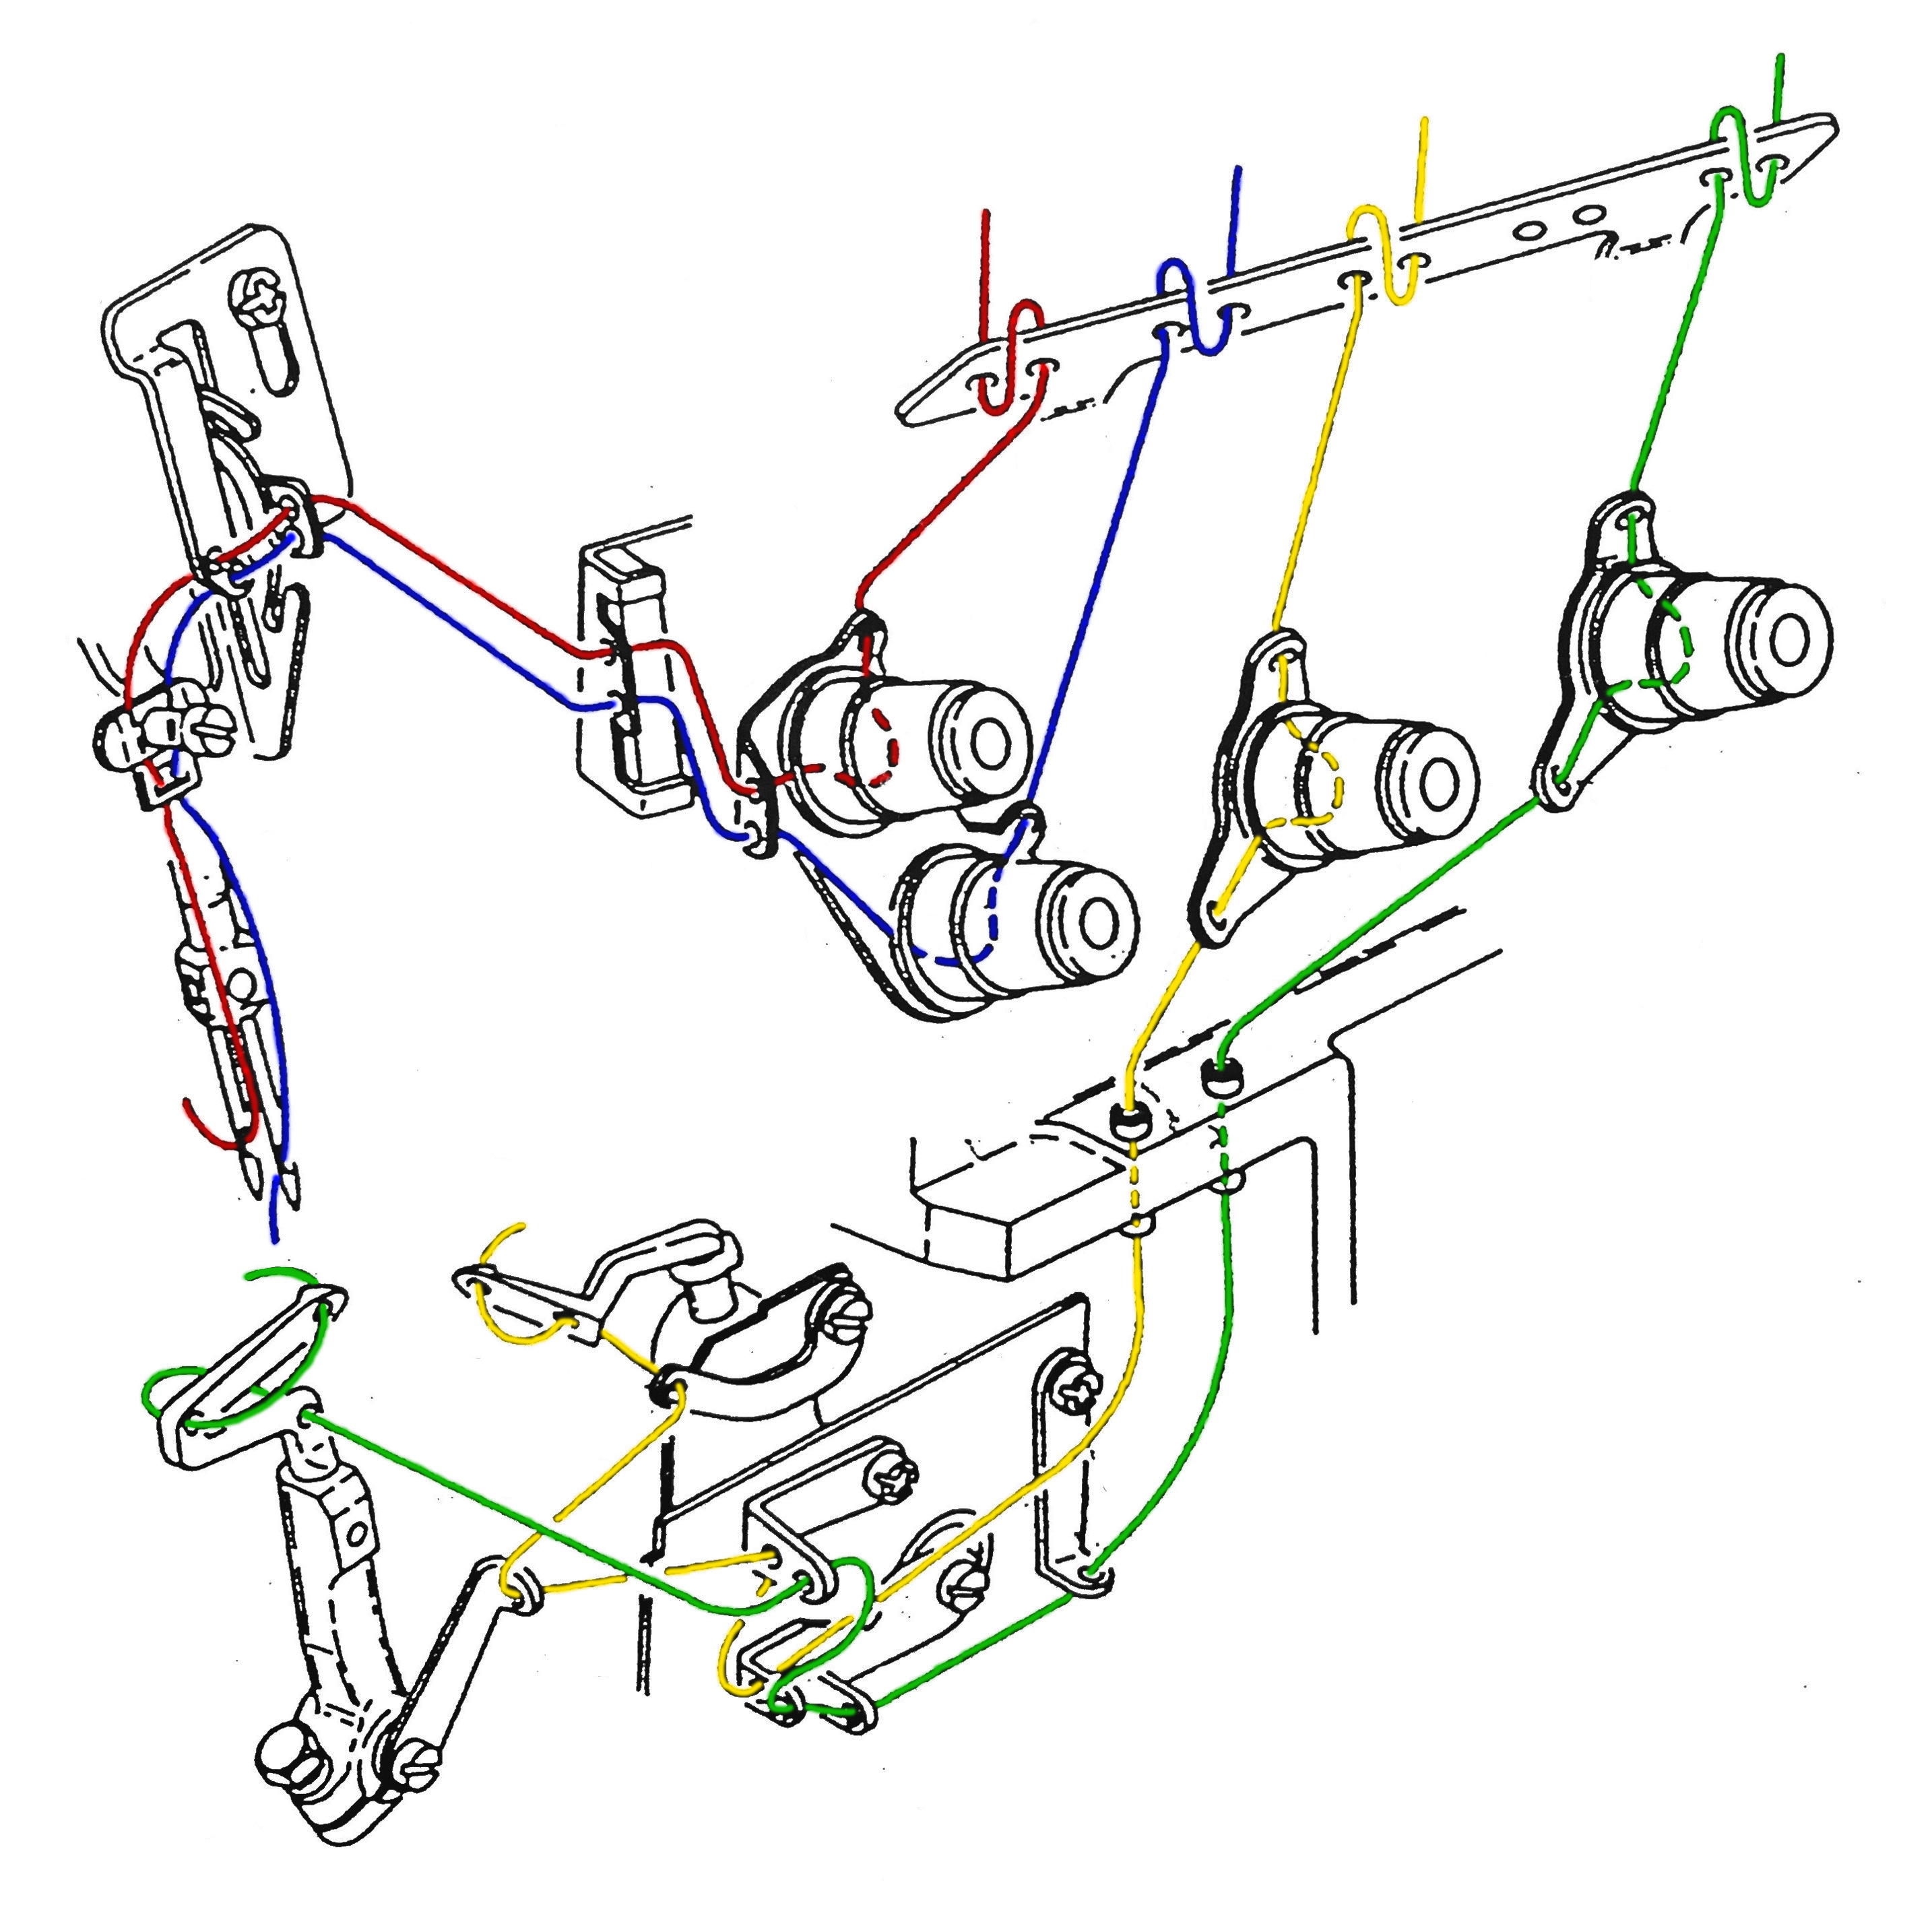
1.3. Threading (video)
-
Turn off the machine. - Snip off the thread of the old spool at the spool roll and remove the roll.
- Place the new spool in place and tie it to the old thread.
- Lift the presser foot manually, the tension discs are released.
- Pull the thread through.
- Insert the thread through the eye of the needle.
- In straight stitch machines, the needle is threaded from left to right.
- In zigzag machines, the thread goes into the eye of the needle from front to back.
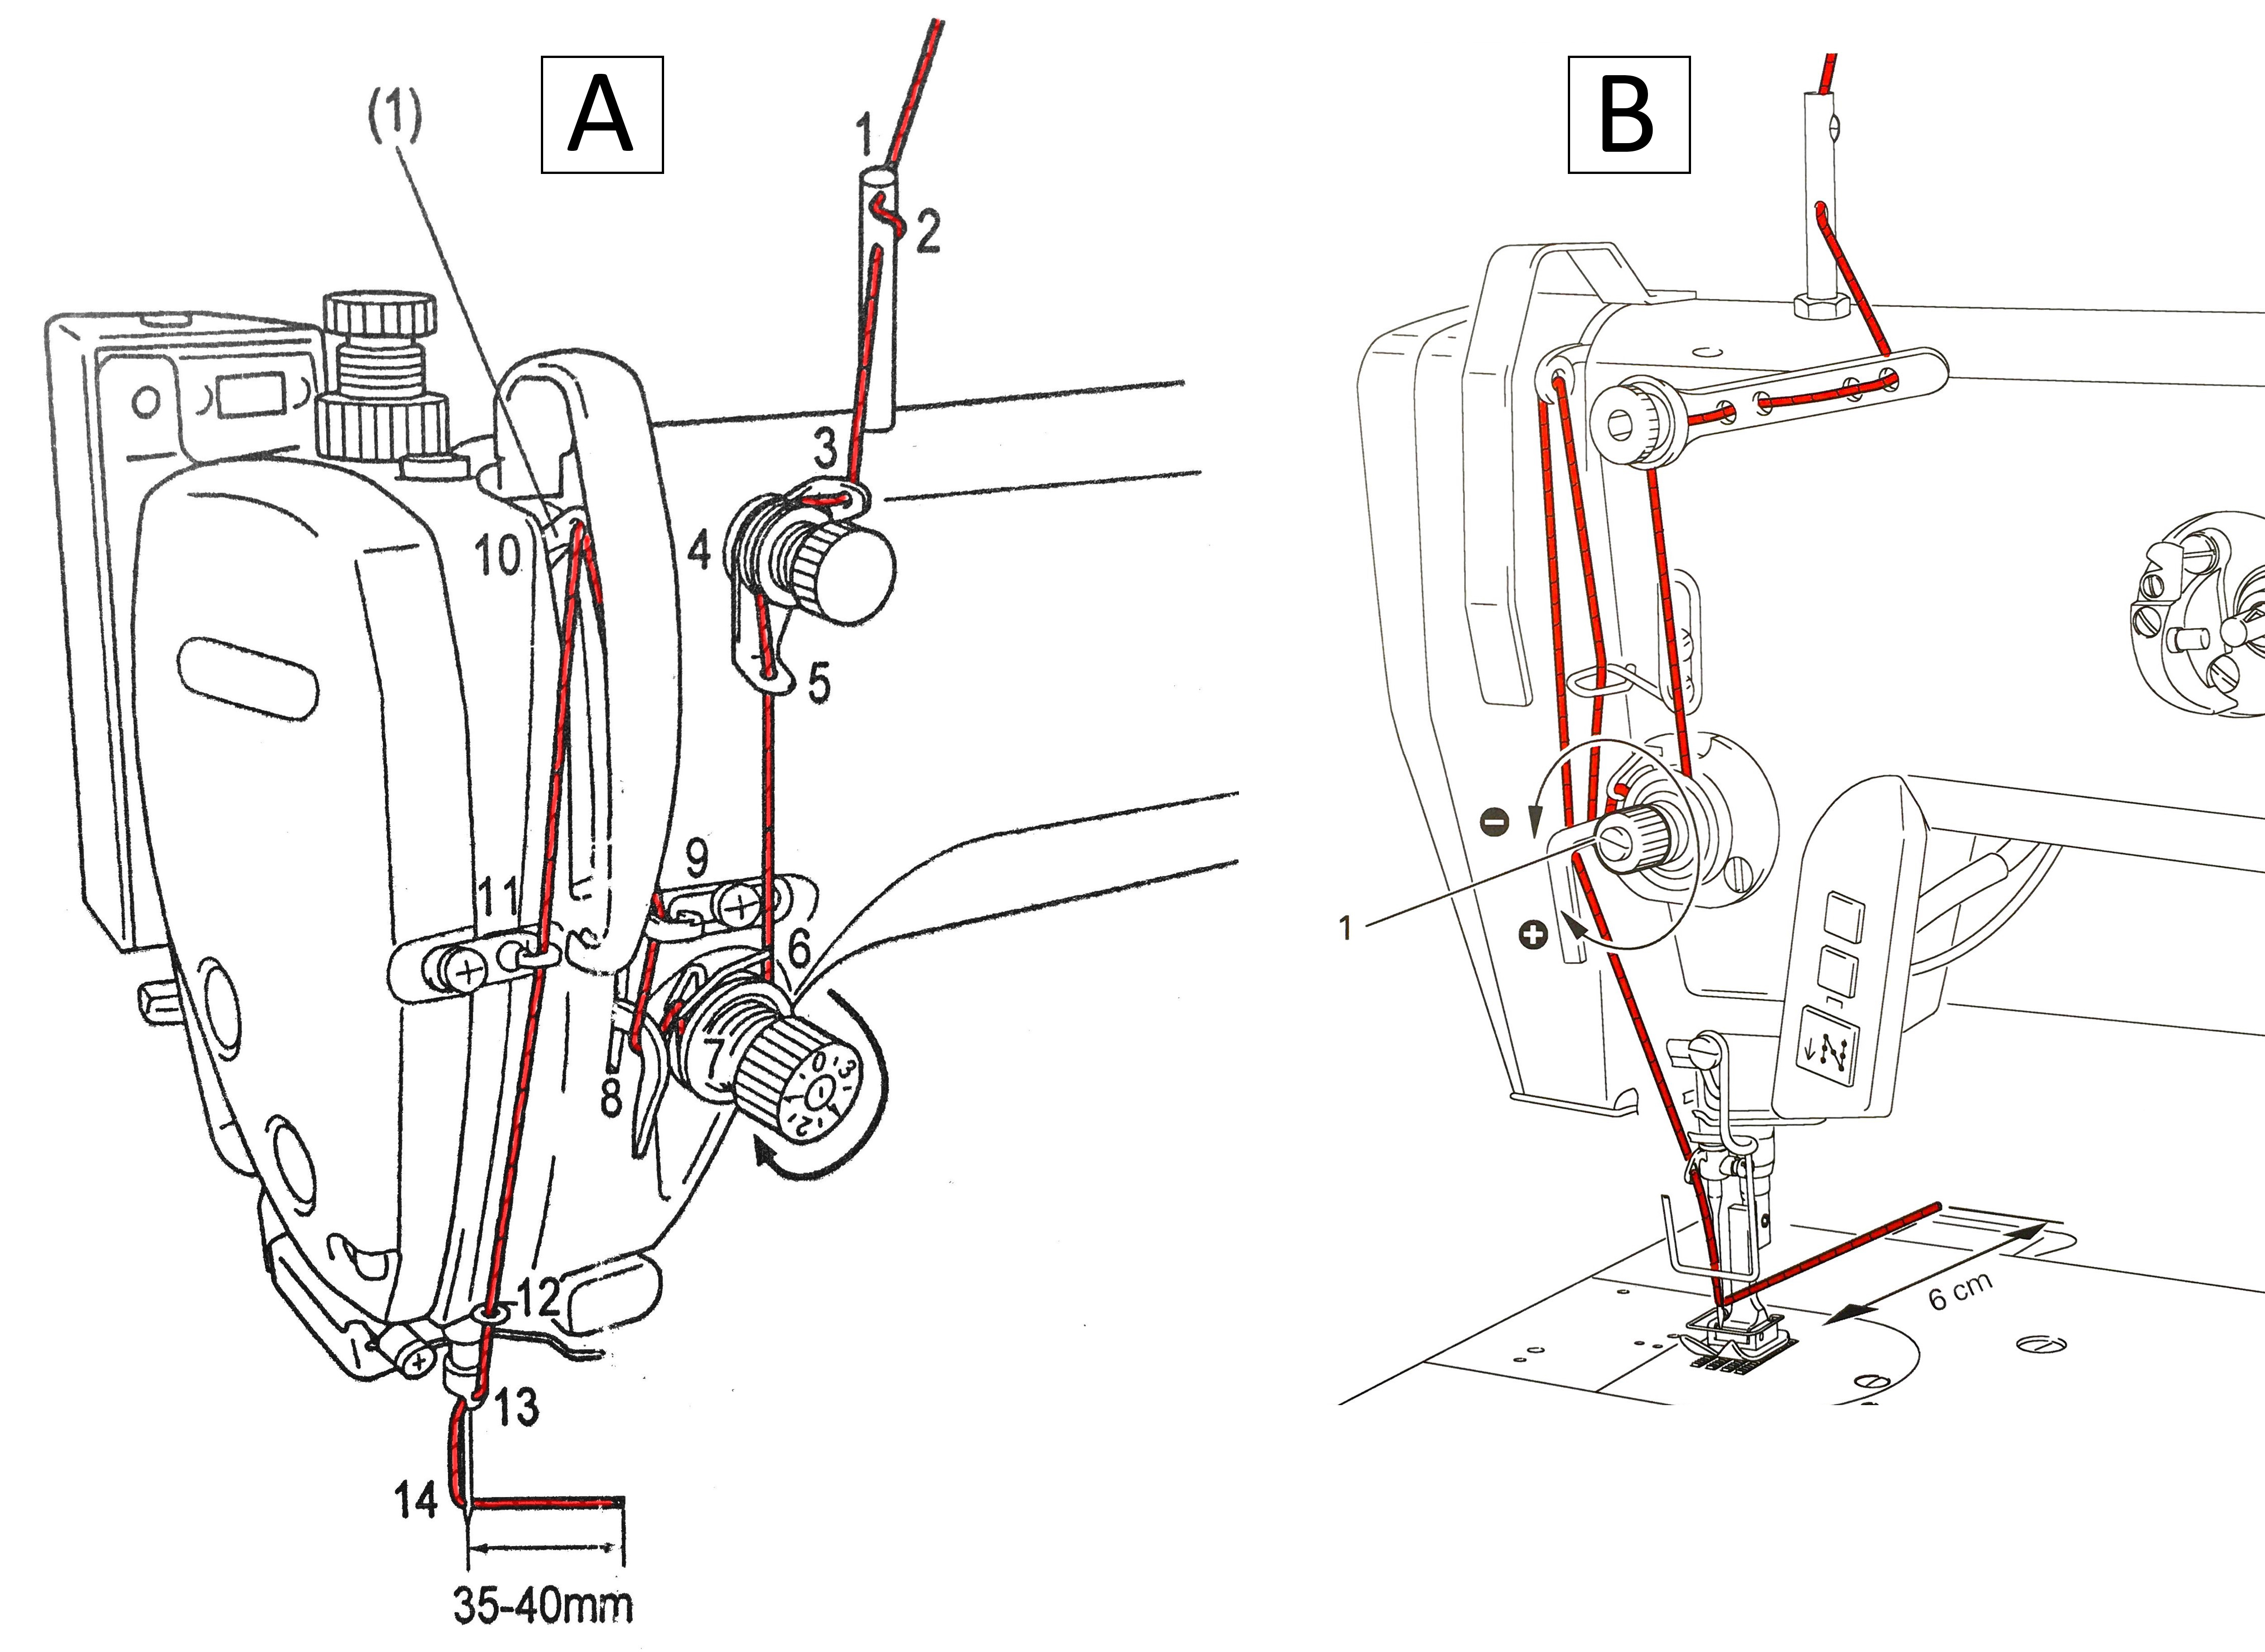
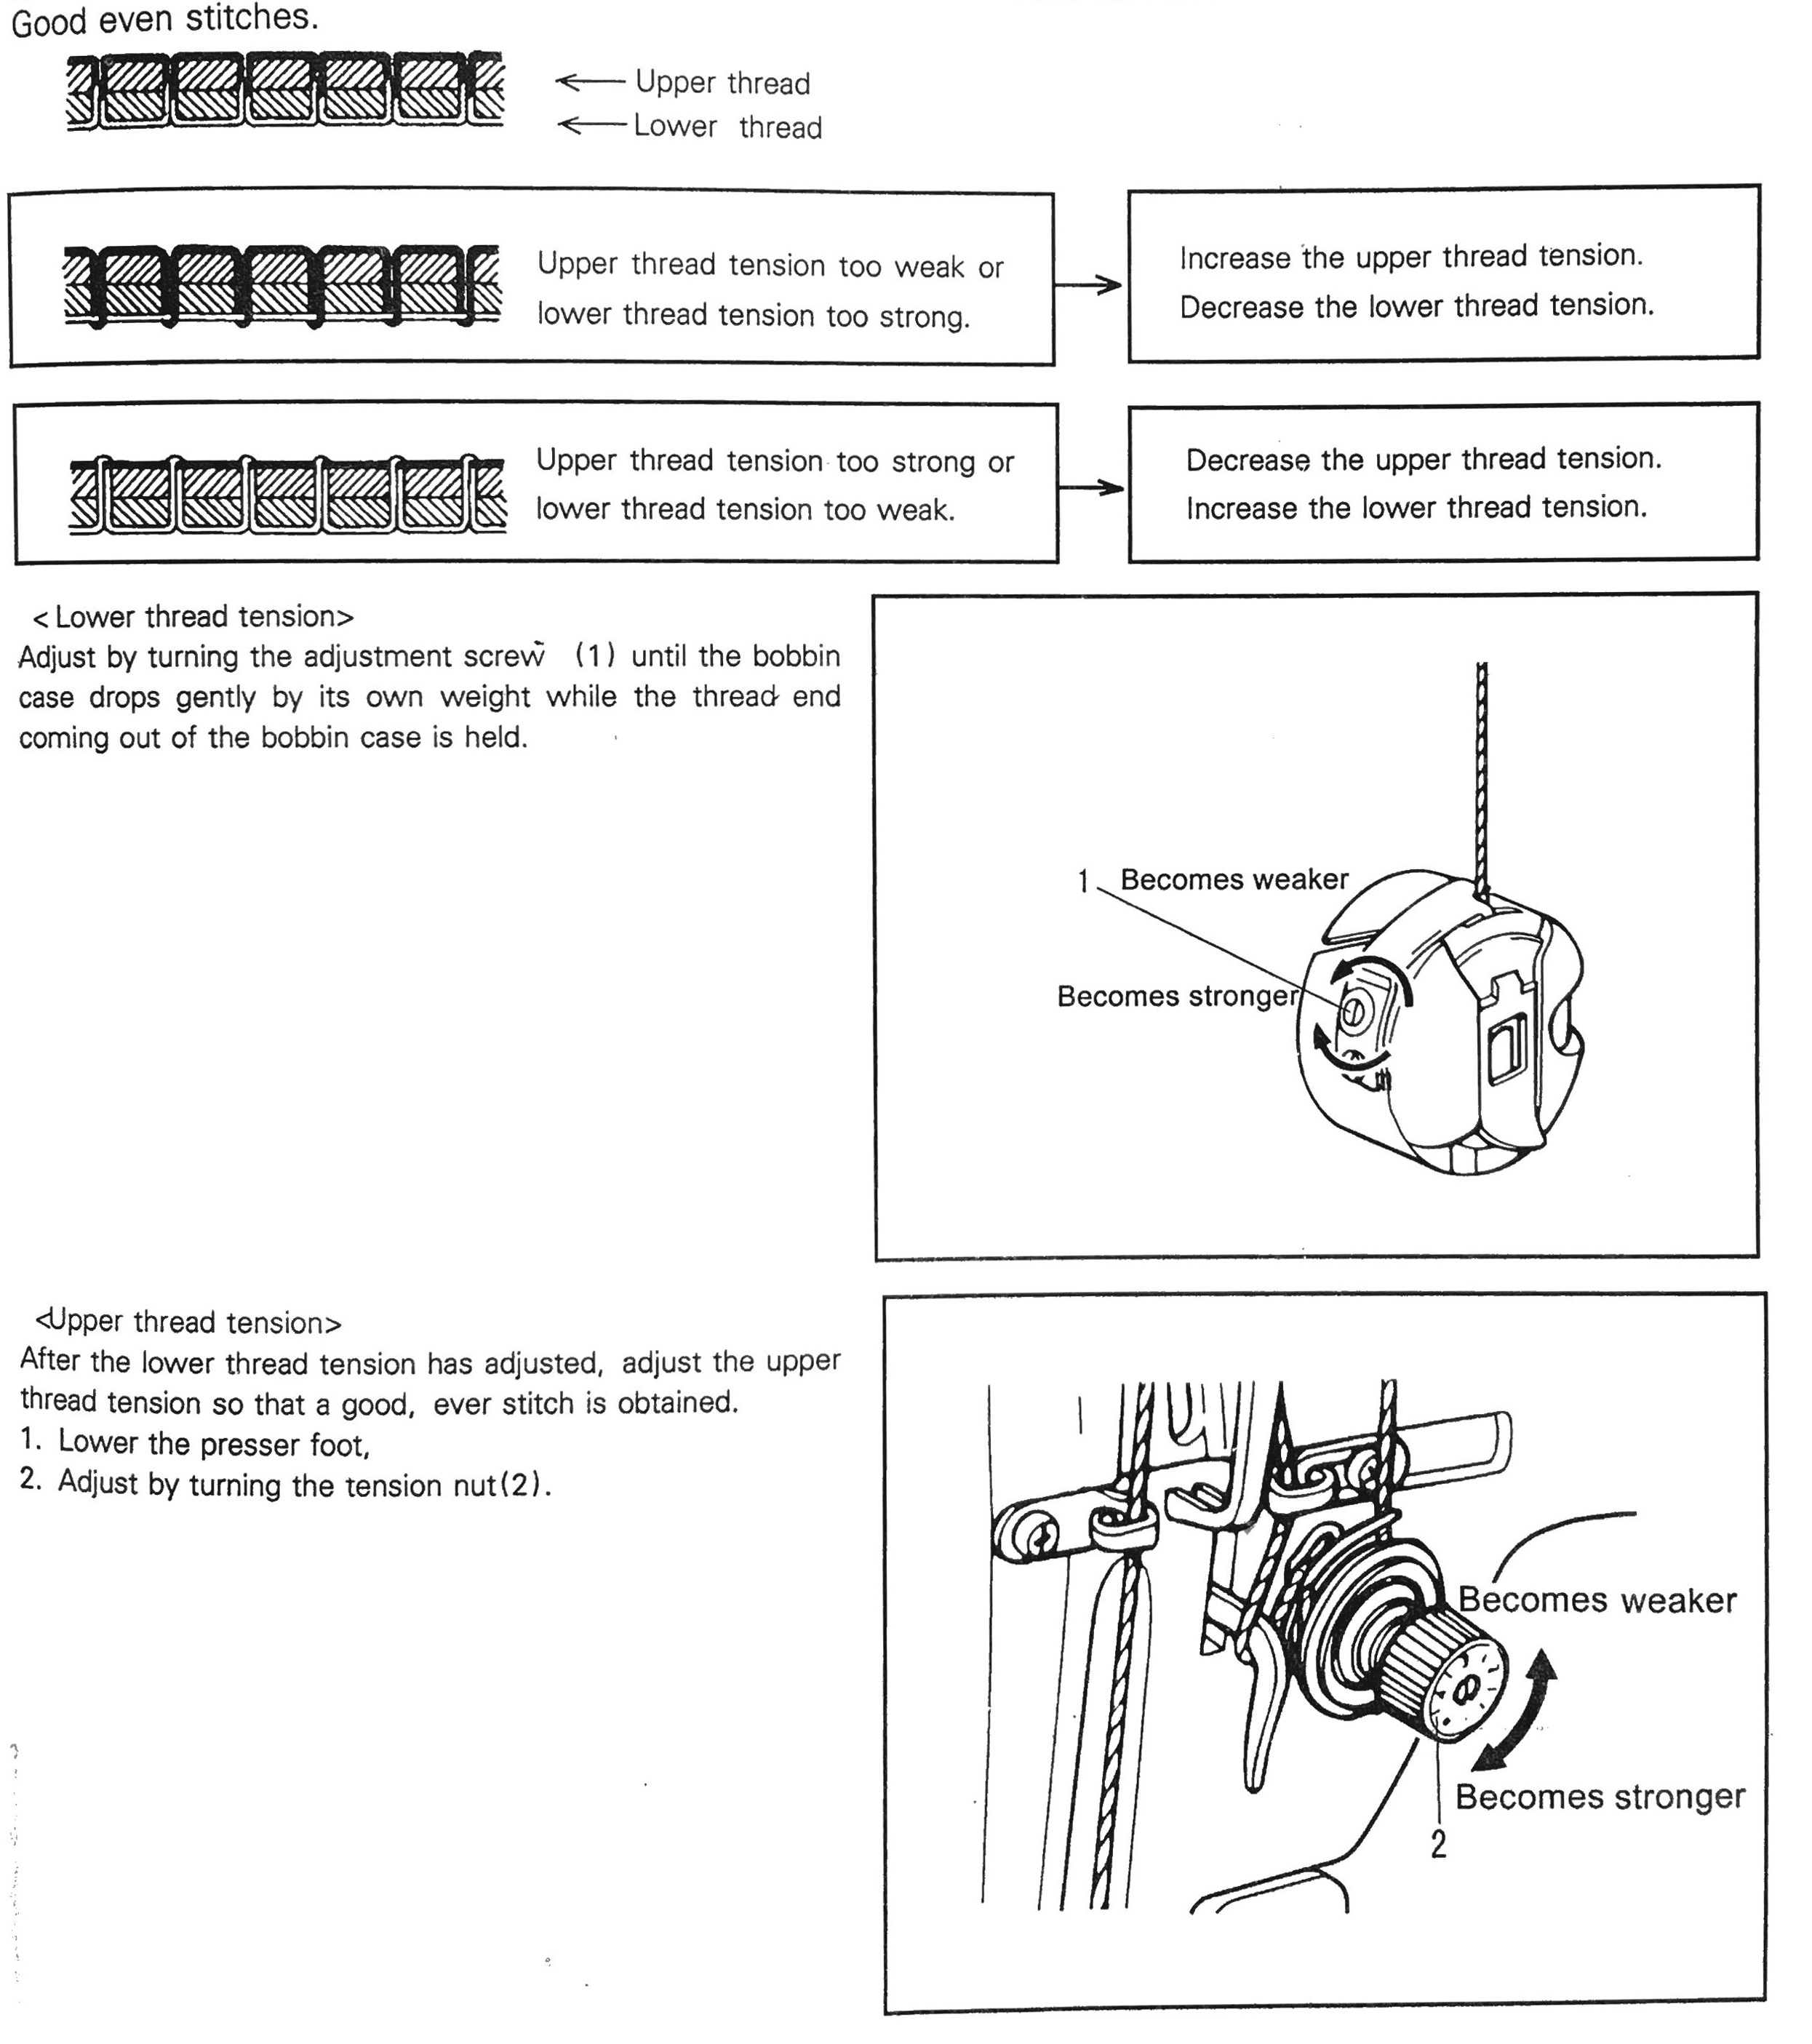
- Check the threading, it is common that the thread remains on top of the tension discs (4 and 7) and not in between, in which case the tension does not work.
- The basic principles of threading are the same for straight stitch machines (A) and for zigzag machines (B), see below.
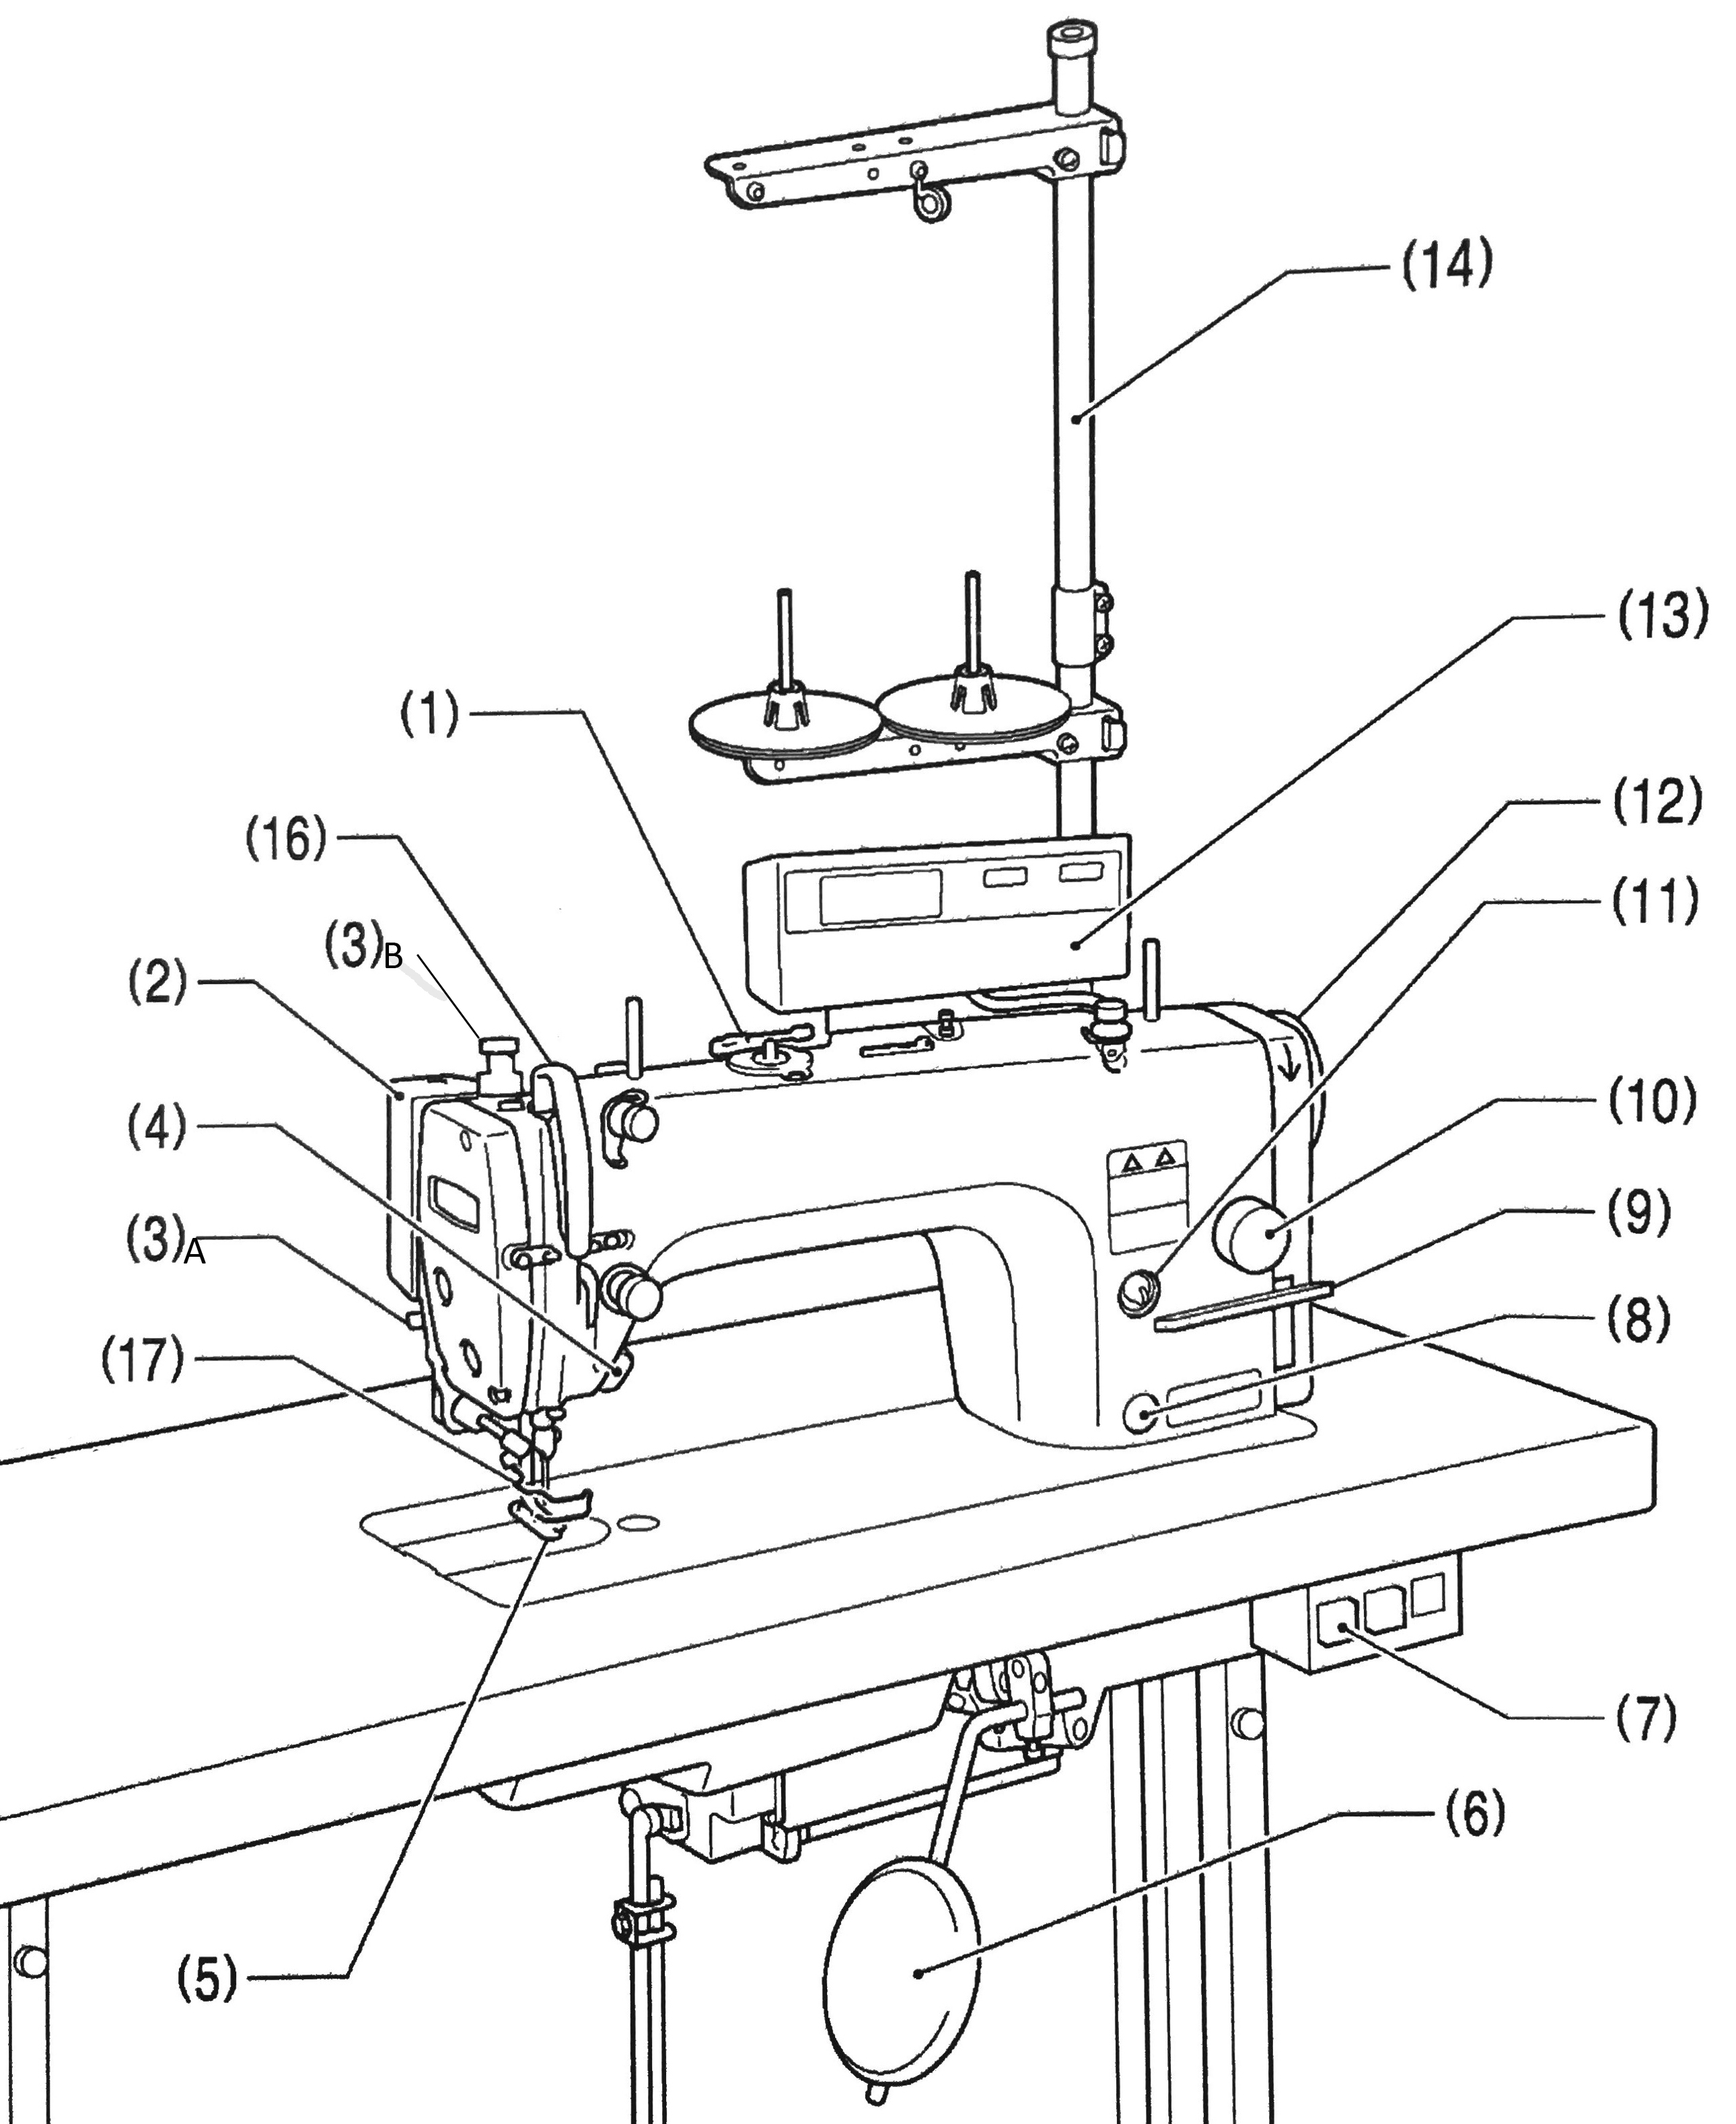
1.4. Main parts of the machine
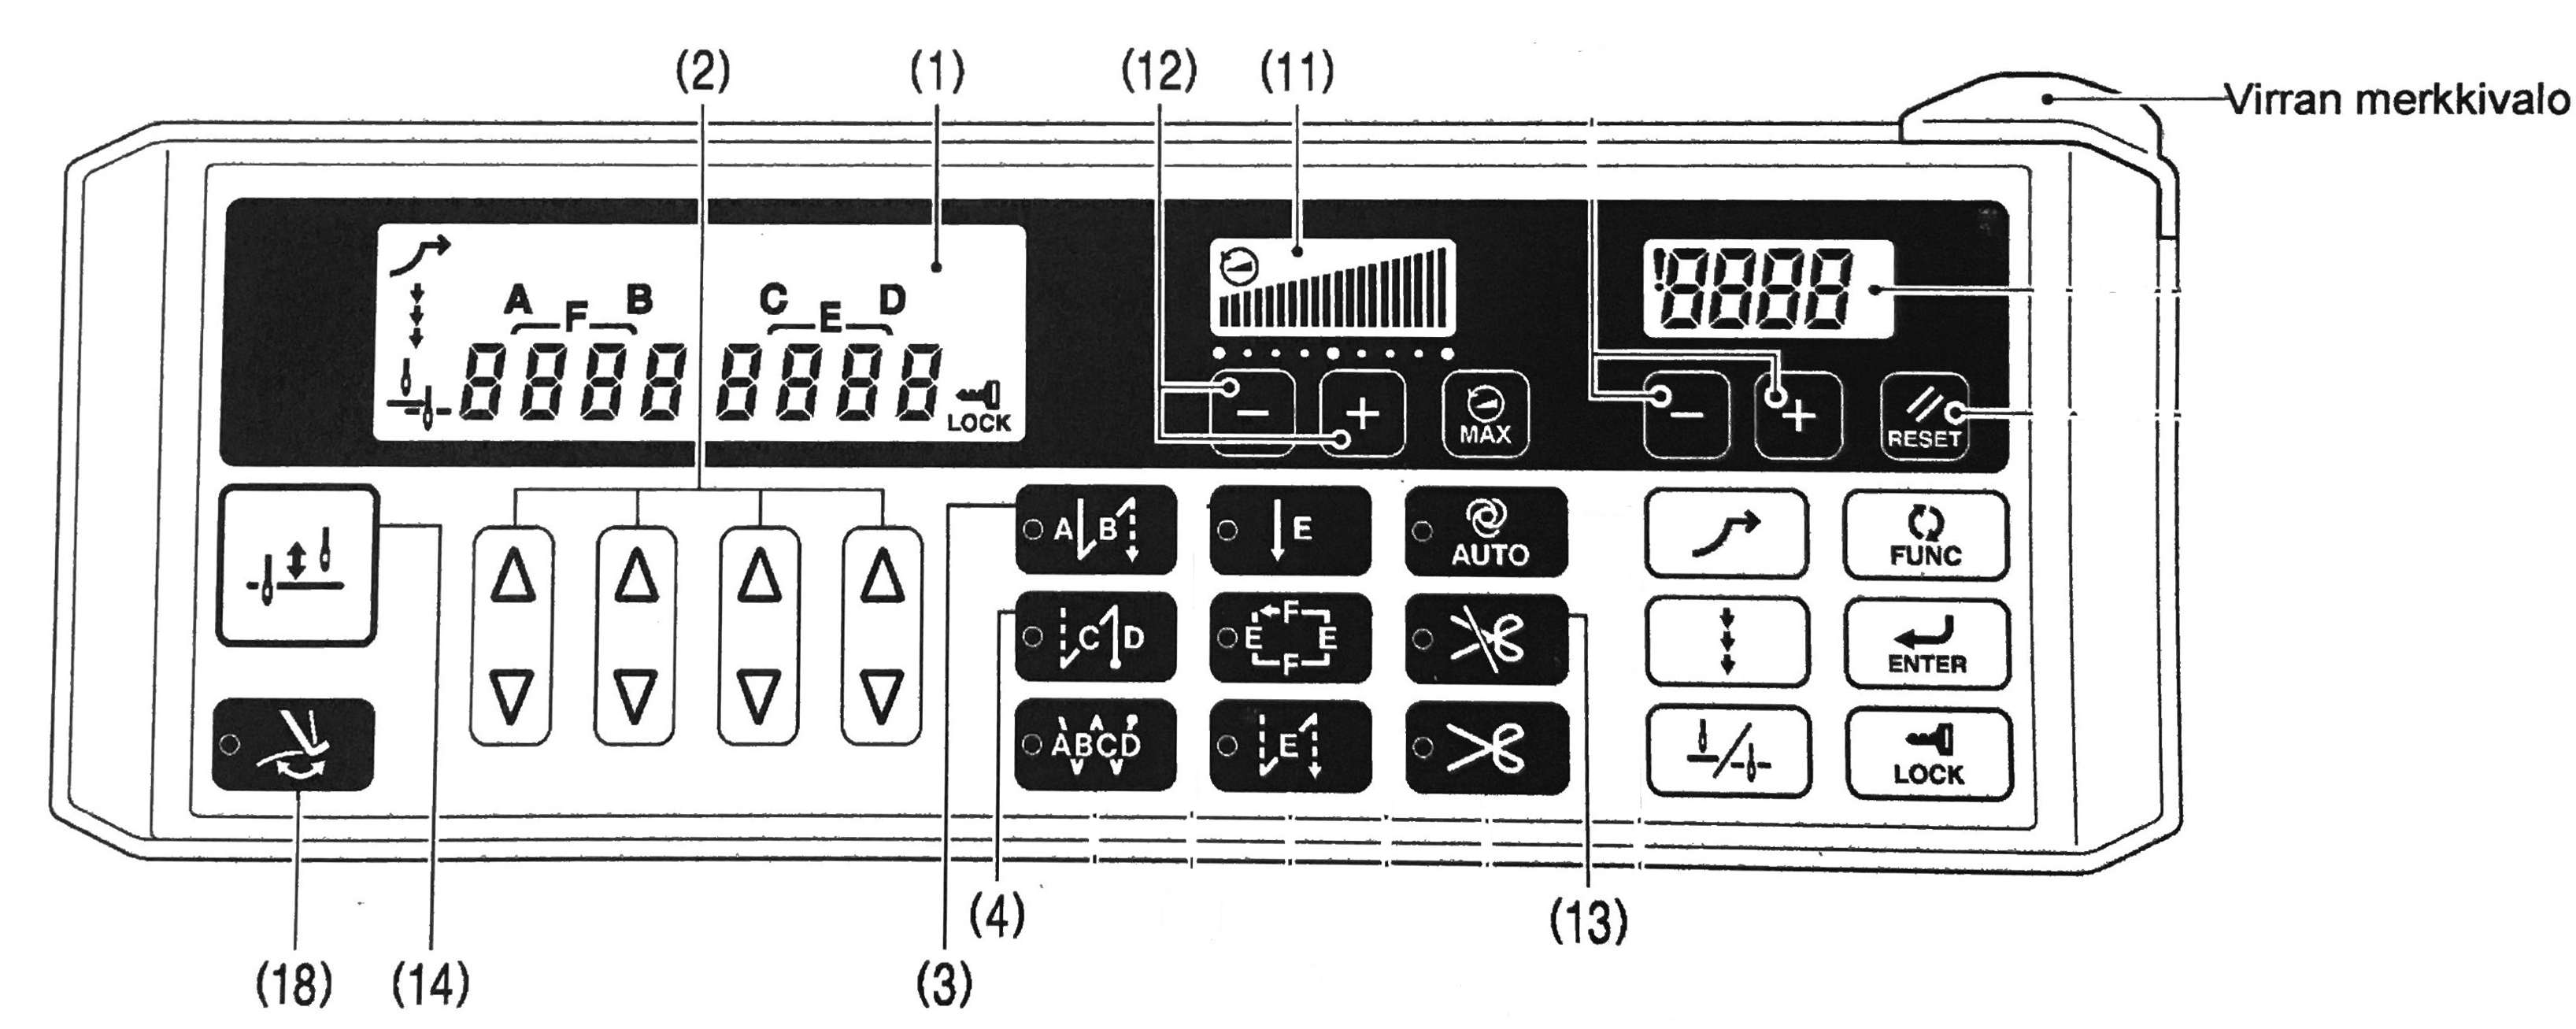
1.5. Operating and adjusting instructions (video)
- Higher (tighter) for thick materials.
- Lower (looser) for thin materials.O
- Test the stitch quality on a piece of fabric of before starting to sew.
- Longer for thick materials.
- Shorter for thin materials.
- Test the stitch quality on a piece of fabric of before starting to sew.
- This adjustment is rarely required.
- Use higher pressure on heavy materials.
- Use lower pressure on thin and poorly feeding material.
- Test the pressure by sewing on a piece of fabric.
- Please note: Loosen gently, the metal rod and spring in the adjusting tube will come loose if the grooves run out.
2. Overlockers (video)
Overlockers are ideal for finishes and for sewing stretchy materials. The stitching is flexible.
The use of overlockers differs from sewing machines
- Usually operated with 3 or 4 threads, which are thinner (120) or crêpe threads.
- Needle threads (1–2) run on top of the machine.
- Looper threads (2) run inside the machine.
- You cannot backstitch on an overlocker, sew past the edge of the fabric to finish off. The remaining tail must be separately finished to stop the seam from unravelling.
- Some overlockers have a cutting blade.
- The pressure foot can be lifted using the small pedal, and you can move forward by using the larger pedal.
- The basic settings (thread tension) are good for most materials.
- Overlockers are challenging to adjust, do not do it alone.
- The workshop master can help if adjustment is needed, for example, to create a very stretchy stitch.
Lifting the pressure foot and cutting the thread
- A separate small pedal, no automatic cutting of thread.
Cutting blade
- All material on the right side of the blade is cut off.
- Do not sew over needles, the blade will become blunt and unusable.
Needles
- See device-specific set of needles.
- 2 needles, you can use only one needle for a three-thread overlock.
2.1. Threading (video)
- Turn off the machine.
- Cut the current threads as close as you can to the thread cones, remove the cones and put new ones in place.
- Take the ends of the two threads and a make a double knot, making sure that the knot holds.
- Cut the needle threads below the needle, the looper threads are released.
- Gently pull the new threads through one at a time. If the thread appears to be caught, gently move it back and forth, and you can also open the machine and help with tweezers.
- Insert the thread into the eye of the needle last.
- Test your stitch on a piece of fabric.
- Open the machine:
- Lift the tabletop aside.
- Open the front cover of the machine (the threading chart can be found here).
- Turn the left side of the machine aside.
- Release the presser foot using the lever behind it and turn aside.
2.2. Replacing a needle
Overlockers can usually be operated with one, two or three needles. A four-thread overlocker can be made down to a three-thread machine by removing one of the needles / leaving one of the needles unthreaded.
- Turn off the machine.
- Each overlocker has its own set of needles, check the device-specific number.
- To gain more visibility, turn the presser foot aside using the lever behind the presser foot.
- Cut the needle threads near the needle.
- Loosen the needle screws using a small Allen key.
- Remove the damaged needles and place them in needle waste for recycling.
- Put the new needles in place, pushing them as high as you can into the slot.
- Tighten the screws.
- Thread the needle eye from front to back.
- Test your stitch on a piece of fabric.
3. Troubleshooting
- Check that the tip of the needle is undamaged. Is it facing the right way?
- Are you sure the threading is done correctly?
- Is the bobbin the right way? Is it too loose?
Loose stitching / seam looks gathered
- The top or lower thread is too loose / tight.
- The needle tip may be damaged.
- The thread tension is wrong for your material: for thinner material, use looser thread tension and shorter stitch length.
The overlocker does not make stitches
- Check the threading, usually the thread has come loose from one of the loopers.
- Always thread the needle last.
Watch the videos
- 1.3. Threading: Threading.
- 1.5. Operating and adjusting instructions: How to operate the industrial sewing machine.
- 2.1. Threading: Threading the overlocker.
- Ask the workshop master for help.
4. Steam iron unit
The industrial steam iron unit is good for ironing almost any material. The silicone shield on the bottom of the iron protects the most sensitive materials, and its stops the bottom of the iron from coming into direct contact with the material being ironed. The bottom is warm, but not hot. Without steam, your fabric will not become very smooth. Steam can be produced by pressing the button on the iron handle.
The first table in the ironing unit is equipped with a vacuum. You can use the vacuum for intense ironing of wrinkled fabrics, and it also dries the material. The second ironing table has a blowing feature. It is a good idea to use the blowing, for example, when ironing shirt collars. The vacuum and blowing features are operated with pedals located at the bottom of the appliance.
Remember, hot steam may burn you. If you forget to switch off the device, it may cause a fire hazard.
On / Off
- 3 buttons in the steam developer, 2 buttons / table (7 in total).
- The last person working in the facility always turns off the device.
Use
- Monitor the amount of water throughout the day and add more if necessary.
- The bottom of the iron is not burning hot, and it does not iron as such.
- The ironing is done by the steam.
- The steam button is located on the handle of the iron.
- Protect the ironing board with a cloth / silicone pad when ironing support fabrics.
- First test the steam iron on your material with caution.
- Particularly tightly woven fabrics may push steam back on you.
- It is not recommended to use the steam iron on sequinned fabrics.