
CS-EJ4102 - Mobile Application Development with Android D, 07.09.2020-23.10.2020
Kurssiasetusten perusteella kurssi on päättynyt 23.10.2020 Etsi kursseja: CS-EJ4102
Your first Android app in Kotlin
In this tutorial, you will learn how to implement an Android application in Kotlin. The app will display a greeting message given an input provided by a user.
Creating a simple layout
First, we create an XML layout that includes the elements required for our app. For this example, we will use three elements: TextView, EditText, and Button
res/layout/main_activity.xml
<?xml version="1.0" encoding="utf-8"?>
<androidx.constraintlayout.widget.ConstraintLayout xmlns:android="http://schemas.android.com/apk/res/android"
   xmlns:app="http://schemas.android.com/apk/res-auto"
   xmlns:tools="http://schemas.android.com/tools"
   android:layout_width="match_parent"
   android:layout_height="match_parent"
   tools:context=".MainActivity">
   <TextView
       android:id="@+id/txtNameLabel"
       android:layout_width="wrap_content"
       android:layout_height="wrap_content"
       android:layout_marginTop="104dp"
       android:layout_marginLeft="20dp"
       android:text="Name"
       app:layout_constraintStart_toStartOf="parent"
       app:layout_constraintTop_toTopOf="parent"></TextView>
   <EditText
       android:id="@+id/editText"
       android:layout_width="150dp"
       android:layout_height="60dp"
       android:layout_marginStart="85dp"
       android:layout_marginTop="84dp"
       android:hint="Input name"
       android:inputType="text"
       app:layout_constraintStart_toStartOf="parent"
       app:layout_constraintTop_toTopOf="parent">
   </EditText>
   <Button
       android:id="@+id/btnTry"
       android:layout_width="90dp"
       android:layout_height="50dp"
       android:layout_marginTop="20dp"
       android:gravity="center"
       android:text="TRY"
       app:layout_constraintStart_toStartOf="@+id/editText"
       app:layout_constraintTop_toBottomOf="@+id/editText"></Button>
   <TextView
       android:id="@+id/txtResultLabel"
       android:layout_width="wrap_content"
       android:layout_height="wrap_content"
       android:layout_marginStart="20dp"
       android:layout_marginTop="50dp"
       android:text="Result"
       app:layout_constraintStart_toStartOf="parent"
       app:layout_constraintTop_toBottomOf="@+id/btnTry">
   </TextView>
   <TextView
       android:id="@+id/txtResultValue"
       android:layout_width="wrap_content"
       android:layout_height="21dp"
       android:layout_marginLeft="92dp"
       android:layout_marginTop="64dp"
       android:text="Hello"
       app:layout_constraintLeft_toLeftOf="@+id/txtResultLabel"
       app:layout_constraintTop_toTopOf="@+id/txtResultLabel" />
</androidx.constraintlayout.widget.ConstraintLayout>
Adding click events in Kotlin
Once defined the XML, we need to implement the action for the click event. First, we link the button declared in the layout by calling the findViewById() method. In this case, the button was defined with id
btnTry
val button = findViewById<Button>(R.id.btnTry)
Next, we define a listener for the button when it is clicked on.
  button.setOnClickListener{
         // action to perform when the button is clicked
       }
MainActivity.kt
package com.example.hellokotlin
import android.content.Context
import androidx.appcompat.app.AppCompatActivity
import android.os.Bundle
import android.view.View
import android.view.inputmethod.InputMethodManager
import android.widget.Button
import android.widget.EditText
import android.widget.TextView
class MainActivity : AppCompatActivity() {
   override fun onCreate(savedInstanceState: Bundle?) {
       super.onCreate(savedInstanceState)
       setContentView(R.layout.activity_main)
       val button = findViewById<Button>(R.id.btnTry)
       button.setOnClickListener{
           //action to perform when the button is clicked
       }
   }
Defining functions in Kotlin
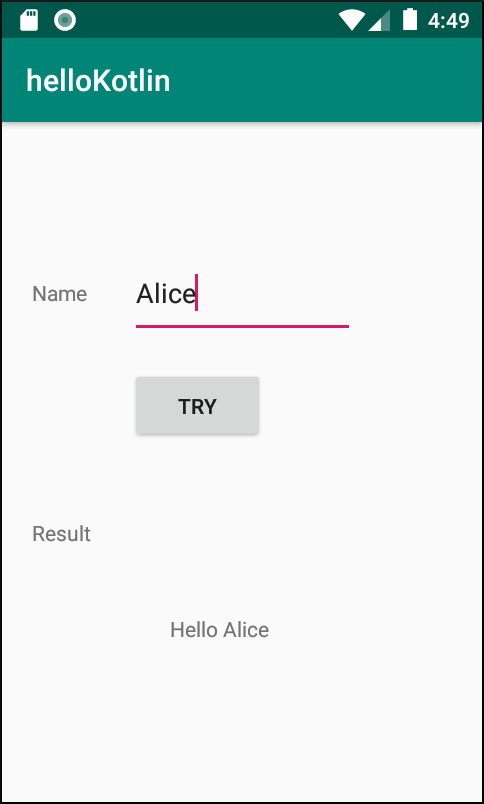
Next, we define a function that is called when the button is clicked. As mentioned before, our app displays a greeting message based on the input provided by the user. For instance, if a user enters Alice, the message will say Hello Alice.
First, we define the function called sendHello()
private fun sendHello(){
}
Next, we need to link the elements declared in the layout. In this case, we use the EditText that represents the input and the TextView which shows the message.
 val editText = findViewById<EditText>(R.id.editText)
 val txtResult = findViewById<TextView>(R.id.txtResultValue)
To obtain the input from the user, we call the text method from the EditText
val input = editText.text
To append the new content, we use the function append from the TextView
txtResult.append(" " + input)
Finally, the function looks like the following
private fun sendHello(){
   val editText = findViewById<EditText>(R.id.editText)
   val txtResult = findViewById<TextView>(R.id.txtResultValue)
   val input = editText.text
   txtResult.append(" " + input)
}
Call this function in the listener previously defined
btnTry.setOnClickListener{
   sendHello()
}
At this point, you can test your application.