
MUO-E1042 - Printed Fabrics Studio, 26.10.2020-13.11.2020
This course space end date is set to 13.11.2020 Search Courses: MUO-E1042
Basic instructions
Log in
Log in with your Aalto ID.
Open Garment Creator program from desktop and change from the configuration menu inches to millimeters if you prefer so.
Before Printing
To maintain good print quality, perform following inspection before starting printing operations each day.
- Amount of ink remaining
- If and ink cartridge runs out while printing, you can continue printing after replacing the ink cartridge. However, if ink cartridge is replace during print job, the tone of the print result may differ depending on the drying conditions.
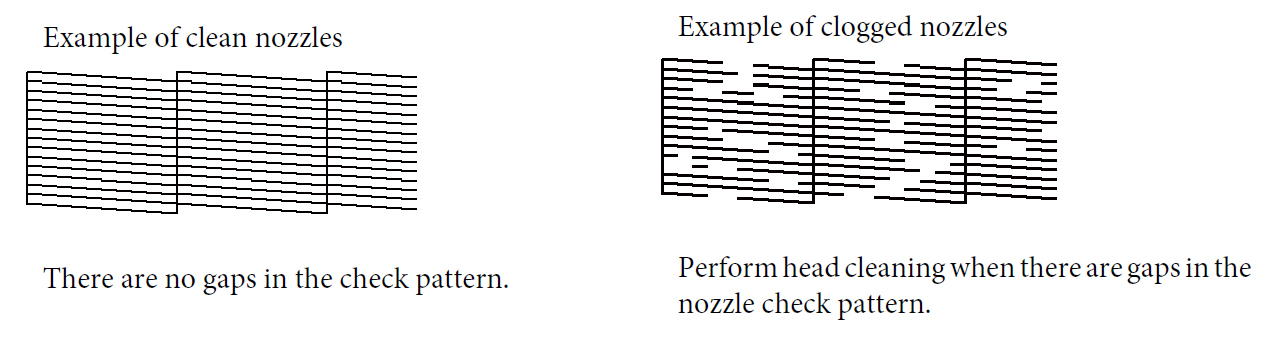
- Print pattern
- Print a check pattern to check clogged nozzles.
- Perform head cleaning if parts of the pattern are faint or missing.
- Stir white ink
Nozzle check
You need to perform a nozzle check if you are first of the day to see if there are any nozzles clogged. If during a day print result seems uneven, you might need to print a nozzle check.
Print Nozzle Check on a clean, dust-free printing surface
- Maintenance or Menu button > Maintenance > Nozzle Check > OK > OK
- Clean the platen immediately after checking the need for cleaning print heads nozzles. Use soft and wet cloth and dry with soft towel.
Head Cleaning
- Maintenance or Menu button > Maintenance > Head Cleaning > choose either Selective Nozzles or All Nozzles > if you chose Selective Nozzles, select the print heads that you want to clean > Choose the cleaning level: light or medium > OK > Proceed > Print Nozzle Check again
- Repeat cleaning, if it is needed
- Use heavy cleaning if you could not clear the clogged nozzle after cleaning with light or medium couple times
Basic workflow for light media
- cut and iron the fabrics well in advance
- choose platen size (S, M or L) and put it on the installation platen
- place the fabric to platen
- remove any lint with sticky tape or cloth brush and press fibers flat with hard roller (light colored bases only) or grip pad tool
- put the frame in place lightly
- pull media outside of the frame to remove any creases and slack
- press down the frame so it will not loosen during printing
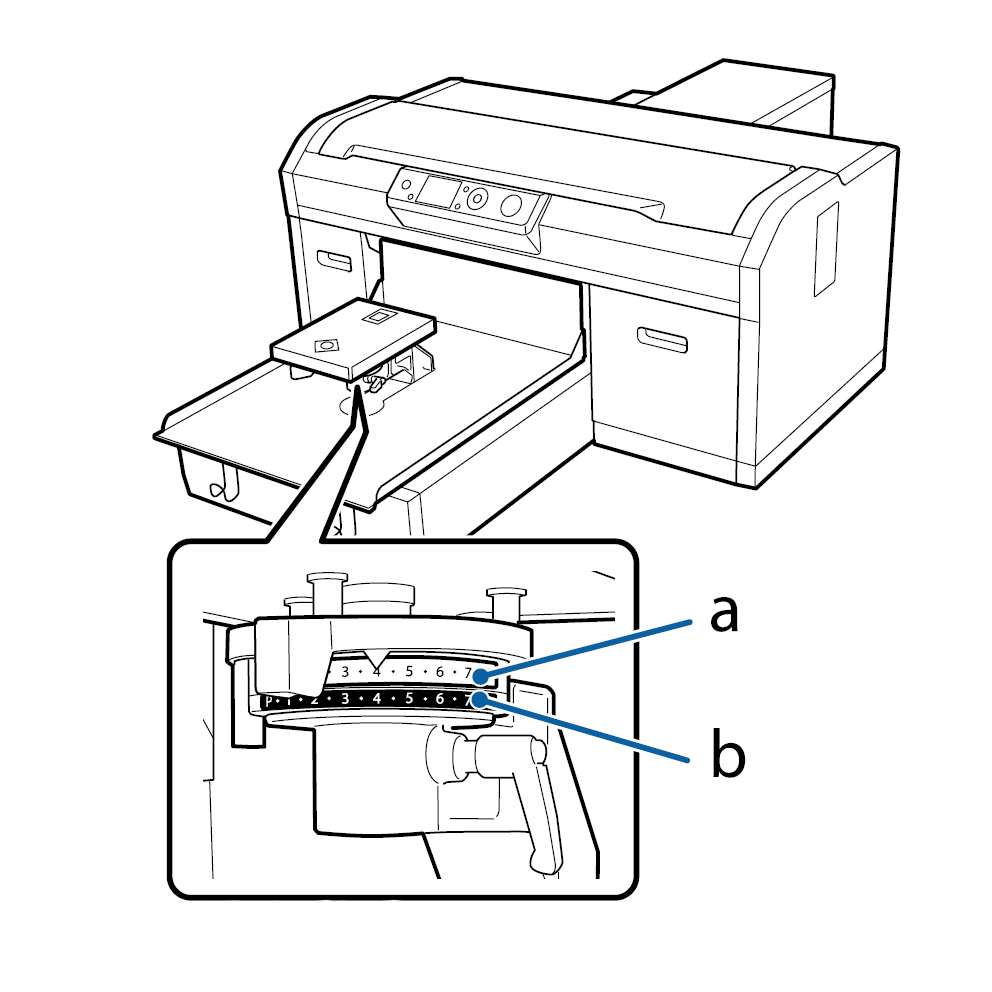
- adjust the height of the platen to suit your media
- lowest height at where printer alarms + 2 steps lower (1 step = half)
- open your file, choose print settings and print
Loading media for platen
Adjusting printing height
The incorrect distance between print heads and media might result in poor print quality:
- unsharp image (too high)
- staining (too narrow)
- need to change the hight during printing on colored bases > prints do not match
Printing
- Open the file
- Select Print Settings:
- Choose from presets:
- Light Color T-Shirt (Standard)
- Dark Color T-Shirt (Standard)
- Black Color T-Shirt (Use Garment Black)
- Dark Color T-Shirt (White)
- Adjust these if needed:
- Print Quality: 1-2 or 1-4 or 1-6 (depends on presets)
- Print Direction: Uni- or Bi-direction
- Ink Density
- color: -50% - + 100%
- white: -50% - + 100%
- Select Layout Settings:
- Select the correct platen size from the drop-down list (S, M or L)
- Position your files either by adjusting the settings or manually
- Press print
- Wait for the program to transfer the file to the printer in a format it understands and press blue print button on control panel.
- You can cancel the printing either from programs cancel button or after the file has transferred to printer from printers main menu > trash can
- Dry the prints on the rack or fix immediately after printing
Drying and fixing
Use heat press for fixing the ink to the fabric.
Method 1
- dry the print, then use heat press
- 170 oC, 45 s, low pressure (1 bar)
Method 2
- use the heat press with foam sheet or mat to allow the steam to escape
- 170 oC, 45 s or more, low pressure (1 bar)
Sign out
Sign out from the computer but do not NEVER TURN OFF THE PRINTER.
A built-in ink circulation system prevents problems due to sedimentation of ink particles in the White ink tube. Stable ink supply and print quality have been achieved by regurarly circulating ink system.
Stable print quality has been achieved by automatically cleaning the surface of the print head nozzles. In addition, the auto maintenance system automatically performs white ink maintenance regurarly.
If the printer is turned off these automatic cleaning systems are not working and result is permanently clogged print head nozzles, which will reduce print quality.