CS-E4160 - Laboratory Works in Networking and Security D, Lecture, 10.1.2024-12.4.2024
This course space end date is set to 12.04.2024 Search Courses: CS-E4160
A3: IPv6
Motivation
Communication over the internet is done using IP-addresses. IPv4 addresses consist of 32 bits divided into 8 bit segments, and in a common form represented using decimal numbers, e.g. 172.217.21.142. However, with 32 bits it is theoretically possible to have roughly 4,3 billion distinct addresses (232). This doesn’t provide enough addresses to have even a single distinct address for every human in existence. Furthermore, with people having multiple devices connected to the Internet, from mobile phones to air conditioners, many regional internet registries have depleted their pool of IPv4 addresses.
This problem was
anticipated however, and IPv6 protocol was developed. With 128 bit long
addresses, a vast amount of 3.4*1038 (2128) addresses can
be used and divided between the world. Currently, both protocols are used
simultaneously, with IPv4 addresses being used for the foreseeable future.
While there has been transition to IPv6 for decades, the protocols are
not compatible with each other, and therefore IPv4-only hardware would need to
be completely replaced to fully migrate into IPv6.
Description of the exercise
In this exercise you will familiarize yourself
with Internet Protocol version 6 (IPv6). The main task is to build a small
network and assign addresses and routes automatically with router
advertisements. You will also create a connection between two IPv6 networks over an IPv4 network.
Additional reading
-
RFC 4291 - IP version 6 Addressing Architecture
-
RFC 4193 - Unique Local IPv6 Unicast Addresses
-
RFC 2375 - IPv6 Multicast Address Assignment
-
RFC 2460 - Internet Protocol, Version 6 (IPv6) Specification
-
RFC 2461 - Neighbor Discovery for IP version 6 (IPv6)
-
RFC 4380 - Teredo: Tunneling IPv6 over UDP through Network Address Translations
-
RFC 6052 - IPv6 Addressing of IPv4/IPv6 Translators
-
RFC 6146 - Stateful NAT64
-
IPv6 HOWTO - Good information about IPv6 and Linux
-
IPv6 - Ubuntu Wiki - Information about IPv6 and Ubuntu
-
ip, route and tcpdump manual pages
1. IPv6 addressing
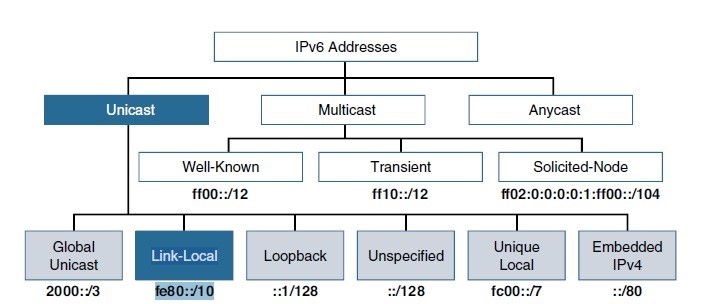
IPv6 addresses may look more foreign to many people, due to being more complex than IPv4 addresses, even though they have been in use for a long time. You can think in your case, which is the more familiar loopback address: 127.0.0.1 or ::1 (0:0:0:0:0:0:0:1 or even more verbose 0000:0000:0000:0000:0000:0000:0000:0001). The following picture shows the categories of
different IPv6 address types, so first study it and familiarize yourself with the use of them. Then answer some questions related to some of them.
|
1.1
|
In Unique Local IPv6 Unicast Address space. how does a device know whether the IPv6 address it just created for itself is unique?
|
2p
|
|
1.2
|
Explain 3 methods of dynamically allocating IPv6 global unicast addresses?
|
2p
|
2. Build two IPv6 networks with a router
To prepare for creating the final network, you will first familiarize yourself with routing messages between two IPv6 networks.
You will set up lab1 to act as a router. This means that lab1 will route traffic from one network to another. In practice this is done using routing tables, but before that you must allow certain things that are not allowed by default. Use the following sysctl commands (note that the last one will avoid messing up enp0s3 interface. You should do the last one on all of your VMs to prevent problems with misconfiguration.):
sudo sysctl -w
net.ipv6.conf.default.forwarding=1
sudo sysctl -w net.ipv6.conf.all.forwarding=1
sudo sysctl -w net.ipv6.conf.enp0s3.accept_ra=0
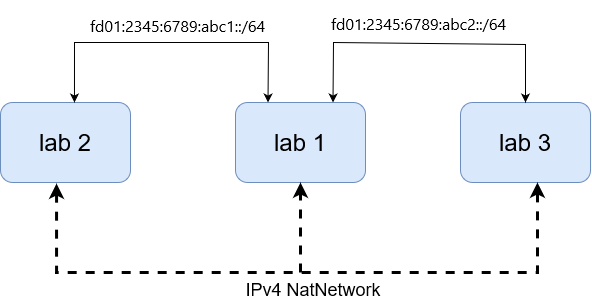
After the following steps you should have network topology similar to the following image:

Assign static IPv6 addresses from the subnets fd01:2345:6789:abc1::/64 and fd01:2345:6789:abc2::/64 to your virtual machines. On lab2 and lab3 add IPv6 route to the other network using lab1 as a gateway. Make sure that you can ping lab1 from lab2 and lab3, then ensure that IPv6 routing works on lab1 by pinging lab3 from lab2. You can also try traceroute to see the route taken by the packets.
You can do the configurations using ip(8). Editing /etc/network/interfaces is a bad
idea as it can mess radvd in the next part. The addresses should be
assigned to intnet interfaces, not the NAT Network.
|
2.1 |
What do the above sysctl commands do? |
1p |
|
2.2 |
The subnets used belong to Unique Local IPv6 Unicast Address space. Explain what this means and what is the format of such addresses. |
2p |
|
2.3 |
List all commands that you used to add static addresses to lab1, lab2 and lab3. Explain one of the add address commands. |
1p |
|
2.4 |
Show the command that you used to add the route to lab3 on lab2, and explain it. |
1p |
|
2.5 |
Show enp0s8 interface information from lab2, as well as the IPv6 routing table. Explain the IPv6 information from the interface and the routing table. What does a double colon (::) indicate? |
1p |
|
2.6 |
Start tcpdump to capture ICMPv6 packets on each machine. From lab2, ping the lab1 and lab3 IPv6 addresses using ping6(8).. You should get a return packet for each ping you have sent. If not, recheck your network configuration. Show the headers of a successful ping return packet. Show ping6 output as well as tcpdump output. |
2p |
3. IPv6 Router Advertisement Daemon
Instead of having to manually assign the addresses to the interfaces, this can be done by the router, so they automatically get an address assigned to them.
Set up Router Advertisement Daemon
on lab1 to automatically assign IPv6 addresses to VMs connected to intnet1 and
intnet2.
- On lab2 and lab3: Remove all static addresses from the intnet interfaces and run the interfaces down.
- lab1: Install IPv6 Router Advertisement Daemon (radvd). Modify the content of radvd.conf file to be used in your network (If radvd.conf file does not exist create one under /etc directory). Radvd should advertise prefix fd01:2345:6789:abc1::/64 on intnet1 (enp0s8) and fd01:2345:6789:abc2::/64 on intnet2 (enp0s9). Start the router advertisement daemon (radvd).
- Check using tcpdump that router advertisement packets are sent to enp0s8 and enp0s9 of lab1 periodically. If you can’t see any packets sent, edit the conf file.
- Start tcpdump on lab2 and capture ICMPv6 packets. Bring the interfaces on lab2 and lab3 up. Stop capturing packets after receiving first few ICMPv6 packets. Make sure the addresses that are assigned to the interfaces are received from the router advertisement.
- Ping lab3 from lab2 using the IPv6 address allocated by radvd. You should get a return packet for each ping you have sent. If not, recheck your network configuration.
|
3.1 |
Explain your modifications to radvd.conf. Which options are mandatory? |
2p |
|
3.2 |
Analyze captured packets and explain what happens when you set up the interface on lab2. |
2p |
|
3.3 |
How is the host-specific part of the address determined in this case? |
1p |
|
3.4 |
Show and explain the output of a traceroute(1) from lab2 to lab3. |
1p |
4. Configure IPv6 over IPv4
Ideally, IPv6 should be run natively wherever possible, with IPv6 devices communicating with each other directly over IPv6 networks. However, the move from IPv4 to IPv6 will happen over time. The Internet Engineering Task Force (IETF) has developed several transition techniques to accommodate a variety of IPv4-to-IPv6 scenarios. One type of IPv4–to–IPv6 transition mechanism is translation including NAT64, Mapping of Address and Port (MAP), IPv6 Rapid Deployment (6rd), etc.
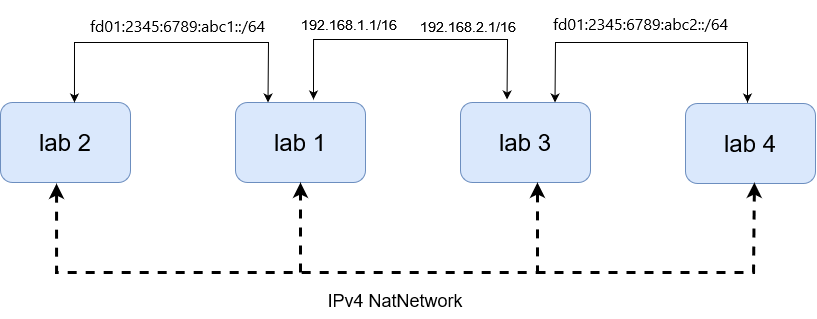
In this part of the assignment the goal is to demonstrate two ipv6 only nodes communicating with each other and the global internet through an ipv4 link. You will need to spin up another VM, lab4 for this part of the assignment to setup the network shown below, which has two IPv6 only nodes and two nodes with both IPv6 and IPv4 capabilities but only an IPv4 link connecting them to each other
1. Reset the networking on lab1, lab2 and lab3 back to default.
2. Create a new VM named lab4. Lab4 should have a NAT adapter for you to be able to ssh into and administer it, so set up port forwarding accordingly
3. On lab3 and lab4, add a network adapter of type internal network and name it intnet3
4. On lab2 and lab4, disable all static IPv4 addresses on the intent adapters. Create an IPv6 link between lab2 and lab1 assigning static addresses from the fd01:2345:6789:abc1::/64 subnet, similarly create an IPv6 link between lab3 and lab4 assigning addresses from the subnet fd01:2345:6789:abc2::/64.
5. Between lab1 and lab3 setup an IPv4 link with static addresses from 192.168.0.0/16
6. Make sure only lab3 has internet access. Configure your routing so that lab3 is used as the internet gateway
|
4.1 |
Do a traceroute from lab2 to lab4, showing it taking the route through lab1 and lab3 |
2p |
|
4.2 |
Show that you can ping 8.8.8.8 from lab1 and lab4 |
1p |
|
4.3 |
Explain your solution. Why did you use this method over the other options? |
3p |
|
4.4 |
Are there security issues with your solution? What and how can they be addressed? | 2p |
5. Finishing your work
When finishing your work, please remember to backup files related to the assignment and after your demo possibly reset the configuration changes that you did to the lab environment (Lab1, Lab2, Lab3) to start the next assignment with a clean slate.

