CS-E4160 - Laboratory Works in Networking and Security D, Lecture, 10.1.2024-12.4.2024
This course space end date is set to 12.04.2024 Search Courses: CS-E4160
Extra: Containers
Assignment description
This task has two main objectives, the first one is to familiarize yourself with containerization (using Docker) and the running of containerized, interconnected services. After being familiar with containers, the second task is to host the same system using Kubernetes for orchestrating the containers. This adds scalability by using deployed services.
It is
strongly recommended to do this assignment on your main Linux (i.e. not on a
virtual machine) because running Docker and Kubernetes on a VM results in nested
virtualization, which VirtualBox has limited support for. If you want to do the
assignment on a virtual machine, VMWare Workstation Player is a free software
that allows running Docker inside your VM.
1. Preparation
You can
download the files needed for the assignment at: https://version.aalto.fi/gitlab/illahig1/containers.git
Then, install Docker and create a user to Docker Hub. This is necessary because you will be building and pushing images there.
|
1.1 |
Show your Docker Hub for this assignment’s containers. |
1p |
|---|---|---|
|
1.2 |
How can you use one Docker repository to hold multiple containers? |
1p |
2. Docker
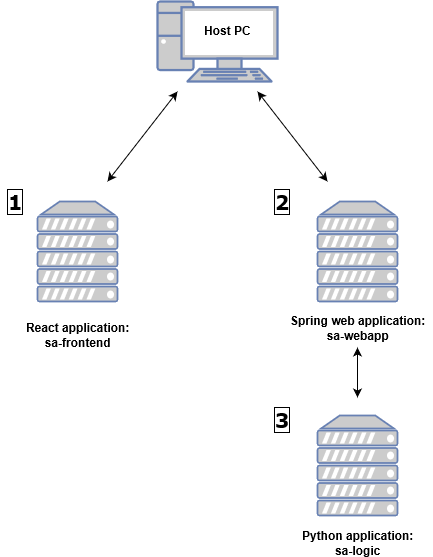
You will host three services on different Docker containers: a react webpage, which is the frontend of the website; a spring web application, which contacts a python application and returns the results in json format; and a python application containing the website logic. Due to this architecture, you will need to build the website in reverse order, as the spring application will need to know the IP address of the Python application, and the webpage will need to know the Spring application’s IP. To test out the Docker installation however, you will first build the frontend of the website. Then build the other services and change the webpage to point to the right address.

|
2.1 |
List the commands you used for building, pushing and running the containers |
2p |
|
2.2 |
Show the IP of one of the running containers |
1p |
|
2.3 |
Demonstrate that the website is running and functional |
3p |
|
2.4 |
Explain your changes to the Dockerfiles |
2p |
3. Kubernetes
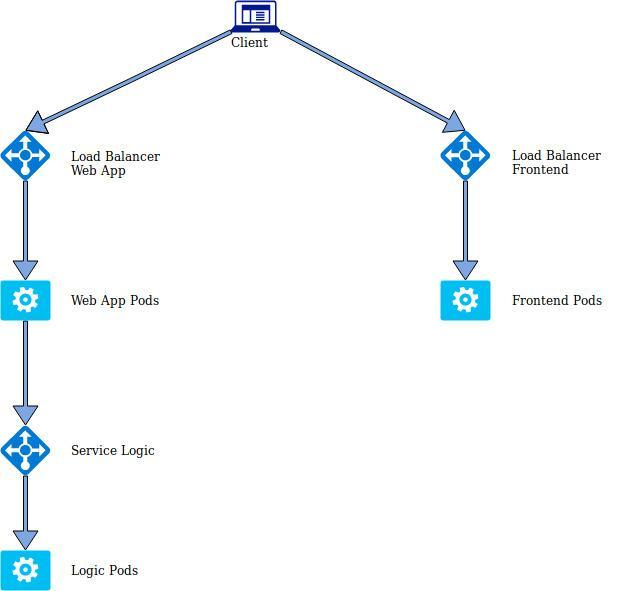
Now you will add scalability to your service by using load balancers and deployments. In Kubernetes, deployments can be used to create a replica-set of a service, allowing for scaling of the service for your needs. A load balancer will forward your request to one of the replicas, which will deliver the service. The resulting service topology will look like this:

|
1 |
This section requires you to install Minikube for running a Kubernetes cluster, as well as kubectl, a client tool for accessing the cluster. Install them and start Minikube. |
|---|---|
|
2 |
Go to resource-manifest directory, and create a Kubernetes pod using sa-frontend-pod.yaml. Edit the yaml-file to use the frontend container image from your Docker hub. Set port-forwarding so that you can access the pod’s port 80 on localhost port 88. Make sure you can see the webpage. |
|
3 |
To add scalability to your website, create another frontend pod from sa-frontend-pod2.yaml. Use the container image from your hub. Check that the new pod is running. This is not the best way to provide scalability, but it will be improved in further steps. |
|
4 |
You will now add a load balancer service to direct traffic to one of the front pages. The load balancer recognizes the pods by the label “app: sa-frontend”. Make sure both pods have that label. Then run the service using service-sa-frontend-lb.yaml. Check that the service is running. Don’t worry if the IP stays in pending; it is because you are using minikube and not a cloud service. You need to locally solve this issue, so that you can access it by using the web browser. |
|
5 |
At this point the load balancer is recognizing the pods based on a label. That fulfills the requirements for a scaled application. Now you need to run two replicas of the frontend -pod using a deployment. You can do it by using sa-frontend-deployment.yaml. Once again, you need to edit the file to use your own container image. After you have the deployment running, remove the two pods created in the previous steps using kubectl delete. |
|
6 |
Now it’s time to deploy the other services. Start by deploying logic. Edit the yaml file to use your own container. Remember to apply the logic service as well as the deployment. After this, verify that the service and pods are running. |
|
7 |
Finally, you need to deploy the webapp service and load balancer. Note that the yaml-file has defined the environment variable pointing to the logic service URL, so you don’t need to change that. Change the file to use your container image, though. After the edits, start the deployment and the load balancer. |
|
8 |
Note that you must change the frontend App.js to point to the right address again. Use the IP of the webapp load balancer. You can get it by using “minikube service list”. After making the changes, use npm to build the webpage, build the docker image, and upload it to Docker Hub. Then reapply the deployment. The website should now be accessible and working through the frontend load balancer service. |
|
3.1 |
List the commands you used for running the services, pods and deployments |
2p |
|
3.2 |
Demonstrate the website is running by connecting to the frontend load balancer. How does this differ from connecting to one of the pods? |
3p |
|
3.3 |
Explain the contents of sa-frontend-deployment.yaml, including what changes you made |
2p |
|
3.4 |
How can you scale a deployment after it has been deployed? |
1p |
