
MUO-C3003 - Muotoilun työprosessit, Luento-opetus, 19.4.2022-3.6.2022
This course space end date is set to 03.06.2022 Search Courses: MUO-C3003
Pe 29.4 Ohje: Adobe Photoshop - perusteet
In this lecture material you'll find some of the basics of Photoshop that are important when working with surface designs, and then we'll go through how to create repeats in Photoshop. There are probably as many ways of using Photoshop as there are users, so you can use these instructions as a guide to find your own way of working.
GENERAL SETTINGS
Quick tips:
Check Photoshop preferences: Edit –> Preferences (PC) OR Photoshop –> Preferences (Mac), and there e.g.- in General check Image Interpolation settings:
- change it to Bicubic Automatic while working with e.g. Smooth and Feather tools and unlimited amount of colors
- change it to Nearest Neighbor while working with colour separation and for creating sharp scaling, cropping and transforming
- in Scratch Disks you can add an external driver to be used for temporary memory while Photoshop is running. Often while making patterns in Photoshop and the file sizes are large, an error "Scratch Disk is Full" may appear. Then you should either delete unnecessary files from your computer, or add an external driver as a scratch disk. It is not recommended to use memory sticks as scratch disks.
- in Cursors change cursor types if wanted
- in Units & Rulers change Rulers to centimeters/millimeters

Modify keyboard shortcuts: Edit –> Keyboard Shortcuts –> Shortcuts for: Tools
- e.g. Decrease / Increase Brush Size (used a lot with print designs, therefore I always change them to , and .)
- Keep original as Background or Layer 0 and modify its duplicate layer –> right click on Layer panel –> Duplicate Layer OR Layer –> New –> Layer via Copy (ctrl/cmd + J)
Use Smart Objects whenever you want to scale or rotate elements (especially if scaling/rotating would be made several times): right click on layer –> Convert to Smart Object. When you have finished modifying the element –> right click on layer –> Rasterize Layer
Scanning and saving the original sketch:
Usually the scan resolution should be at least 300 ppi – if you want to scale up the design e.g. 200%, scan the original in 600 ppi.
Always keep the original scanned file saved, save all modifications in their own file name.
With rasters keep also the grayscale image saved in its own name.
Image Size:
Check and change the resolution and size from Image –> Image Size (ppi = pixel per inch, dpi = dots per inch (with printers and scanners))
Changing the image size:- Image –> Image Size –> untick Resample
- By reducing the resolution, the image size increases, and vice versa
- Image –> Image Size –> Resample selected
- Can choose the optimum interpolation method. All other interpolation methods create new pixel tones except Nearest Neighbor (so for designs with color separation done use only Nearest Neighbor)
Most important color modes:
- Image –> Mode –> Bitmap: black and white pixels without any other tones. Flattened layers. Only some of the tools can be used in this mode.
- Image –> Mode –> Grayscale: allows the use of most tools and functions, also layers
- Image –> Mode –> RGB: the default color mode that allows all tools and functions and layers
- Image –> Mode –> Indexed Color: optimum for working with color separation. Allows the use of some tools and functions, but not layers.

BRIEF LOOK AT SELECTION TOOLS
Selection tools:
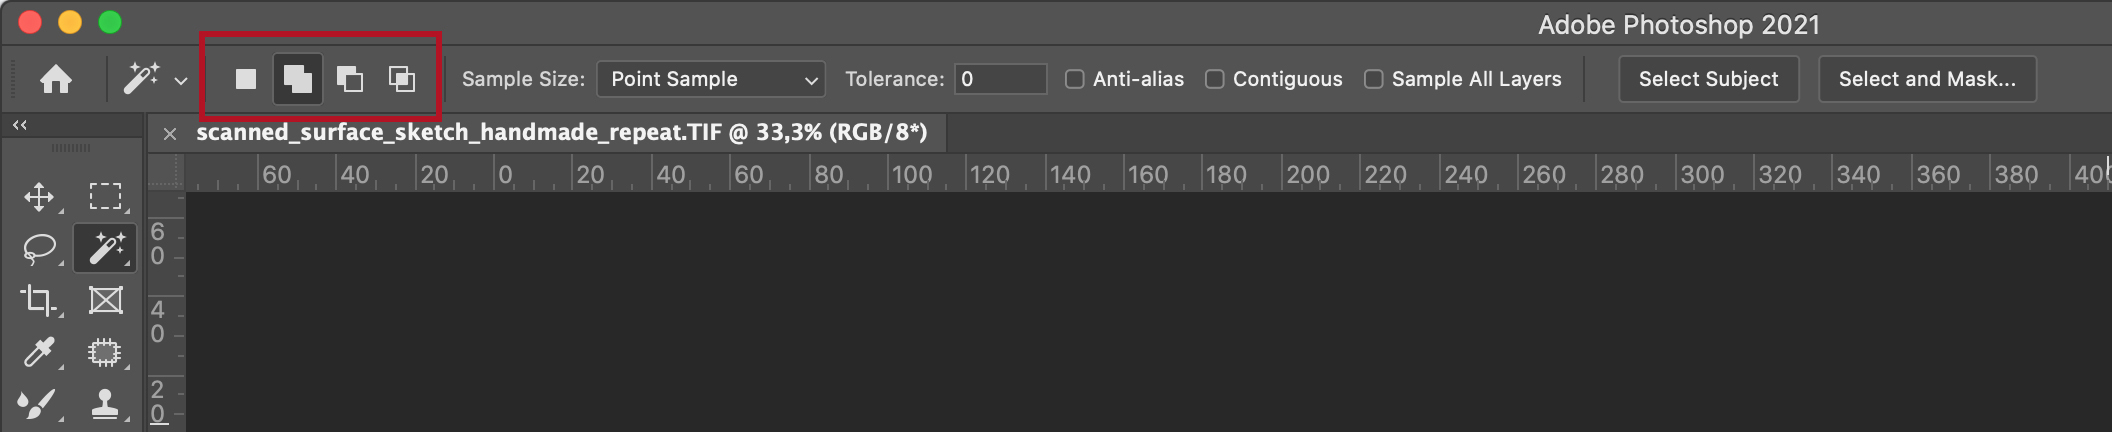
In all selection tools you can define (in Options bar) if making a selection will: make a new selection, add to existing selection, substract = take away from existing selection or intersect with existing selection.
Shortcut for deselecting a selection is Ctrl + D.
With Rectangular Marquee Tool you can select rectangles, circles and lines of 1 pixel. With Lasso (Lasso, Polygonal Lasso, Magnetic Lasso) you can select free-formed areas.
Magic Wand selects areas of similar color. The bigger the value in tolerance, the more similar colors Magic Wand will select (0= only the colour of selected pixel, 256=all colors). If you have Contiguous ticked, Magic Wand will select only contiguous color areas. If it is not ticked, Magic Wand will select similar colors anywhere in the image. Sample All Layers is valid only when you have multiple layers in your image, where Magic Wand selects color from all visible layers. If you turn off this option, the Magic Wand selects colors from the active layer only.
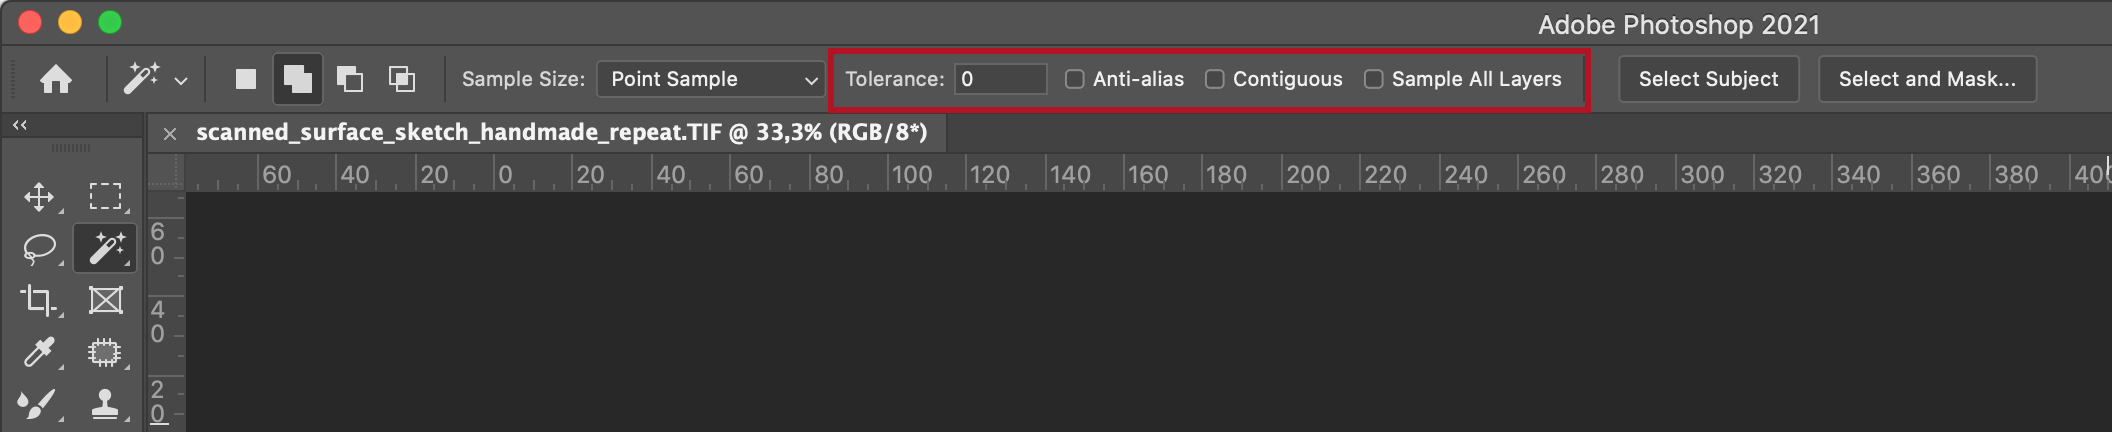
Also in Select –> Color Range you can select similar colors. Use + and – eyedroppers to add or take away tones from the selection. Adding fuzziness adds more tones in selection too, but it also adds a lot of transparency in the edges of selection.
Select –> Similar would add still more similar tones in selection. Photoshop does this automatically, so often it is better to add to selection with other selection tools, e.g. Magic Wand or Color Range.
Object Selection Tool automatically recognises and selects objects inside a selection. Begin by making a rough selection around the object you want to select: Use Object Selection Tool in Rectangle or Lasso Mode to make the first selection (you can change the mode in Options Bar). Object Selection Tool then automatically tries to select objects in this selection.
With Quick Mask you select and modify the selection using drawing tools and image adjustment tools. Click Quick Mask symbol in bottom of Toolbox. Paint over the area you want to select with Brush or Pencil tool (the selection becomes translucent red, see image below). You can quickly fix the selection by keyboard shortcut X (changes between foreground ad background color). Click Quick Mask symbol again to make the selection active. Note! Photoshop creates a selection inverse to the painted area, so you need to change the selection from Select –> Inverse.

In all selection tools there is Anti-alias option. It softens the edges of selected areas by changing the color of edge pixels. In some selection tools there is option Feather. It softens the edges of selected areas by making the edge of selection transparent. The bigger the value in Feather, the wider the transparent edge. Do not use Anti-alias or Feather when working with reduced amount of colours!
You can modify the edge of any selection: Select –> Modify or Select –> Select and Mask.