
MUO-C3003 - Muotoilun työprosessit, Luento-opetus, 19.4.2022-3.6.2022
This course space end date is set to 03.06.2022 Search Courses: MUO-C3003
Pe 29.4 Ohje: Adobe Photoshop - raportti
PHOTOSHOP FOR SURFACE DESIGN – REPEAT
In this section you'll find two ways of creating repeats in Photoshop: first Fixing the repeat with Offset if you just want to make one sketch to continue seamlessly, and then Creating patterns with Pattern Preview mode, if you want to make a repeat out of several separate elements.
This material does not include instructions for cleaning the background of a scanned/photographed sketch. There are many ways for doing that, where the easiest would be to just use Eraser tool, or to select the background and then do Edit –> Clear.
Fixing the repeat with Offset
This technique can be used for fixing hand-made repeats (scanned sketch on left) or creating repeats from all-over surface sketches (sketch on right).

Crop the sketch so that it could work as a repeat (e.g. using the repeat size in W x H x Resolution). Edges of cropped repeat can be sharp, OR if you want to make the edges of the sketch to overlap then include background to the crop (see image below).
- There is an option for deleting or retaining cropped pixels -> tick Delete Cropped Pixels in Options bar

You may clean the background of the sketch in this stage if needed. The example sketch below does not have cleaned background, since cleaning it might delete also some of the finer lines, and that would make fixing the repeat more difficult.
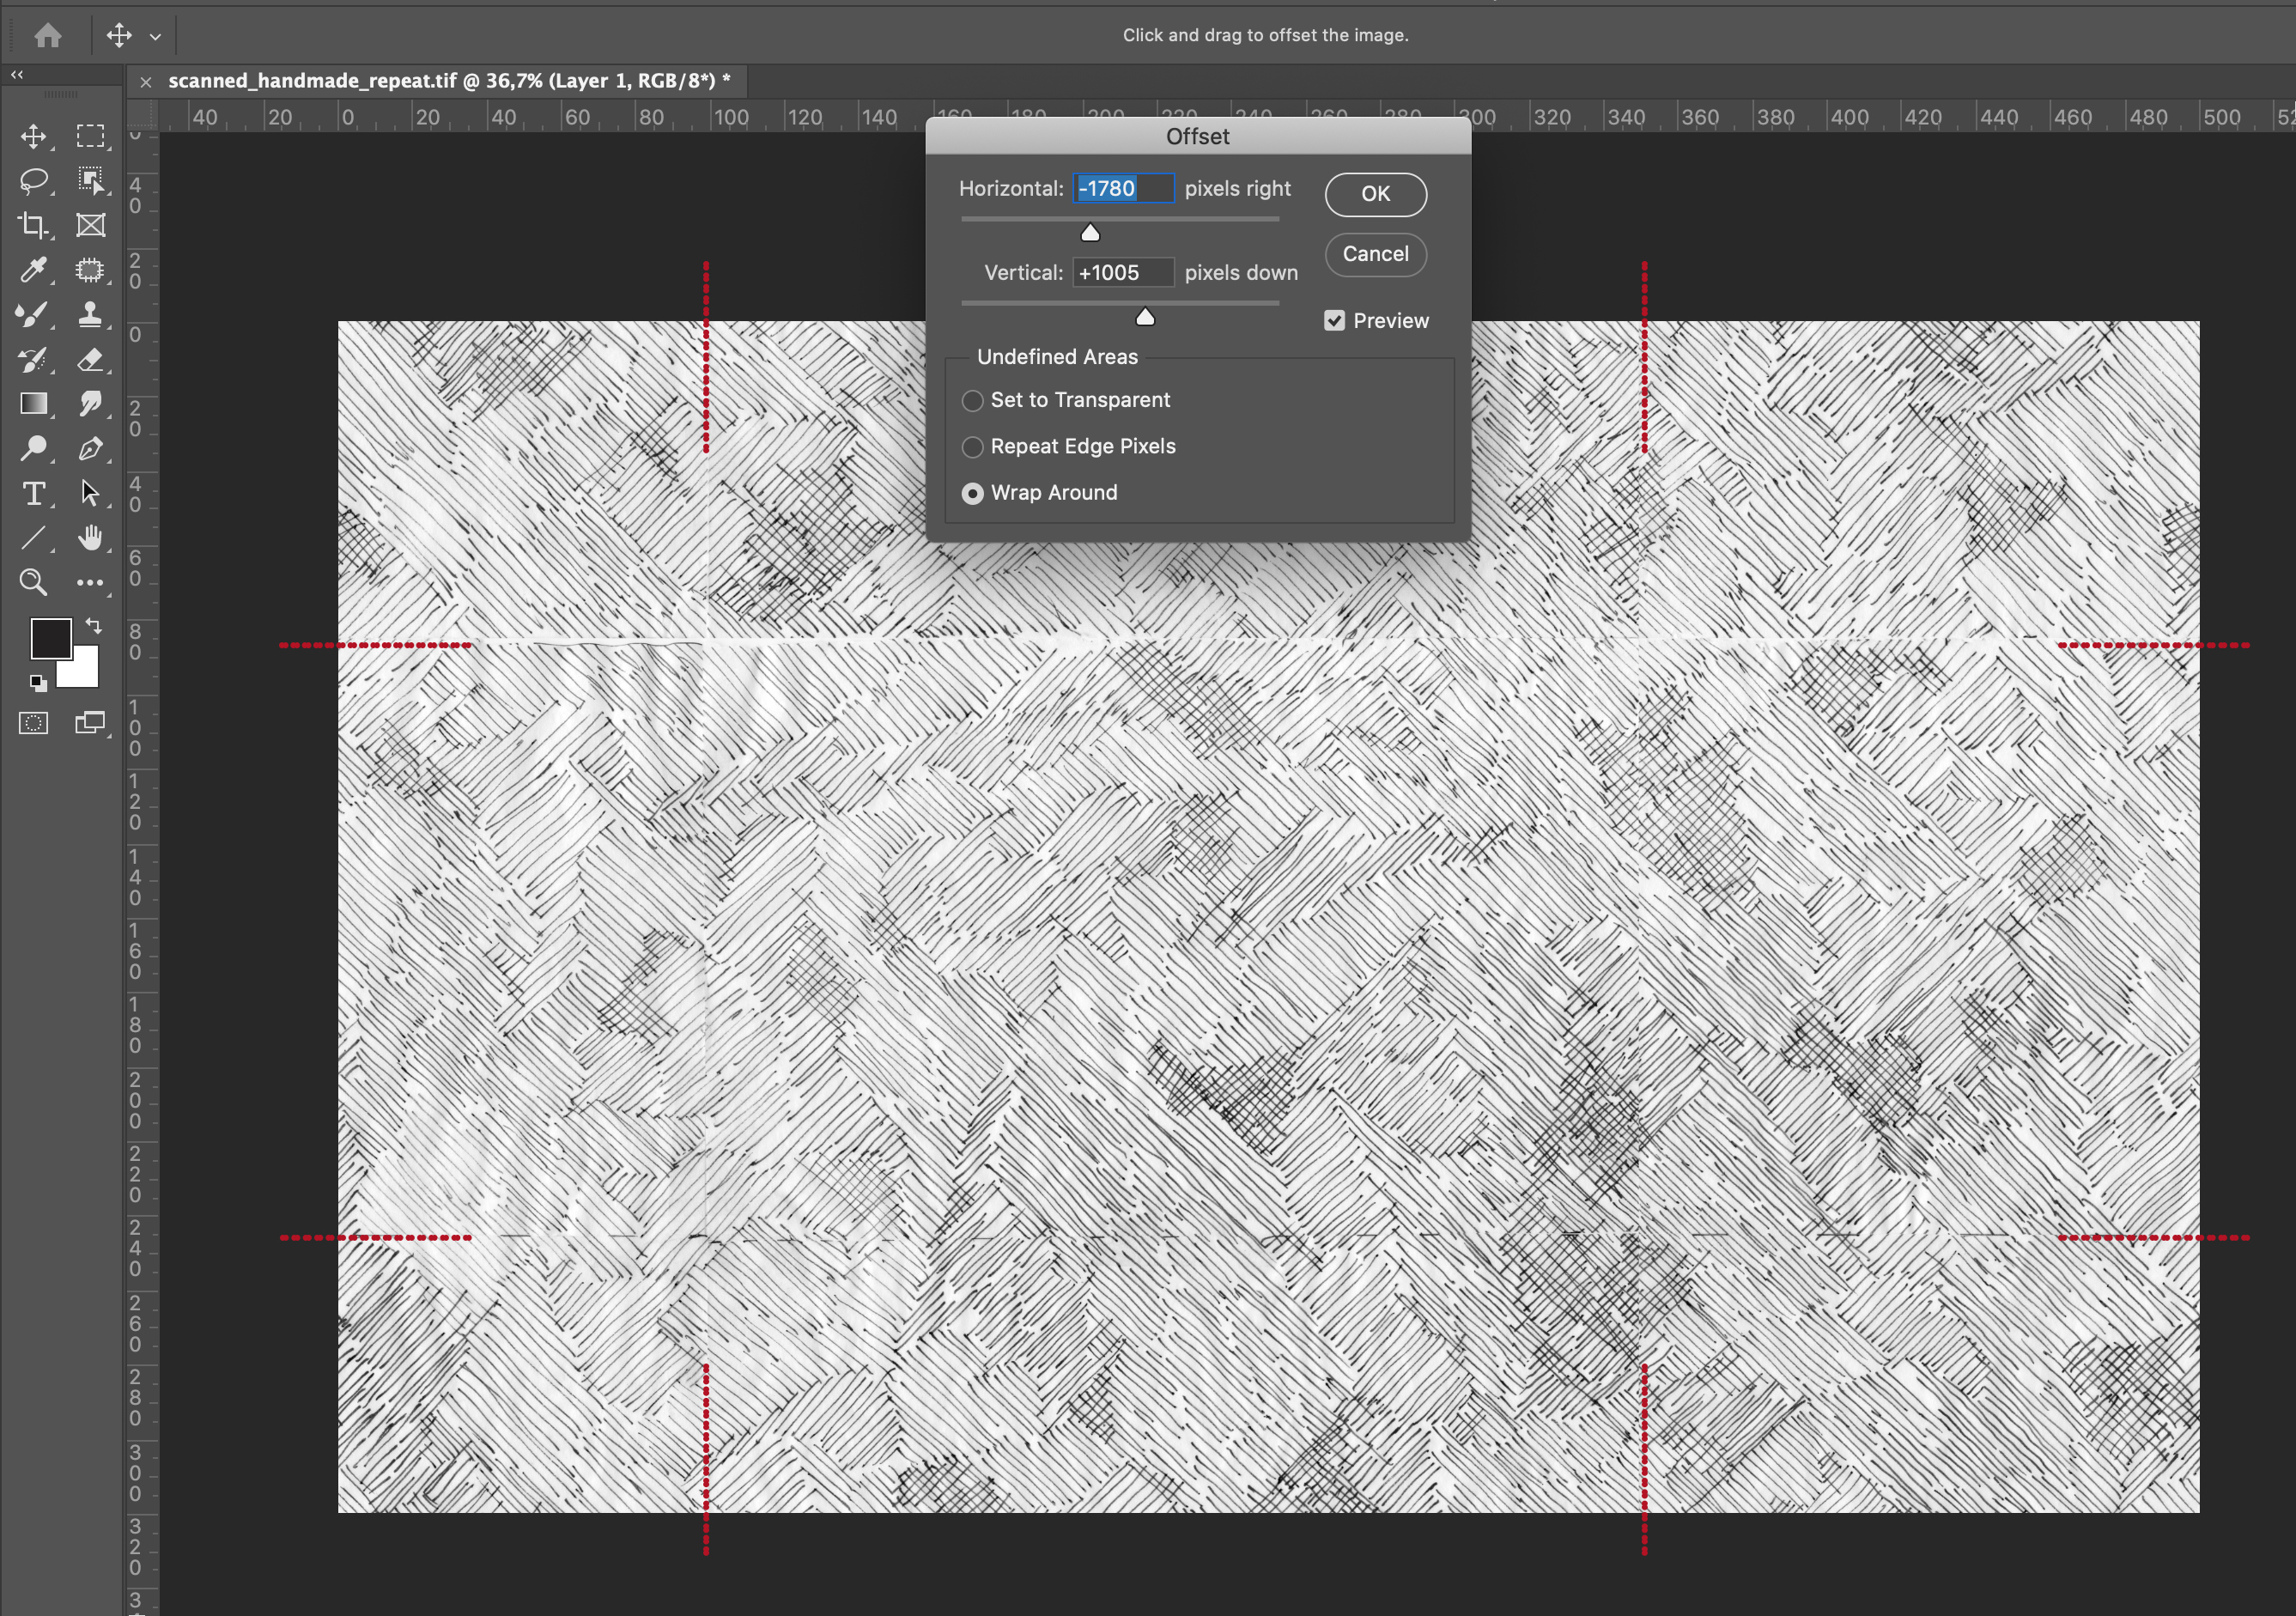
Do Filter –> Other –> Offset. Tick Wrap Around. Move the repeat lines of the design by dragging the horizontal and/or vertical bars.
Tools for fixing the repeat lines
Clean the cut repeat lines. Several tools can be used:
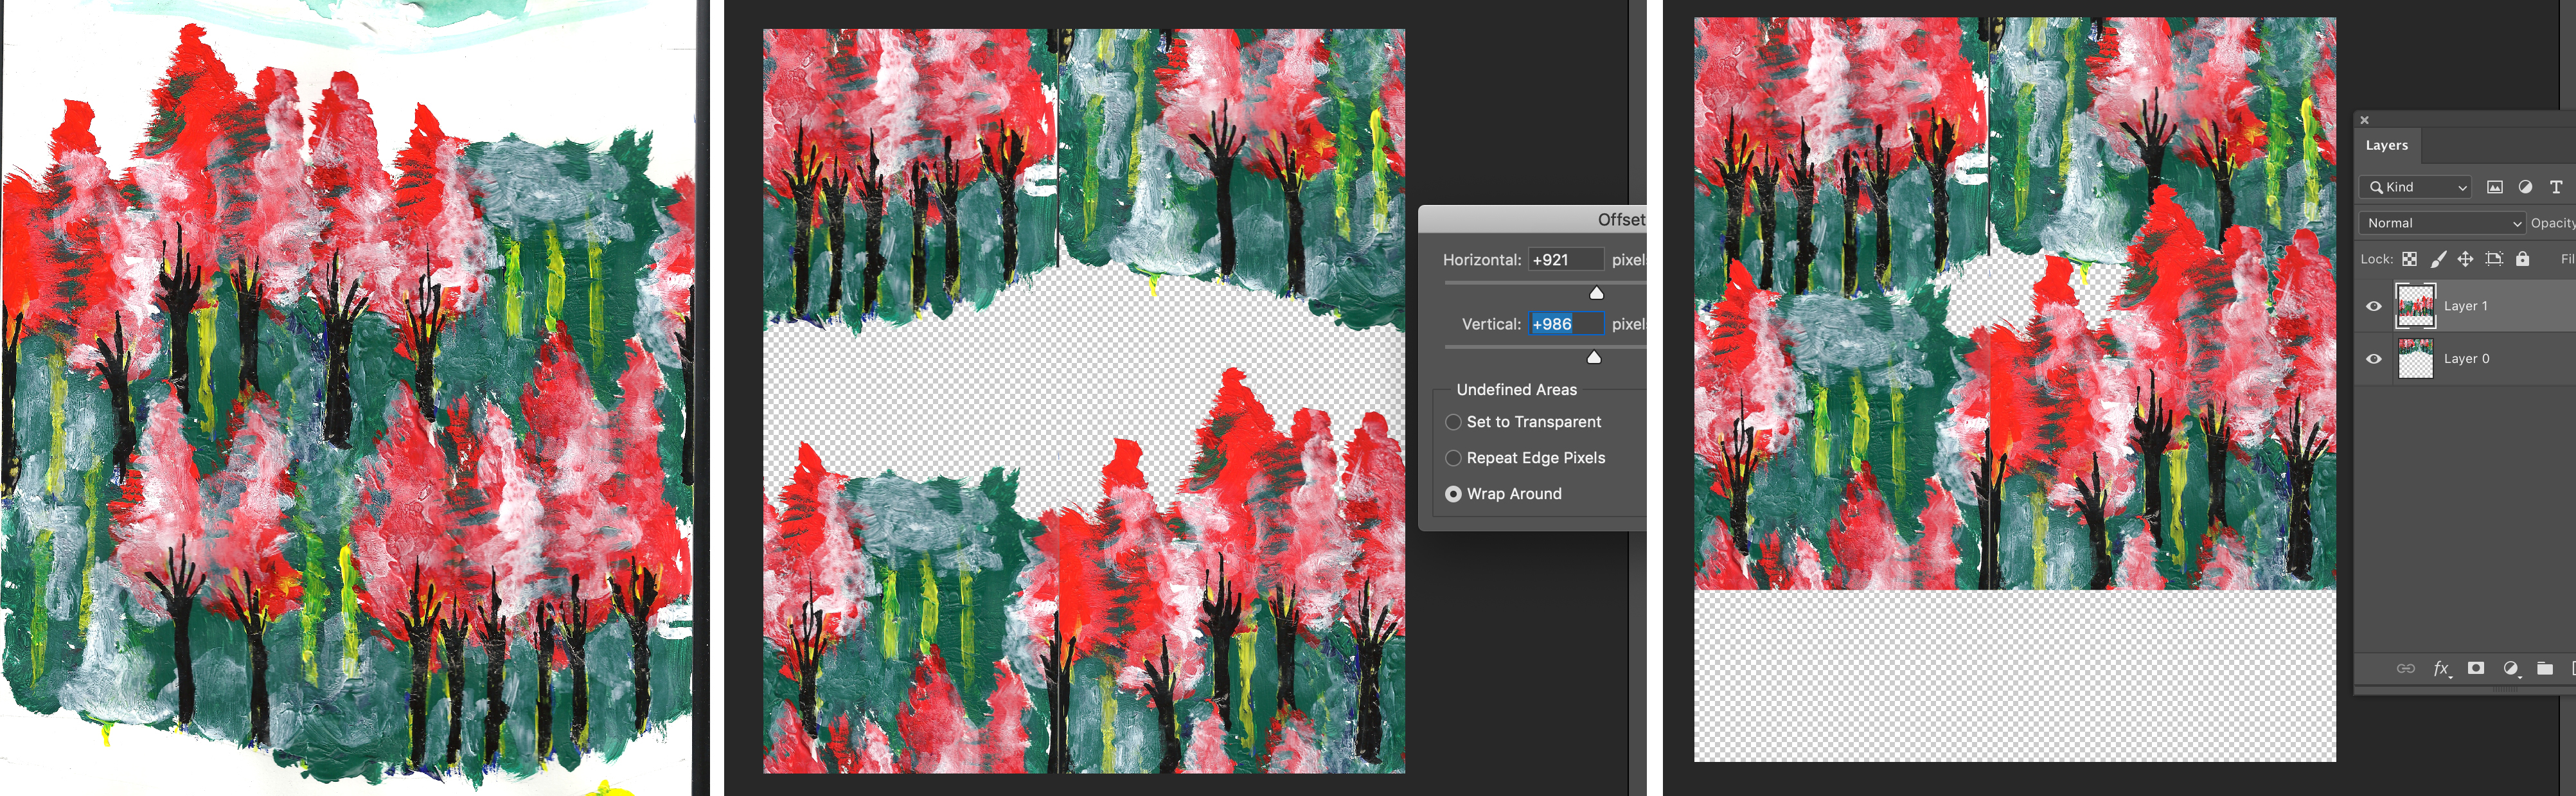
If you did not cut the edges of repeat sharp: Delete the background of design. Select one side of the design and cut it on a new layer (Layer –> New Layer via Cut). Move the edges of repeat to overlap. Use e.g. Eraser to work with the repeat. Flatten the image (Layer –> Flatten image) and trim the edges: Image –> Trim. (image left: scanned sketch; middle: sketch during offset; right: edges moved to overlap)
If you cropped the edges of repeat sharp, you can simply paint, or copy, paste and move elements in the design to cover the repeat-line. Alt-drag to duplicate elements quickly.
You can of course add new elements in the design: Open images (delete their background) and drag or copy and paste them in the design.
With Clone Stamp you can paint with your own design. Select the point to be used as clone source by Alt-clicking. Healing Brush works in similar way, but it tries to match new painting seamlessly into image.
Spot Healing Brush works also in similar way, but you don´t define the clone source by yourself. Brush automatically samples it from around the area you are painting with it.- Type Content-Aware
Patch Tool is similar to the Healing Brush Tool, in that it matches the texture, lighting and shading of the sampled pixels to the source area, but the Patch Tool uses selection-defined areas instead of a brush.
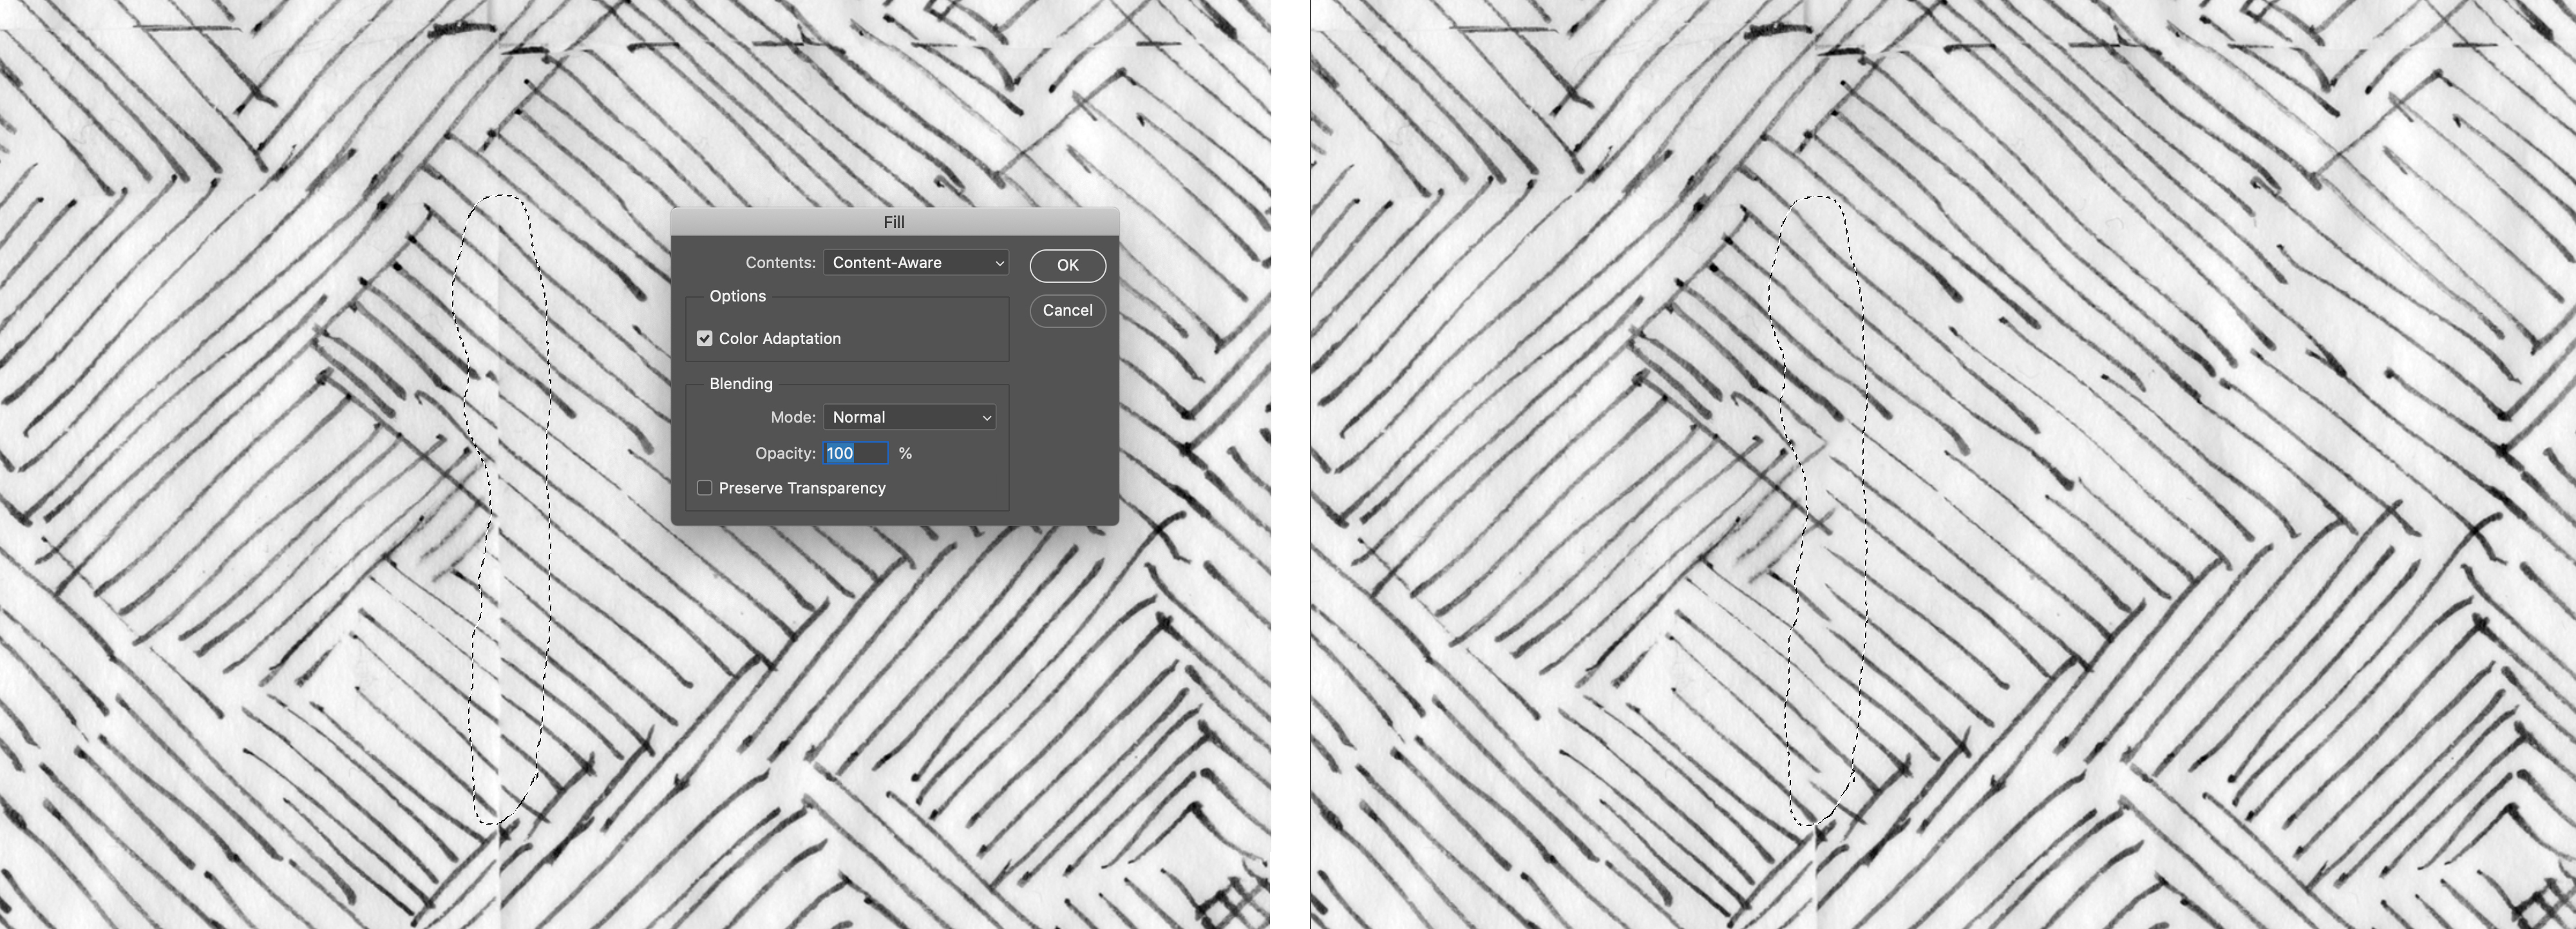
With Content-Aware Fill you can fill with contents of your own design. Photoshop automatically samples the fill content from around the selection: Select an area to fix (select the area around repeat line with e.g. Lasso tool). Do Edit –> Fill, Use: Content-Aware- Colour Adaptation can be selected especially with gradual color or texture changes
- It is better to select small areas and do Content Aware Fill several times when fixing e.g. a repeat line (see image below)
When working with reduced amount of colors, note that Clone stamp, Healing Brushes and Content-Aware Fill add more tones of color into design. Healing Brushes or Content Aware Fill do not function in Indexed colors mode.
Try several tools for fixing the repeat lines and see which tools work nicest to your own sketch (in the image below the line has been fixed with copying elements from the sketch, and also using e.g. Patch Tool and Content-Aware Fill).
You can of course use layers, but note that you need to offset the layers one by one (If you would like to offset several layers at once, you would need to convert them into Smart Object first OR merge the layers before Offset).
Check the design with Offset every once in a while to see that all lines are cleaned.
Check the size of the repeat: Image –> Image Size. Change if needed.
Half Drop
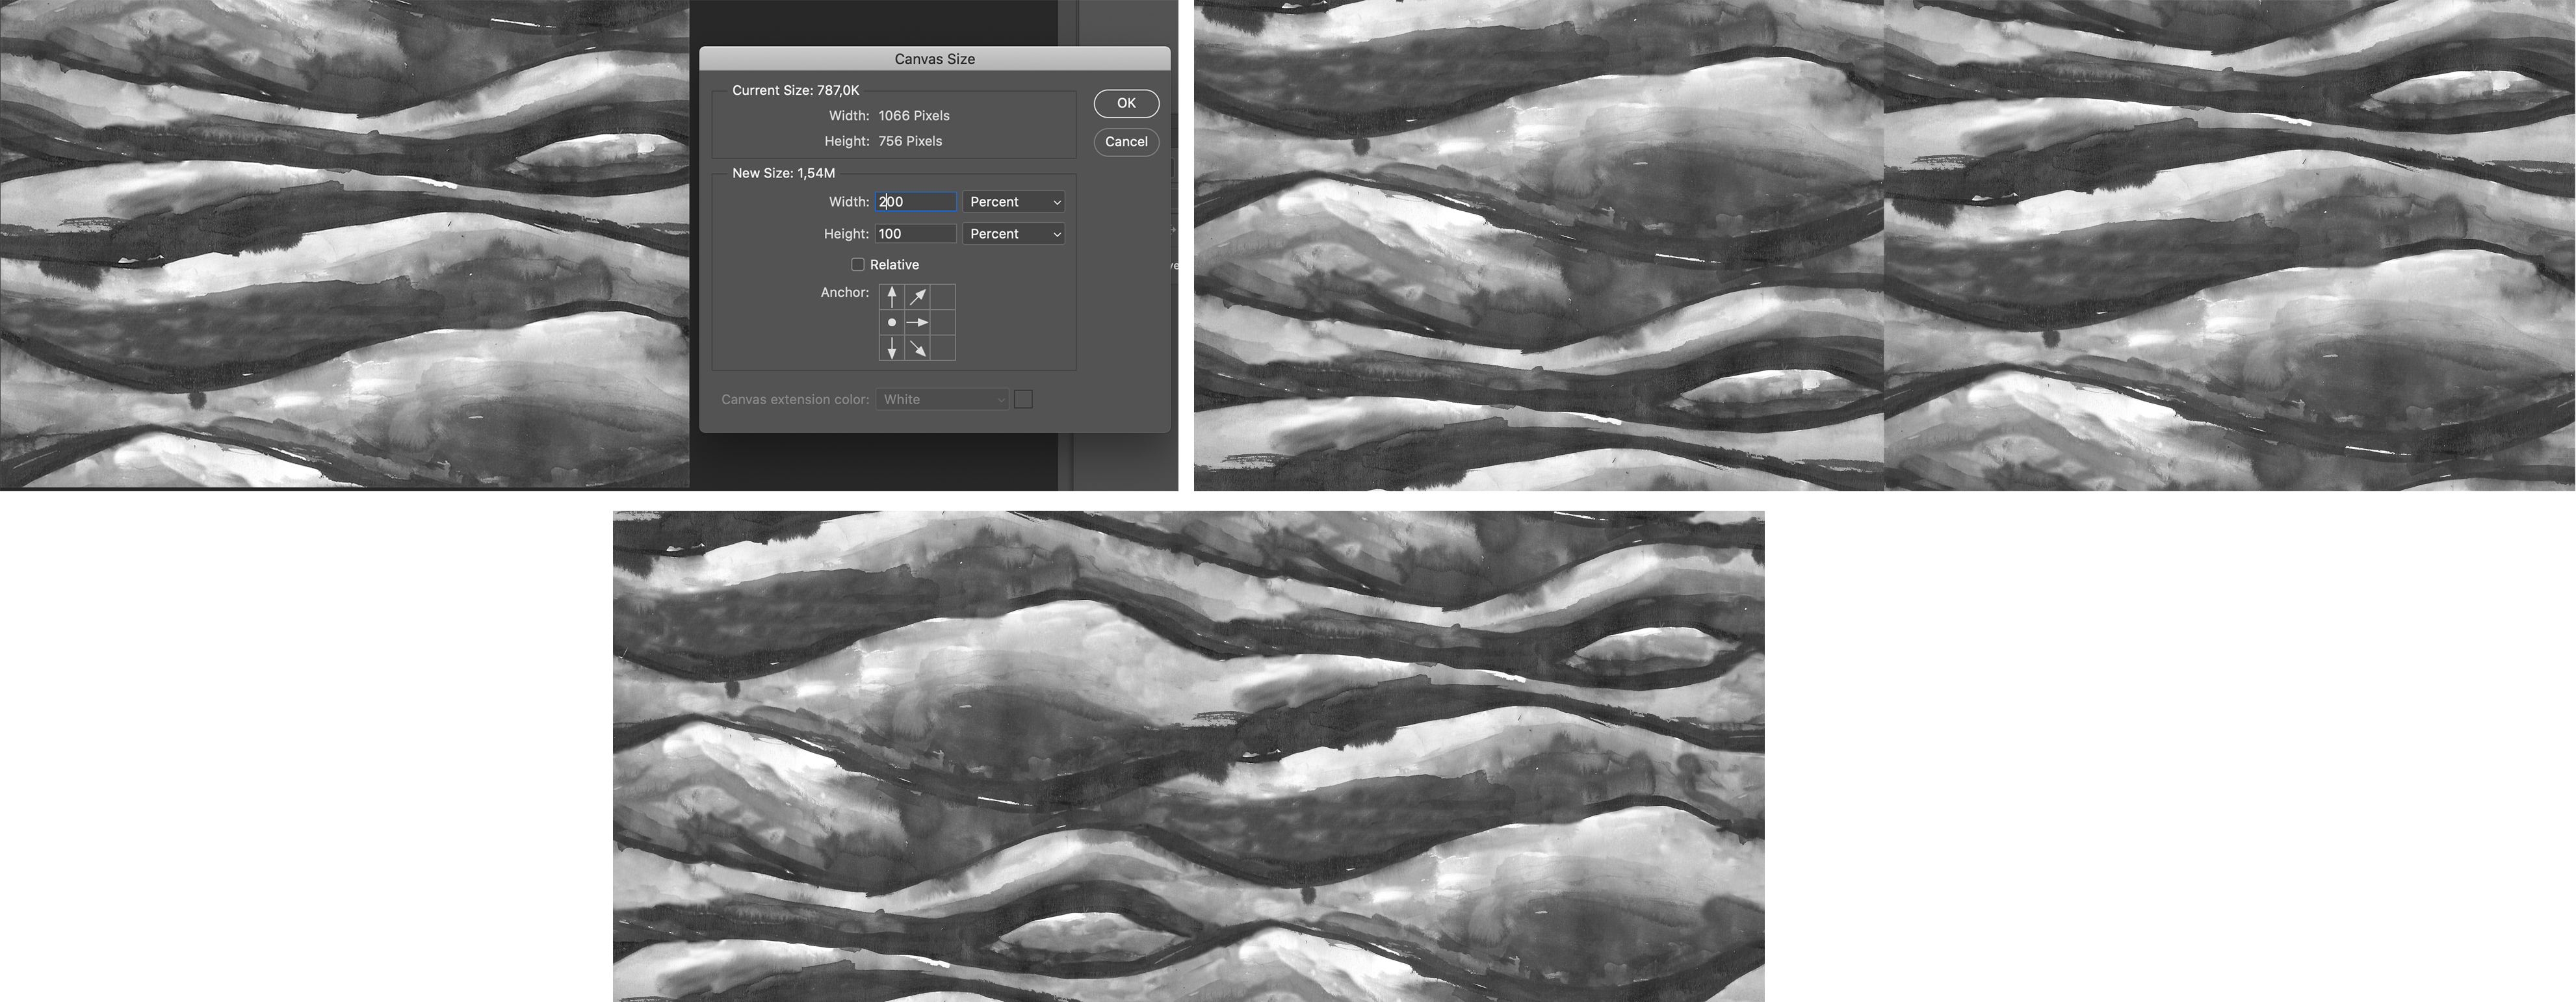
It is possible to make a half drop repeat with Offset: Finish first repeat lines of one repeat, then select and copy it. Continue by adding more space in the canvas (Image –> Canvas size), 200% on its right side (image on left), and paste the original repeat in the extension. Do Filter –> Other –> Offset. Tick Wrap Around. Move then the repeat line of the design only vertically by dragging the vertical bar (image on right). Clean the cut repeat lines (image below).
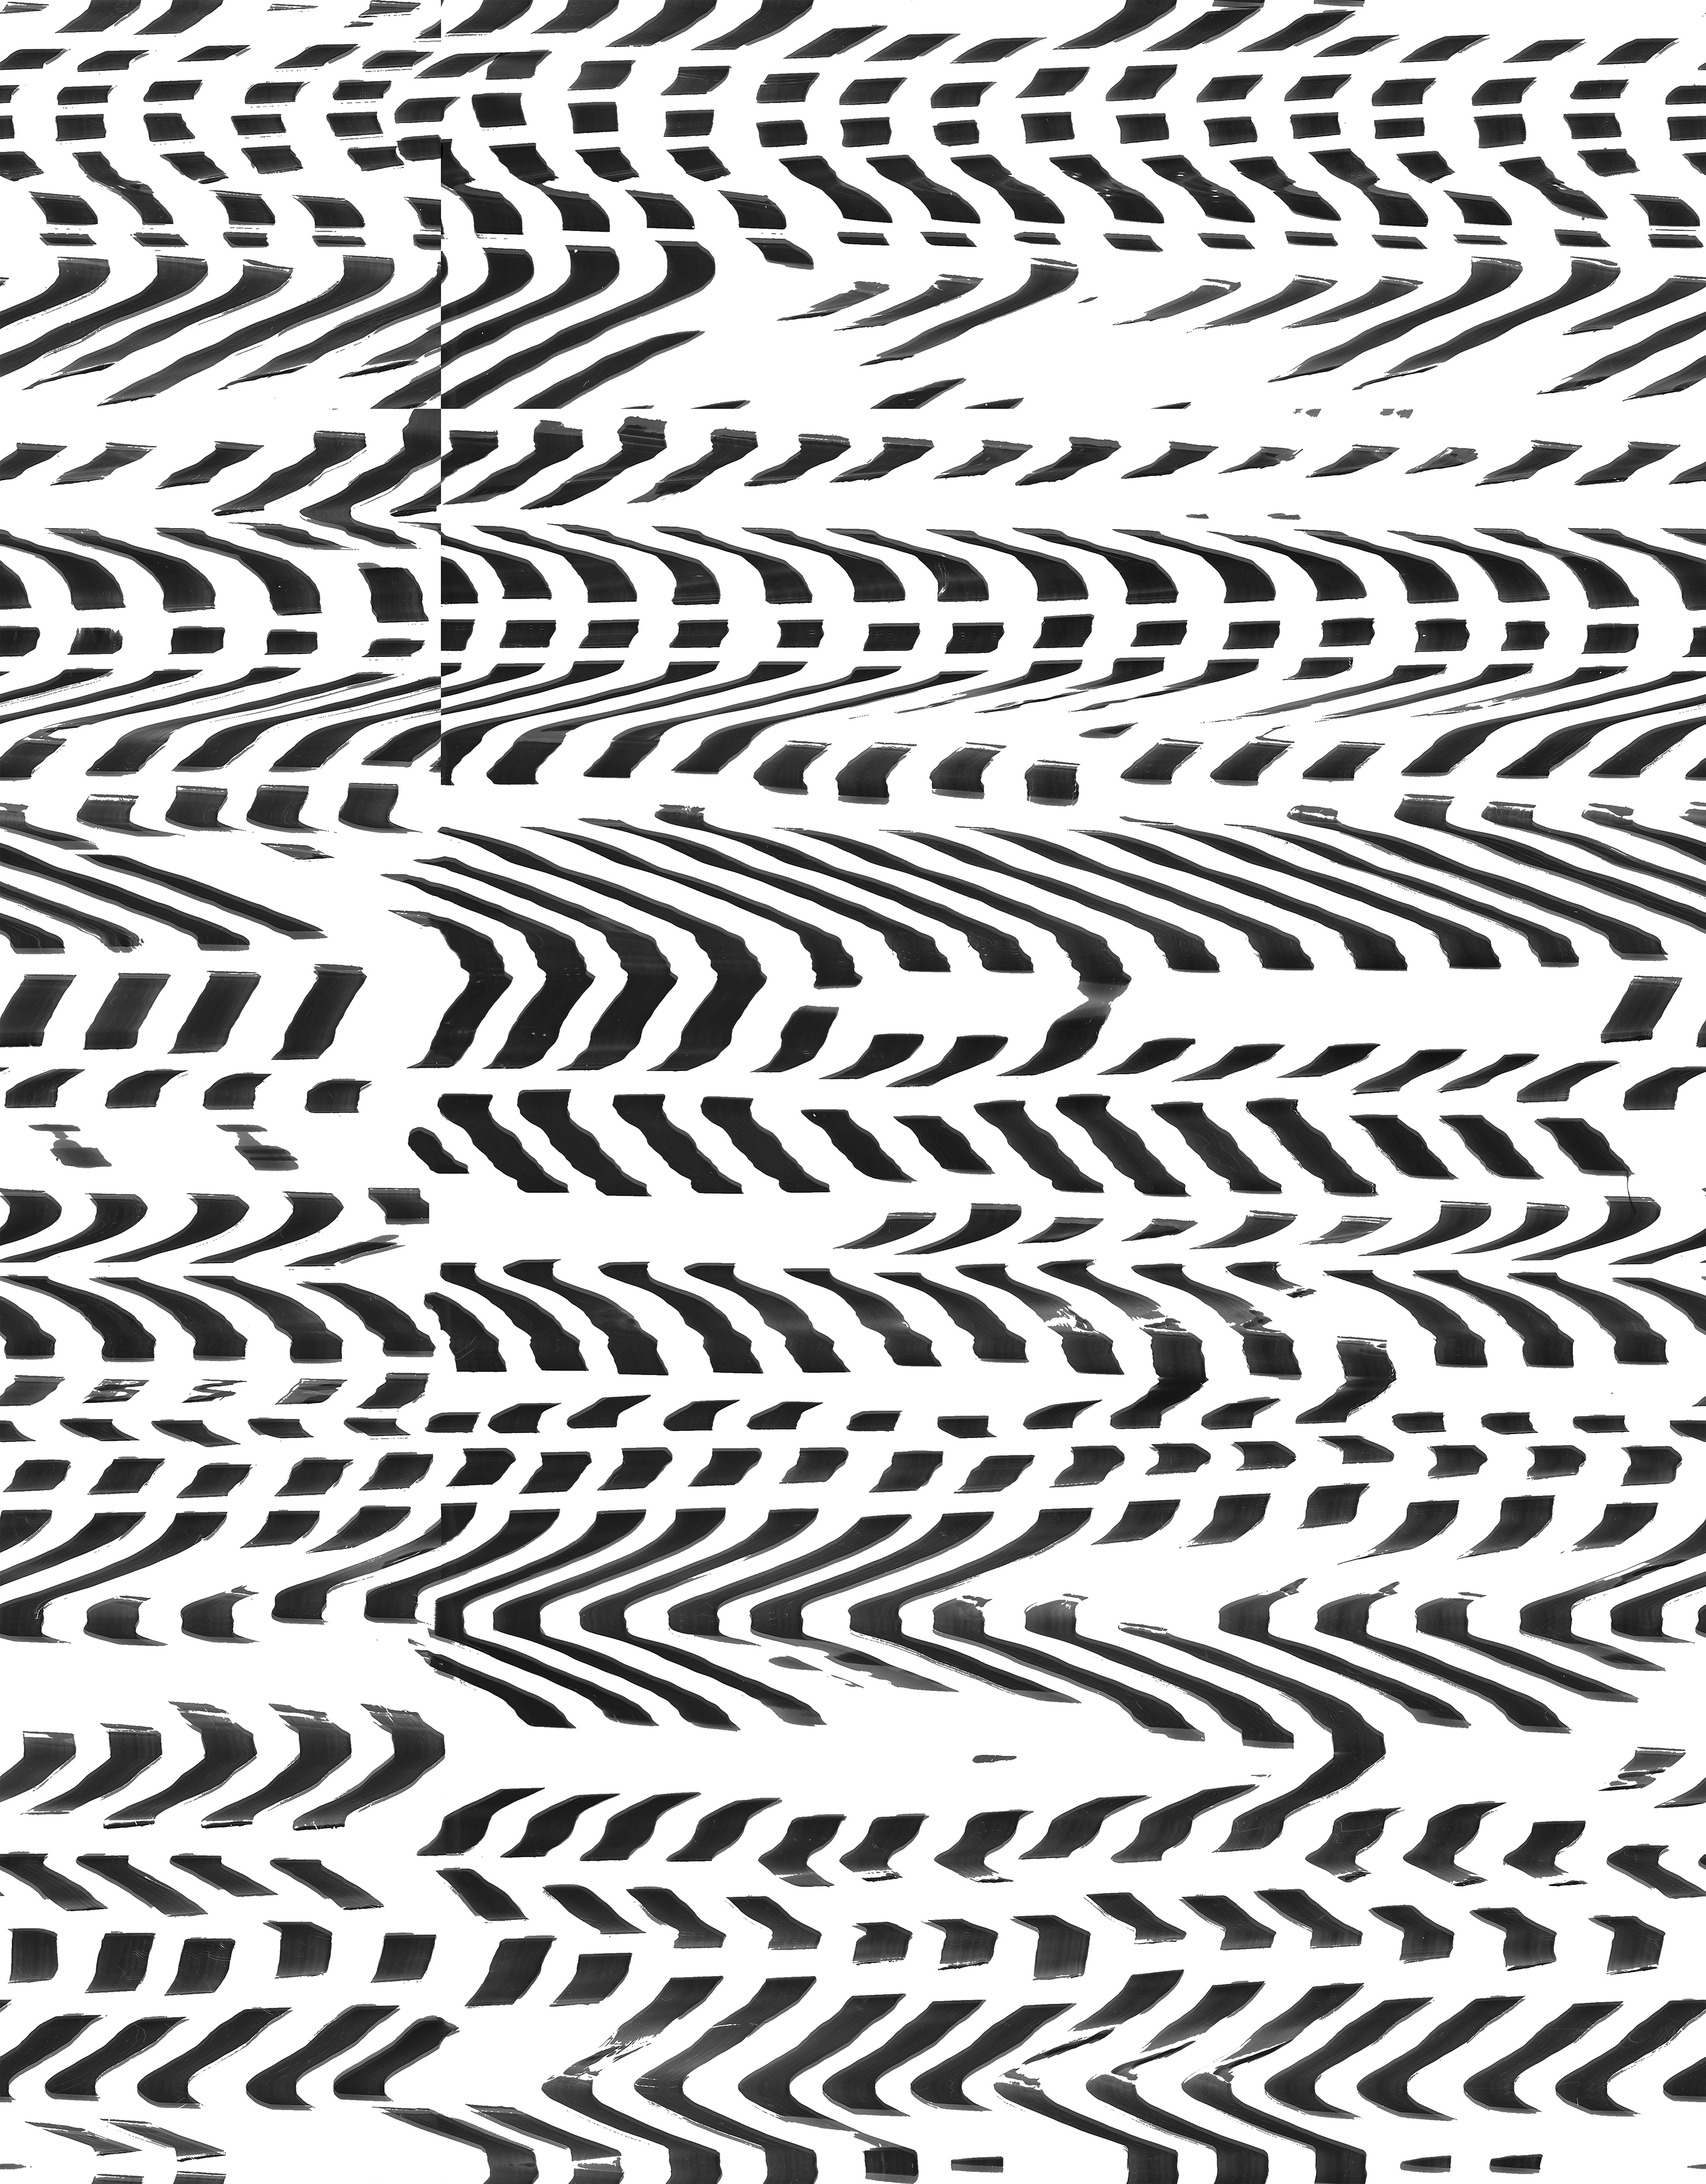
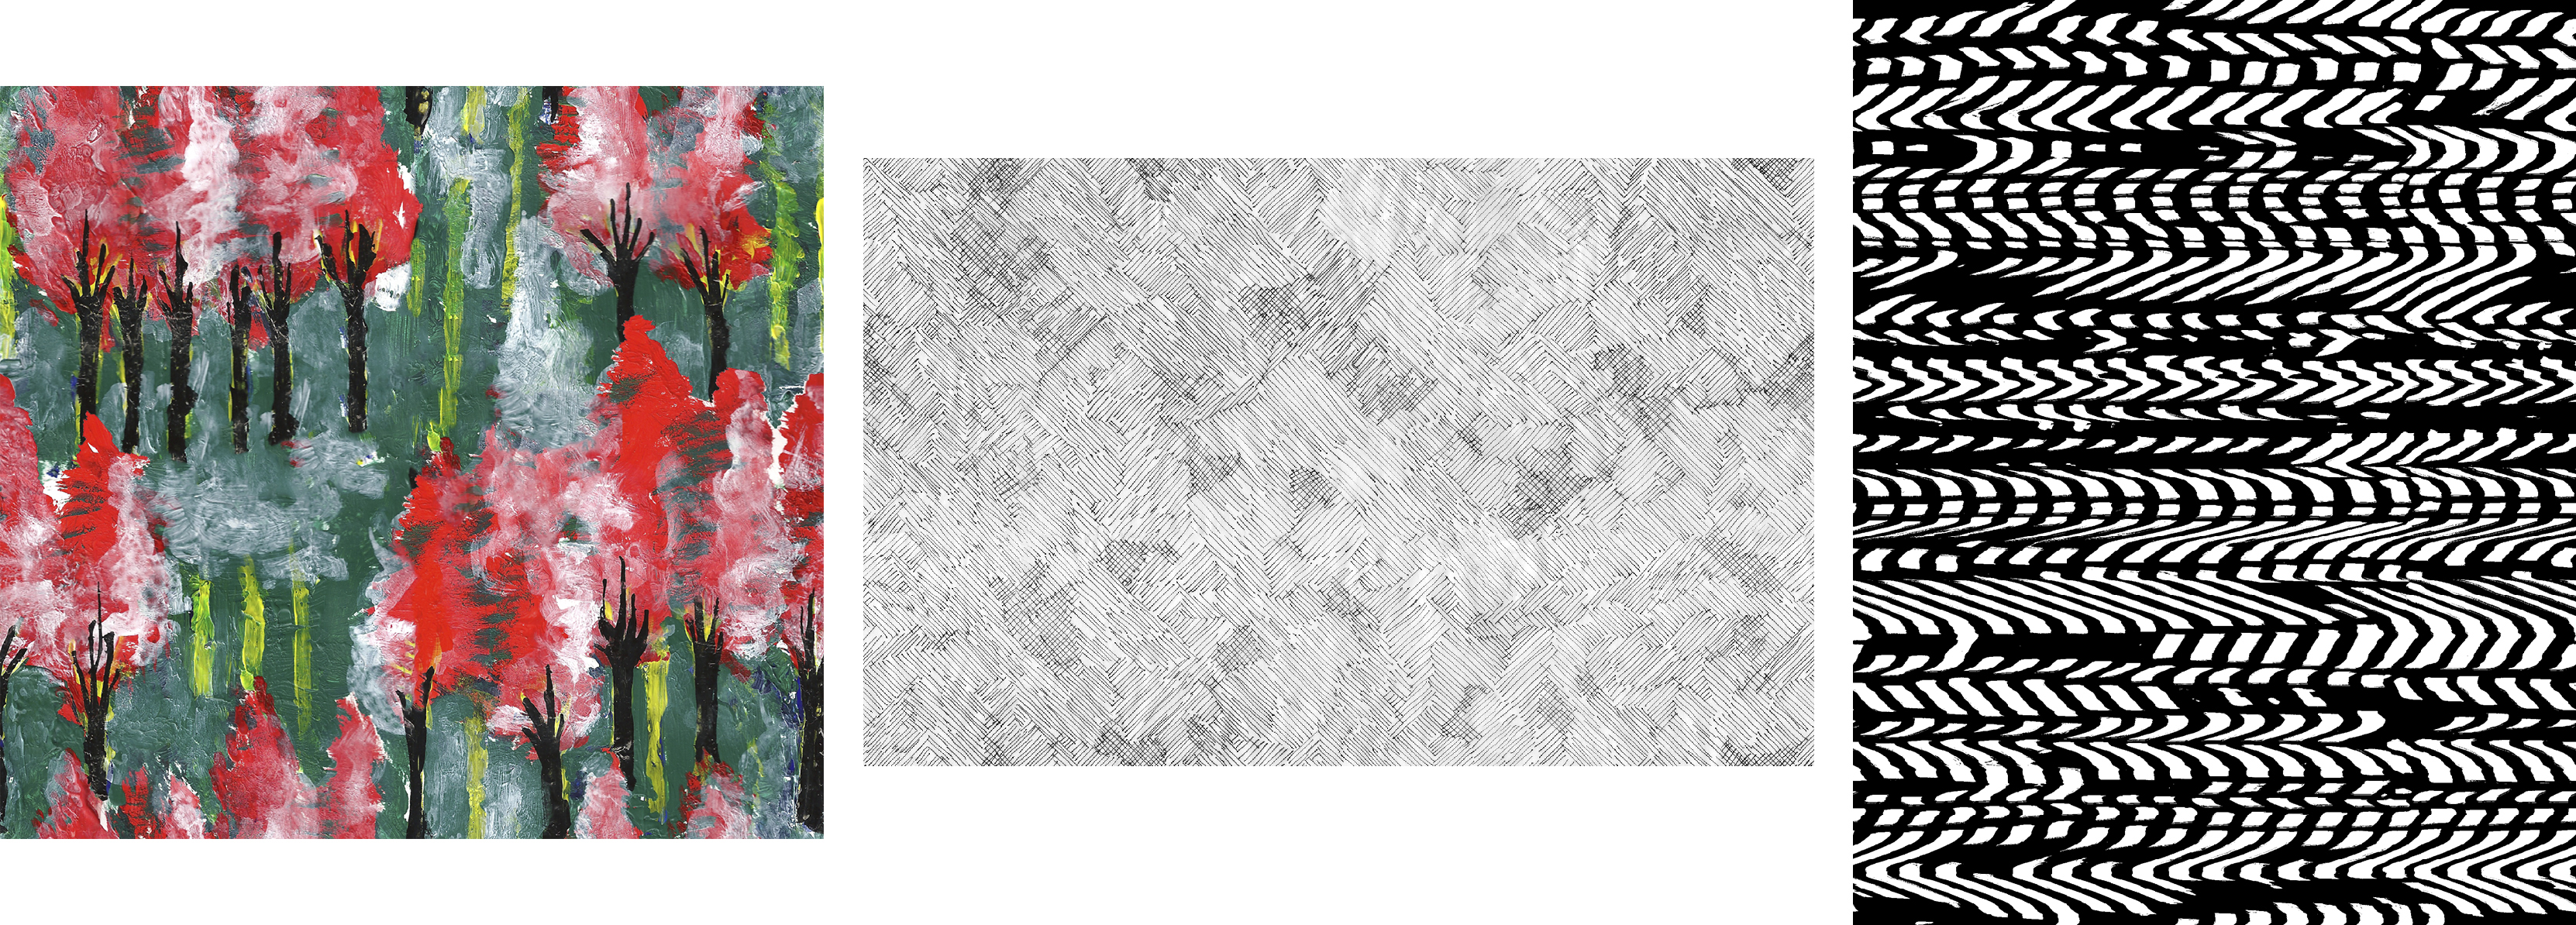
Example designs with Offset method
image on left: handmade repeat without color reduction (Maija Fagerlund, repeat size 35cm*32cm); image in middle: handmade repeat before color reduction (Petra Haikonen, repeat size 50cm*32cm); image on right: surface design with color reduction and inverted colors (Petra Haikonen, repeat size 25cm*32cm)
Creating patterns with Pattern Preview mode
This technique can be used in creating repeats with separate elements by using Pattern Preview mode. Pattern Preview is simply a view mode that shows your pattern file repeating multiple times. It can be found in Photoshop versions 22.0 and later. If you don’t have access to Pattern Preview mode, you can also check the extra instruction of Building the repeat with Free Transform.
Start by creating a file with correct repeat size, and bring there all the elements you want to have in your repeat. Keep the elements in their own layers for modifying them later. Use Smart Objects if you want to scale or rotate elements in Pattern Preview: activate the object layer → go to Layer → Smart Objects → Convert to Smart Object OR right click on the object layer in Layer panel → Convert to Smart Object OR bring new elements in the file using File → Place.
To see your pattern repeating go to View → Pattern Preview. (Photoshop warns about pixel layers not functioning well in Pattern Preview, so remember to change all the layers to Smart Objects before going to Pattern Preview). In this view mode you can freely copy, move, scale and rotate all the Smart Objects for creating seamless patterns.

If you need to use tools such as drawing tools that do not function for Smart Objects, convert the layer into normal mode for modifications: Layer → Smart Objects → Rasterize, and then back to Smart Object to continue working with the repeat: Layer → Smart Objects → Convert to Smart Object
If you need to change the repeat size while working in Pattern Preview change it with Image → Canvas Size. Note that changing the file size will automatically close the Pattern Preview though you can simply open it again from View → Pattern Preview.
After creating the repeat with Smart Objects in Pattern Preview you have to rasterize the Smart Objects in order to get your one repeat file of the pattern to look correct. Still in Pattern Preview go to Layer → Rasterize → All Layers.
To go back to your one repeat file click View → Pattern Preview again.

Saving the repeats as Custom Patterns and filling them in new files
In the previous section we went through how to make repeats in Photoshop in two different ways. Now here you will learn how to save the repeats as patterns, so you can fill them in new files to see how the design repeats in a certain sized file or in a mock-up image. If you are enot able to use Pattern Preview mode, this also enables you to see how the pattern repeats.
Define Pattern function
Use Define Pattern function to see the design repeating: Do Edit –> Define Pattern (after checking the repeat size and resolution). Make a new file, e.g. twice as large as your repeat, or even larger (e.g. bedlinen size 150 x 210 cm), or print size 50 x 70 cm. Remember to keep the same resolution as in your design.
Fill the new file with design: Do Edit –> Fill, Contents: Pattern and select the design from the list of patterns.

Work with the repeat. Try to get rid of blocks and unwanted horizontal and vertical stripes (see red dotted lines in the image above). You can work with the original image, and then do the Edit –> Define Pattern function again.
You can also work with the image with repeating pattern: Take Marquee tool and change its style from Normal to Fixed Size. Check the size of the repeat from original image, and write it in Options panel. Marquee will now only make selection sized the repeat. Select an area where you have fixed the repeat, and do Edit –> Define Pattern. Deselect the selection and fill the image with a new pattern.
Continue fixing the pattern until you are satisfied with the repeat.
Go to Patterns-Window (Window –> Patterns) and delete the pattern presets made in the process.
Define Pattern function with mock-up images
With mock-ups you can easily test how your surface pattern would work in a product.
First, select a picture with suitable garment(s). Pictures with white or light coloured fabrics are easiest to use.
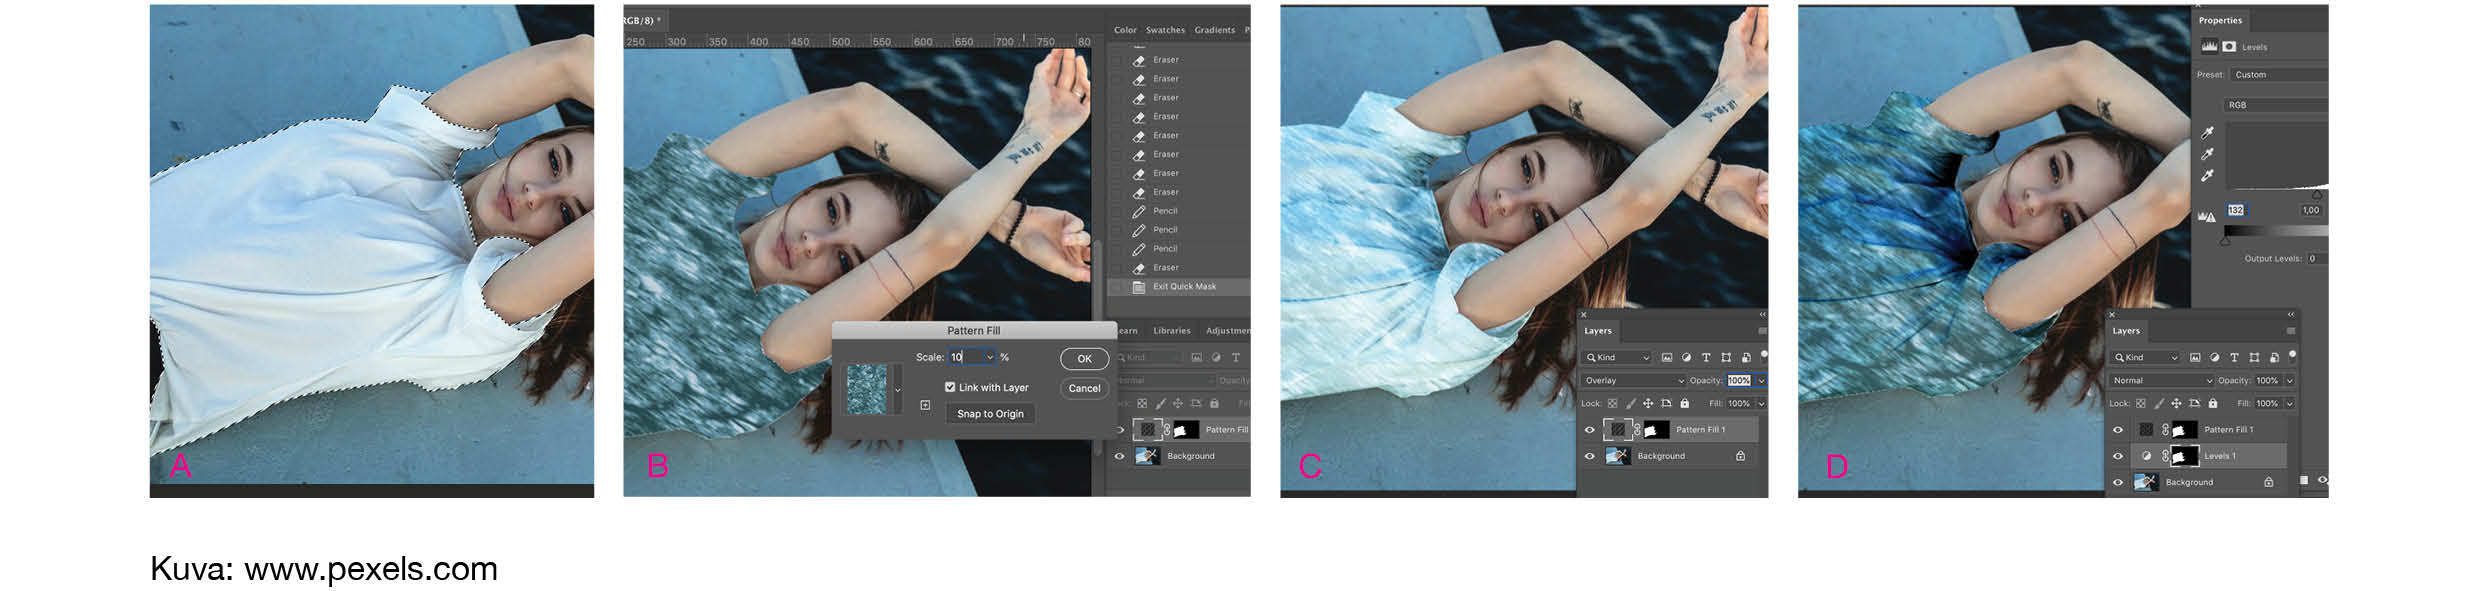
Select an area where you would like to place your design using for example magic wand (tick Contiguous, adjust Tolerance), Quick selection-tool, Lasso or in Quick Mask-mode using drawing tools (A)
Do Layer -> New Fill Layer -> Pattern. Select usually Color: None, Mode: Normal and Opacity 100%. Click ok. In the appearing window: Select your pattern and suitable scaling. Tick Link with Layer. Click ok. You can get back to this window - to change or scale the design - by double clicking the icon of the layer. (B)
The layer is now covered with your surface pattern. In addition, the layer has a layer mask that reveals the surface pattern in the selected area and hides it in other areas. You can edit the layer mask by clicking on its symbol in the Layers window. In the Properties window you can soften the edges of the mask by adding Feather. You can also hide more areas of the surface pattern by painting on the layer mask in black, or reveal more areas by painting in it with white.
The solid surface pattern placed on top of the picture looks of course quite unnatural (B). If the fabric in the picture used is solid coloured (and preferably white) you can easily get a natural look to the mock up image: Change the Blending Mode of the pattern layer (C). (try Multiply, Darken, Overlay, Soft light ...) You could also lower Opacity, or increase the contrast of the original image to enhance the shadows (D).
If the fabric in the picture is not solid coloured, you could try painting the shadows on their own layer. Use a very soft brush (Hardness 0%) and black colour. Change the Blending Mode of the shadow layer. (try Multiply, Darken, Overlay, Soft light ...)
EXTRA Building the repeat with Free Transform
If you don’t have access to Pattern Preview mode, you can use Free Transform to build the repeat
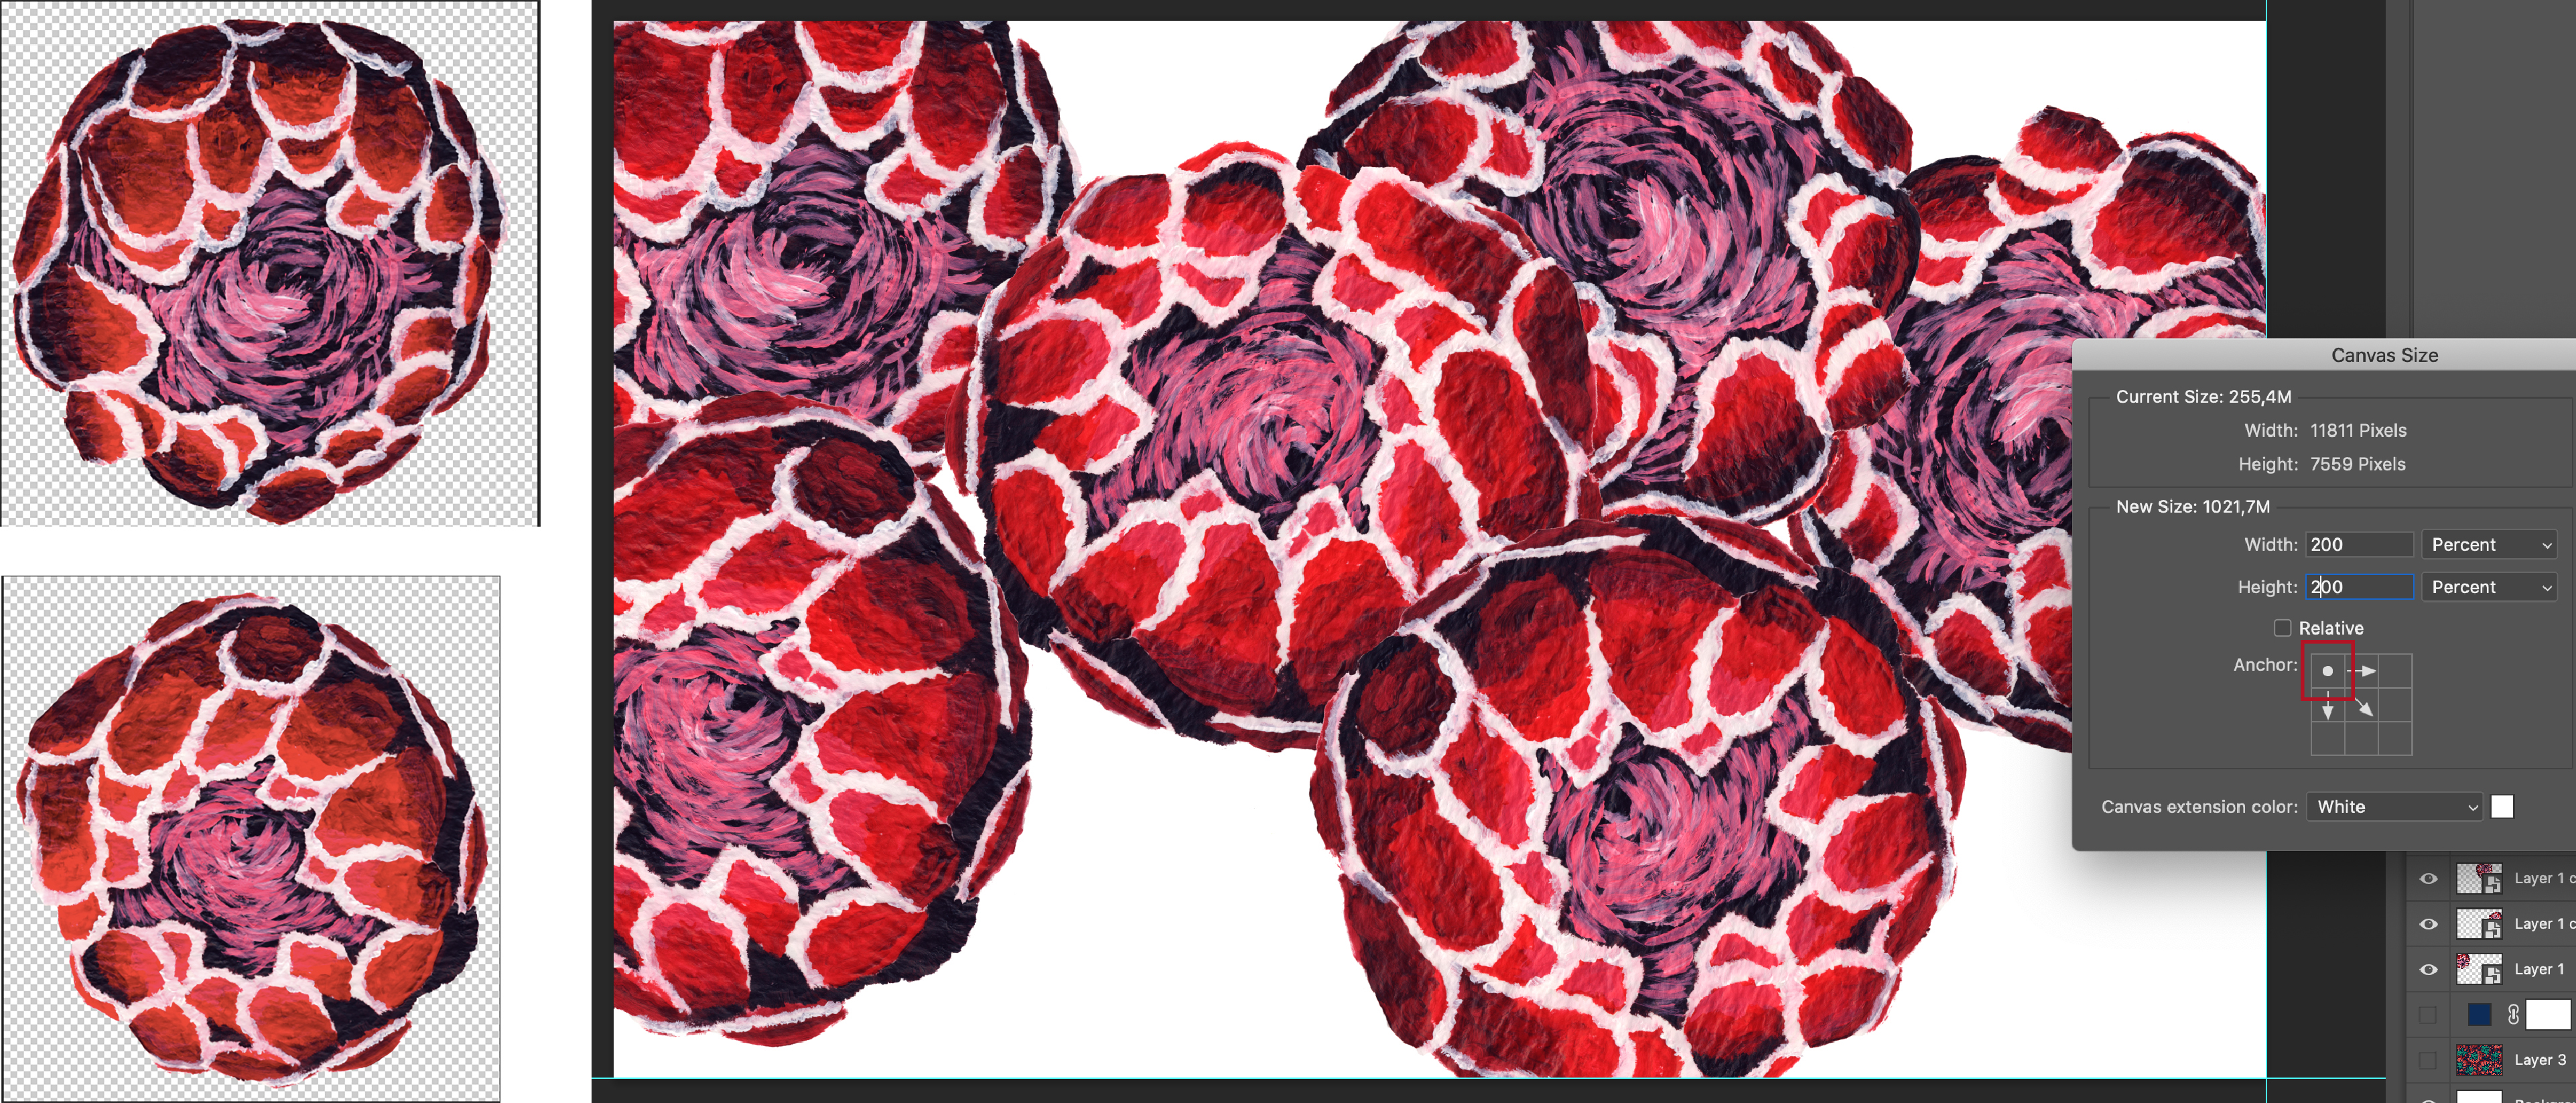
Add more space in the canvas (Image –> Canvas size), 200% under the design and on its right side (see image below).
Copy the design horizontally and vertically to show 2 x 2 repeats of the design. Several tools could be used for this:
Simple copying could be used:- Select one repeat with the Marquee tool (in Fixed size – mode) and alt-drag to copy it. Copy the design exactly in correct place to avoid mistakes! For precise working, see the selection edges snap to the guidelines, press shift-button to copy the design only horizontally or vertically and keep an eye on the values appearing into page: these values should be now exactly same as your repeat size
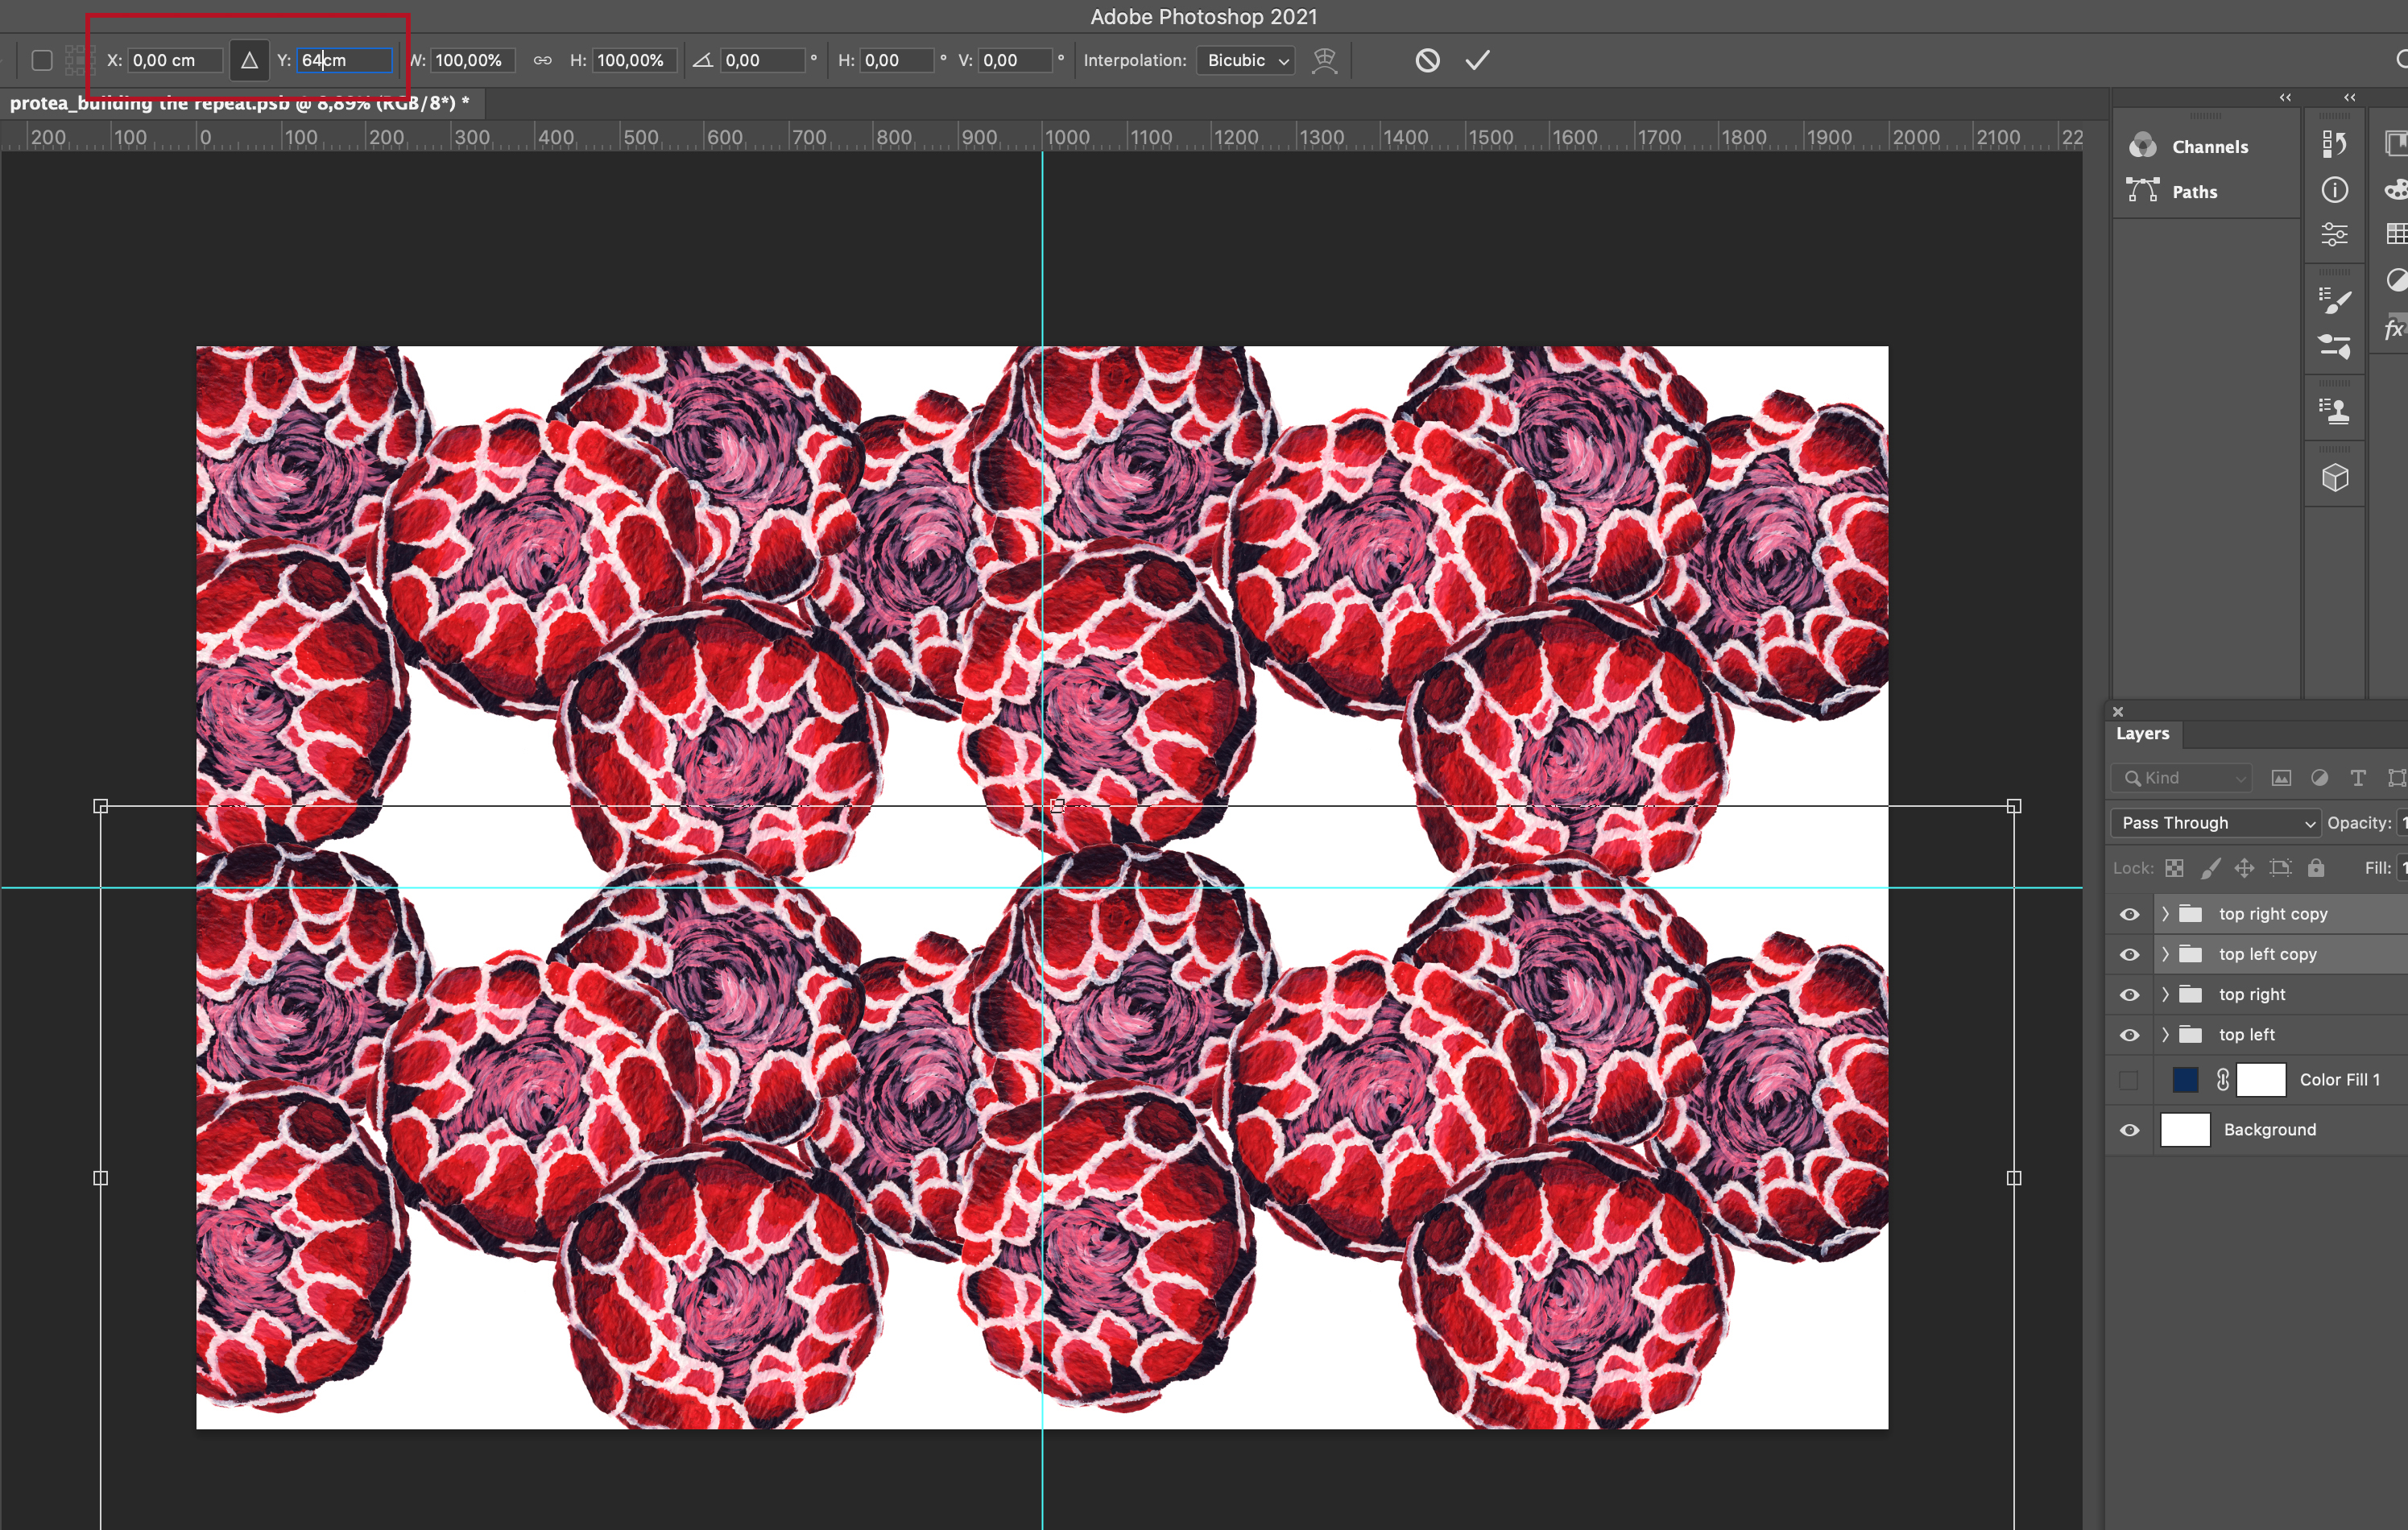
- Select the design (select all the layers), and duplicate the layers: Layer –> New layer via copy (Ctrl + J). Use Edit –> Free Transform (Ctrl + T) to move the design. You can move the selection horizontally using X-value, and vertically using Y-value. Press down the triangle symbol between X and Y-values!
- Write the width of the repeat in X (e.g. 50 cm). Confirm the function by ticking the V-symbol in Options-panel
- Select all layers, and make copies of them (Ctrl + J). Move both of these layers vertically: Go to Edit –> Free Transform. Write the height of the repeat in Y (e.g. 64 cm). Confirm the function by ticking the V-symbol in Options-panel (see image below)
- Smart Objects might not move with Free Transform as they should, so if they won’t work, then rasterize Smart Object before moving them
- Try also half-drop repeat: copy one repeat, and with Free Transform move the copied repeat one repeat width in X and half repeat height in Y; do it vice versa for tile repeat
No matter which copying method was used, next step is to work with the space between repeats. You could add one copy of the design in the center to create a half drop look, or add several copies to create an all over feeling. You can leave more or less space between the elements, and copy and paste other elements in the design. Or whatever suites for your design
- Remember to use Smart Objects if you scale or rotate elements!
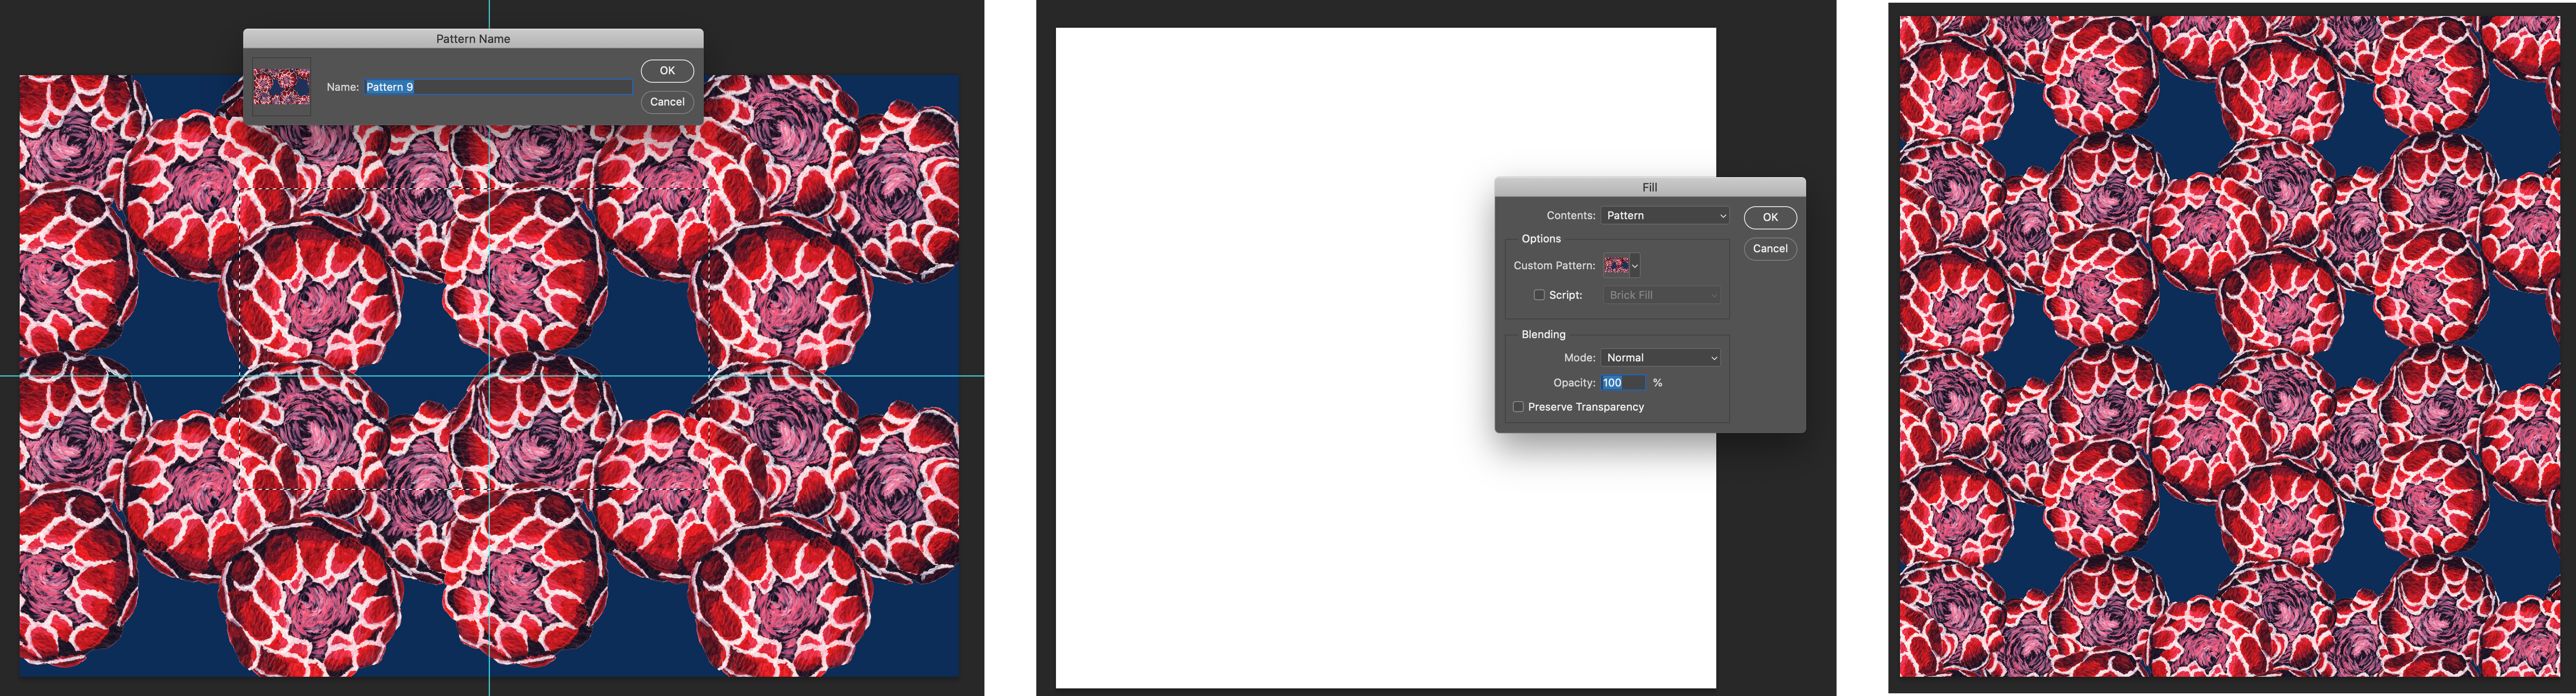
Use Edit –> Define Pattern function to see how the design repeats: Select one repeat with the Marquee tool (in Fixed size mode) from the center of the 2 x 2 repeat and do: Edit –> Define Pattern. Fill this pattern in a new document. If you do not like the repeat, continue working with the original.
images below on top row: first sketch saved as a pattern, then filled to new twice as big file to check how it repeats.
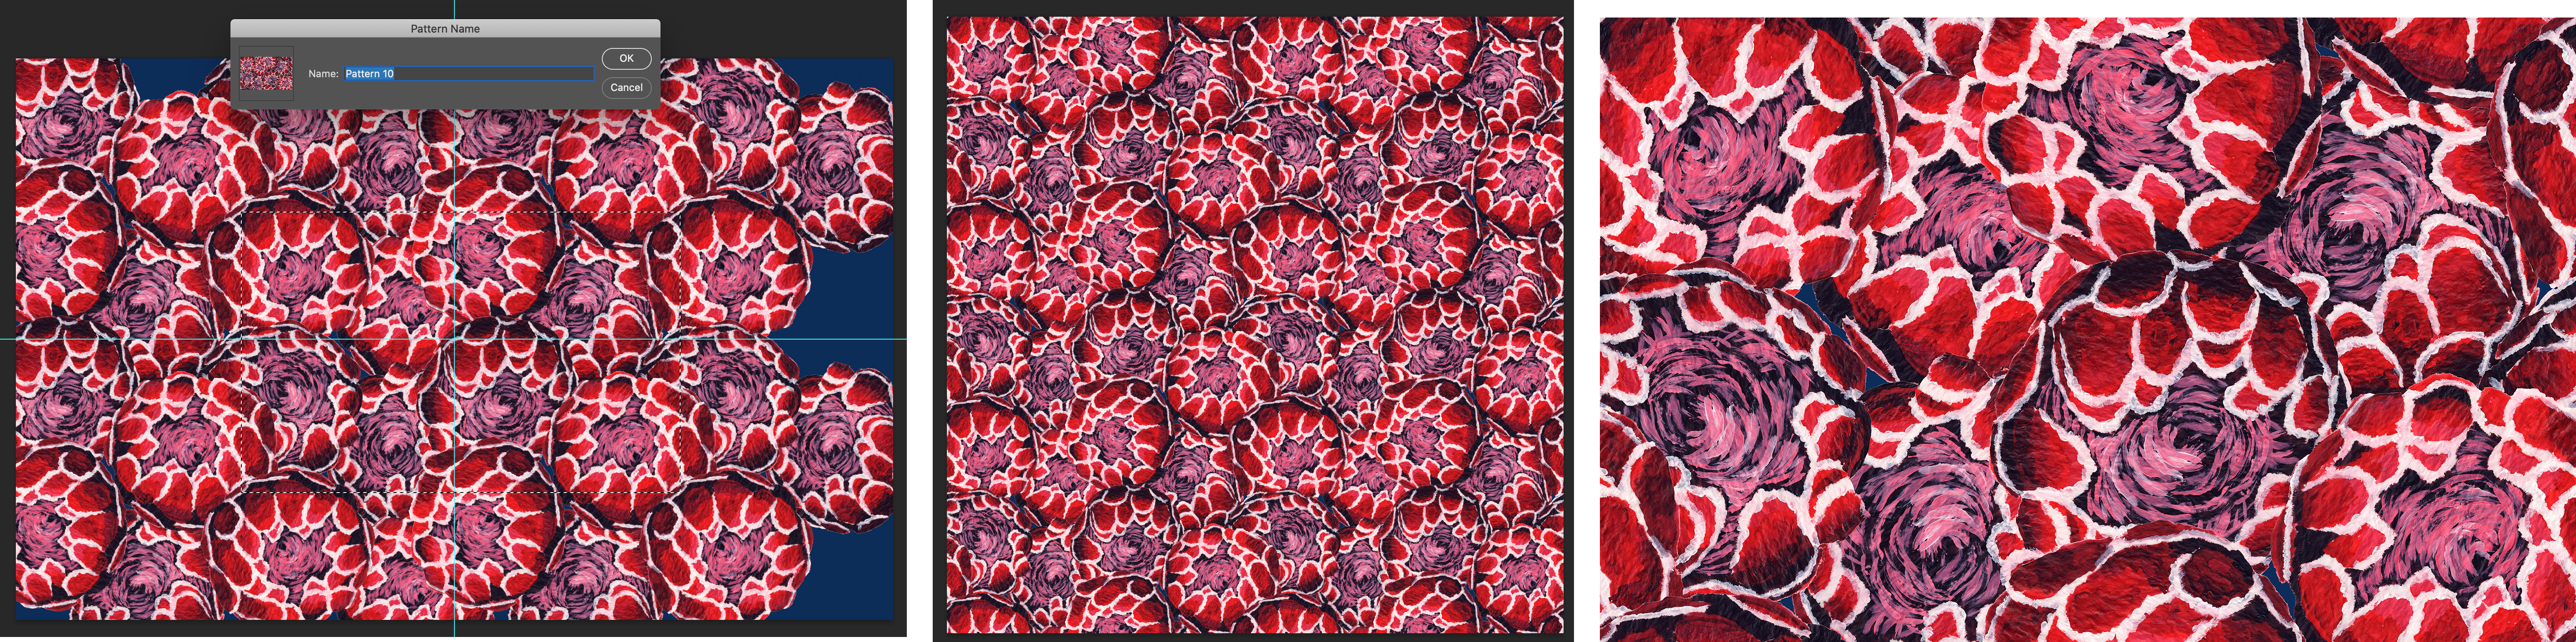
images below on bottom row: still more flowers added, and then checked the repeat – final repeat size 100cm*64cm
EXTRA – Scripted Patterns
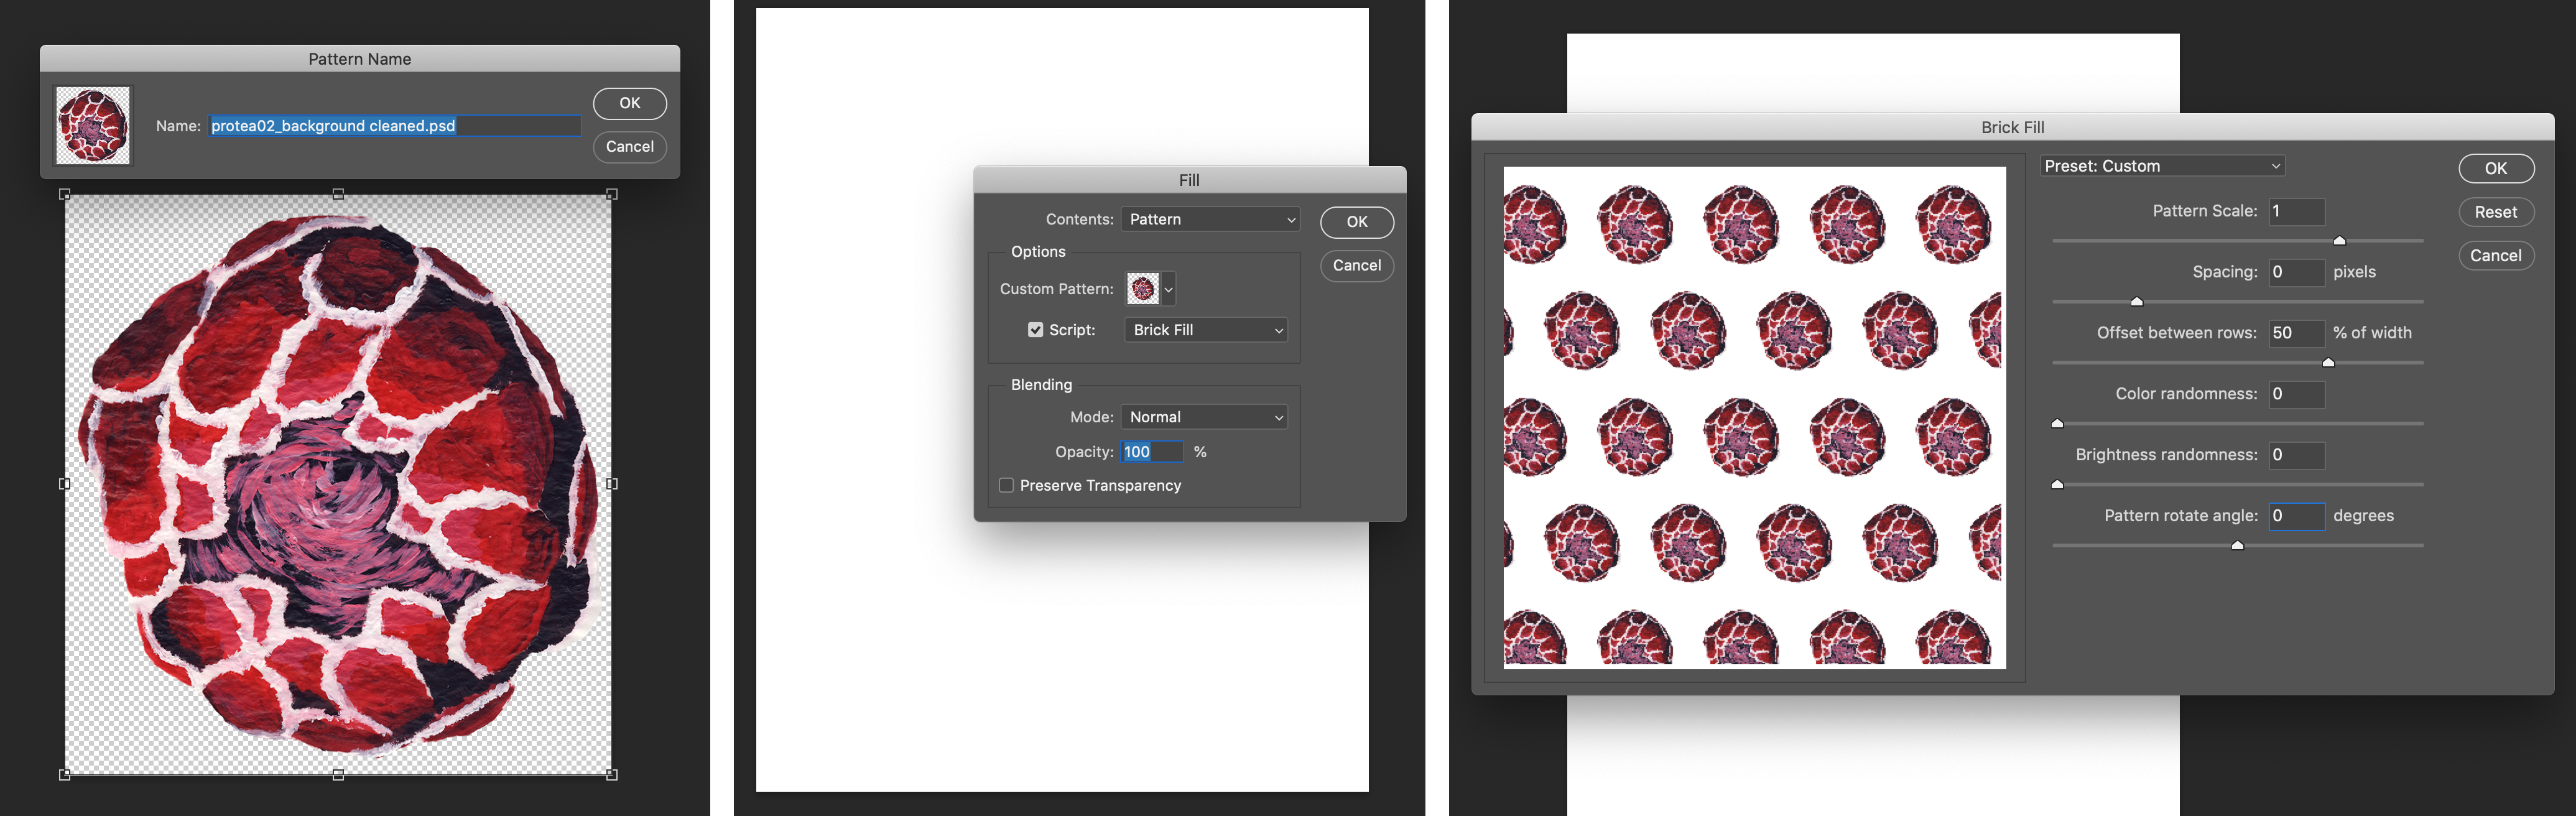
In Fill window there is an option Script. Filling patterns as scripted suites in general better for e.g. using patterns in illustrations and graphic design than to actually make a repeat, but Brick Fill could be used to make a tile repeat and Random Fill might be useful in some cases when designing all-over repeats.
Script: Brick Fill could be used to make a brick/half drop repeat. For basic version, select: Pattern Scale 1, Spacing 0, Offset between rows 50%, Color Randomness 0, Brightness randomness 0, Pattern Rotate angle 0. Of course also other options could be used, but be careful, as many of them could expand the actual size of the repeat a lot, and you might would not know anymore what is the real size of the repeat.
Script: Random Fill could sometimes be useful when placing small elements into an all-over design. Clear a background from the element you want to use and define it as pattern. Use Random Fill to make the composition. Note, that the design is not in repeat after this, but you must still fix the repeat using any of the tools described in this hand-out!
SAVING IN PHOTOSHOP
File formats:
- TIFF: Image Compression None or LZW do not reduce the quality. Can be used for several purposes: saving process files, final designs for printing etc. Widely used file format – can be opened in several software.
- PSD: Photoshop file format. Best when still working with layers.
- PSB: Large document format. Best for really large files, larger than 2GB.
- JPEG: Reduces the quality and does not save layers.
Saving a low resolution pdf for tutoring etc.
Repeat your design in 50cm x 70cm file (or bigger, if your design is bigger)
Save as pdf. Select Adobe pdf preset “Smallest File Size” On Compression, change the compression from JPEG to ZIP.
Saving for printing
Save as TIFF, you can tick LZW Compression.