
ARTS-A0702 - Digitaalinen maalaus ja vektorikuvitus (verkkokurssi), 25.02.2019-31.05.2019
This course space end date is set to 31.05.2019 Search Courses: ARTS-A0702
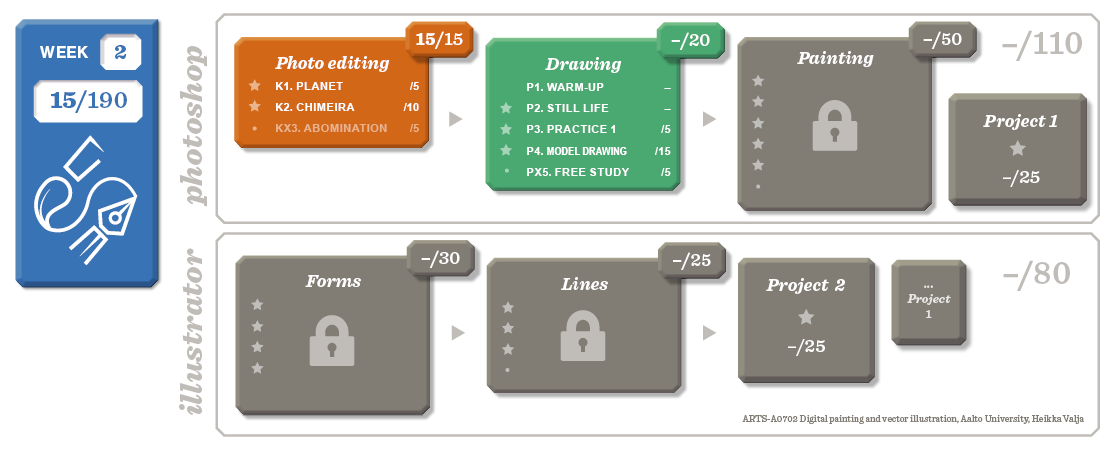
Week 2. Drawing
This week we will start using graphics tablets and start to train drawing.
All the reference images can be found on the Materials section.
Make sure that you return the assignments with the correct file name with the correct form.
If you are using a drawing screen device, please locate the features that are presented from the graphics tablet.
In the next video, you'll go through the graphic tablet properties.
Remember that you need to plug in the tablet before opening Photoshop.
If you don't find a solution, write the problem to the forum
We start by learning how to draw lines and warming up (P1).
In the next exercise (P2) you are free to try how drawing with a tablet feels like.
The actual drawing exercises (P3 and P4) are based on classical french model drawing.
If you feel energetic, you can draw more freely with the extra assignment (PX5).
Assignments
P1. Warm-Up
Goal
Warm-up your hand and learn different ways of drawing lines
Tools | Brush |
Assignment | Draw the model lines over and over |
Brush setup | “Ball-point pen” |
| Model image | Lämmittely_1 / Warm-up |
Instructions |
|
Assessment criteria | Not returned or assessed |
Time to be used | 0,5 hours |
Video | Demo Warm-Up |
P2. Still life *
Objective
Tools | Brush and Eraser |
Assignment | Draw the object on the reference image separately. |
Brush setup | “Ball-point pen” |
| Reference | |
Instructions |
|
Assessment criteria | Returned, but not assessed |
Time to be used | 0,5 hours |
Video | Demo Still life |
Model drawing exercises
We draw with the observational style of classical french model drawing.
You can learn about this method in the Charles Bargue drawing guide
https://archive.org/details/C.BargueDrawingCourse
These assignments are drawn in a particular order.
- Marking the extremities
- Drawing long straight lines from reference point to another
- Checking the directions of these lines and their positions compared to the guide lines
- First the outline
- Then the outlines of the shadow
- Divide the long lines with smaller straight lines
After this the shadow would be coloured grey and then deepened from the areas of the core shadow.
Then the half shadow on the light side would be done
P3. Drawing exercise */5
Objective
Learn to observe, compare and take measurements. And to draw straight lines
Tools | Brush and Eraser |
Assignment | Draw the lines on the model just as long and in the same direction |
Brush setup | “Pencil” Round tip brush Eraser Size 50px, Hardness 100% |
| Reference | Drawing exercise |
Instructions |
|
Assessment criteria |
|
Time to be used | 1 hours |
Video | Demo Drawing exercise |
P4. Model drawing */15
Objective
Learn the basics of classical model drawing
Tools | Brush and Eraser |
Assignment | Draw the outlines of the model and the outline of the shadow according to the technique |
Brush setup | “Pencil” Round tip brush Eraser Size 50px, Hardness 100% |
| Reference image | Body model 1, select the one better for your device |
Instructions |
|
Assessment criteria |
|
Time to be used | 3-4 hours |
Video | Demo Model drawing, Watch the video in the pace of your work |
Extra assignment, awards you points, but is not counted to the required amount of assignments
PX5. Free study -/5
Objective
Tools | Brush and Eraser |
Assignment | Study and draw same subject matter |
Brush setup | “Red and white charcoal pencil” Round tip brush Eraser Size 50x, Hardness 100% |
| Reference | 3 to 10 Anatomy references found online |
Instructions |
|
Assessment criteria |
|
Time to be used | 3 hours |
Video | Demo Free study |